06 云环境实战:快速启动Kubernetes集群
你好,我是潘野。
前面的课程里,我们学习了云原生的基本组成技术,现代化的云原生技术架构如何管理以及公有云的基本特点等内容。你可能觉得前面的知识偏理论,眼睛看会了、脑袋明白了,但是手还不会。
从这一章开始,我为你设计了一系列的实验,从易到难、循序渐进地带你实战演练,最终形成一套可以用在生产环境的基础架构自动化管理方式。除了提高实践水平,你还能加深对不可变基础设施、混合云管理等理论的理解。
这一讲我们会利用Terraform工具,在AWS中启动一个Kubernetes集群,帮你尽快熟悉现代IaC面向资源的管理方式。
前期准备工作
为什么我们选择公有云AWS作为课程的实践环境呢?
因为它提供了完整的IaaS API与文档,更方便我们学习实践。而且无论是哪个云厂商,提供的功能都差不多。即便你所在的团队是自建机房,多数也会采用像Openstack、VMware这样的IaaS解决方案,哪怕API或操作跟公有云略有差别,使用方法和思路也基本一致。
好,下面正式进入实战环节,我们先从配置本地环境开始。我们选用一台Ubuntu 22.04的虚拟机作为基础操作环境。
首先,我们需要安装AWS的命令行工具AWS CLI。如果你使用的是Mac OS或者Windows系统,可以参照AWS的官方文档来配置你的环境,这里我们只列出Linux环境的配置命令。
curl "https://awscli.amazonaws.com/awscli-exe-linux-x86_64.zip" -o "awscliv2.zip"
unzip awscliv2.zip
sudo ./aws/install
当AWS CLI工具安装成功之后,别忘了检查一下版本输出。
root@devops:~/aws# /usr/local/bin/aws --version
aws-cli/2.8.1 Python/3.9.11 Linux/5.15.0-48-generic exe/x86_64.ubuntu.22 prompt/off
接下来,我们在IAM中新建一个USER,并且生成一个access key。AWS 的 IAM 是身份和访问管理的缩写,是一种 Web 服务,可以帮助你安全地控制对 AWS 资源的访问。我们借助 IAM,可以集中管理控制用户可访问哪些 AWS 资源的权限。
对于初次接触公有云环境的同学,我建议使用admin权限,这样能帮你在后续学习中减少一些权限问题。但是要注意,这并不是一个正确的做法,不能在生产环境中使用。关于IAM的安全部分,后续章节我再详细讲解。
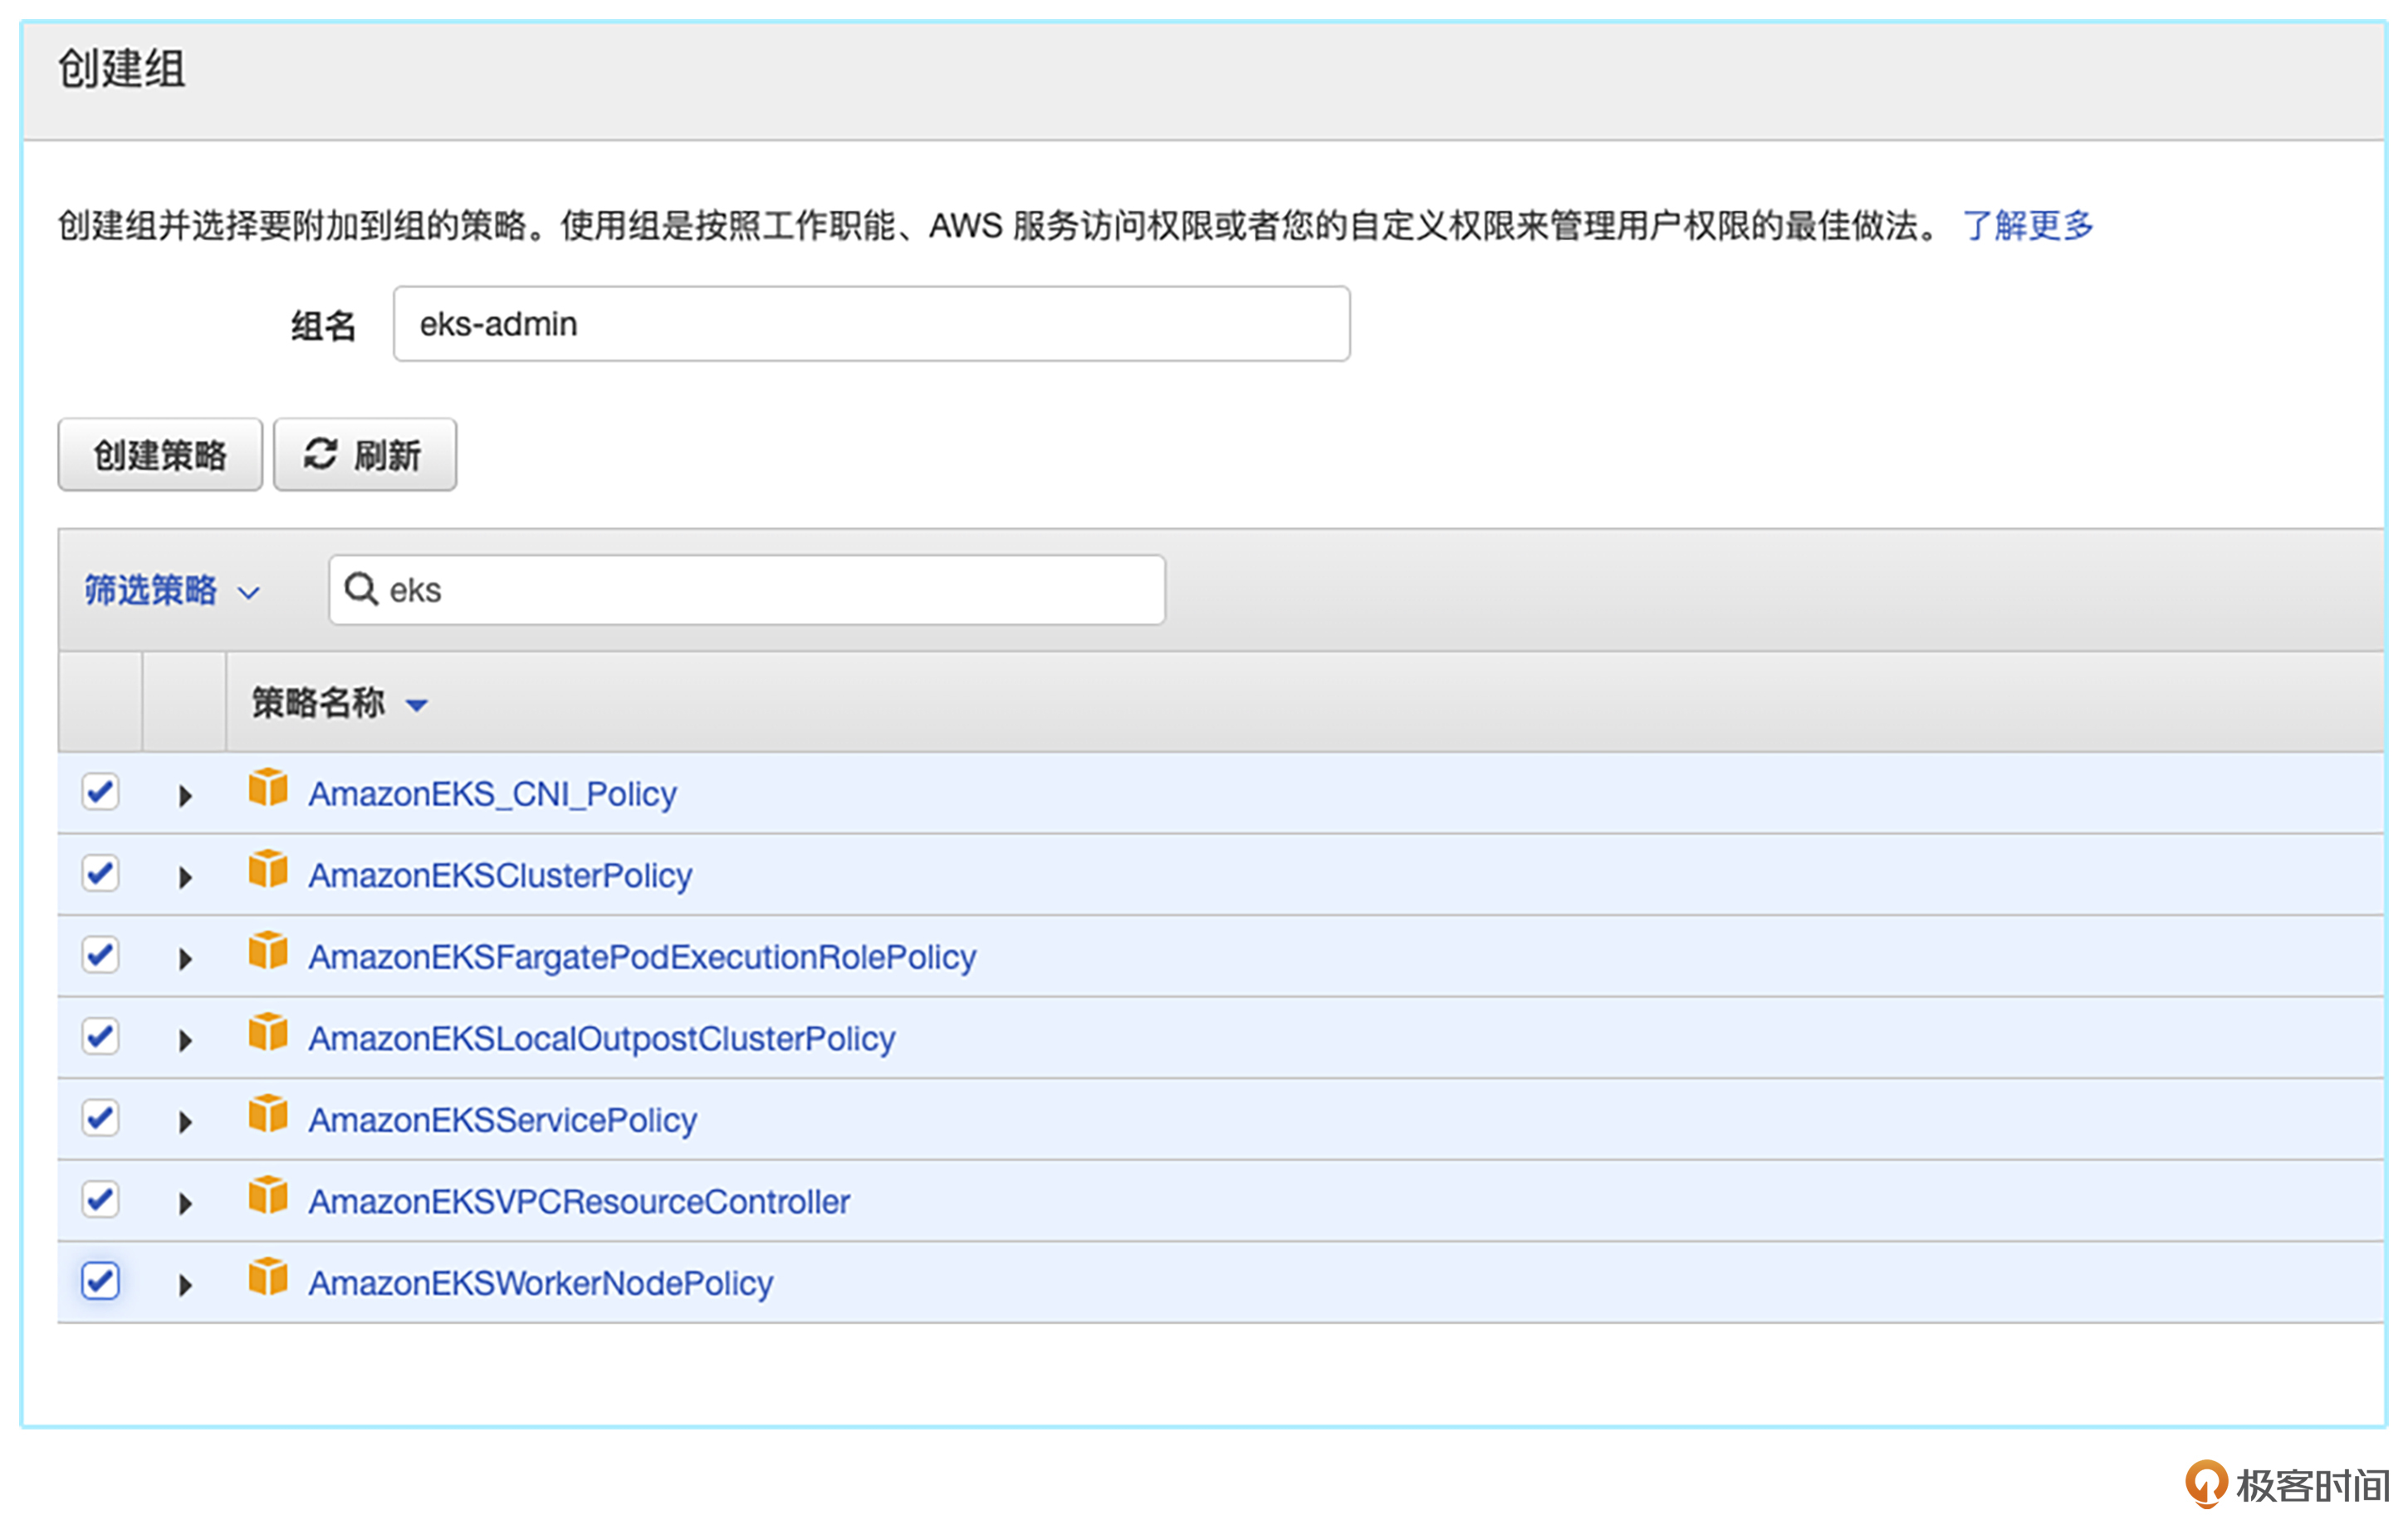
当你完成了新用户的创建以及赋权之后,就需要在AWS CLI工具中完成配置。配置的内容也很简单,将你上一步获取到的Access ID和Key填入即可。
root@devops:~# aws configure
AWS Access Key ID [None]: AKIAY6CN....
AWS Secret Access Key [None]: 482iR9LP3bbCV.....BmZi/Q
Default region name [None]: us-east-2
Default output format [None]:
使用tfenv管理Terraform版本
之前的课程里,我们虽然了解了Terraform的一些基本操作,但是在实际工作中,当你接手前人的代码,还是会遇到后面这类困难。
- 因为Terraform在不同的版本存在一些兼容性问题,在version.tf中需要使用某个特定版本的Terraform。
- 代码年久失修,仍在使用某个很老的Terraform版本,缺少一些新版本的特性。
这时候你就需要一个Terraform版本管理工具,帮助你在不同的版本中切换。这里我们需要用到 tfenv 来帮助我们管理Terraform的版本,它的GitHub的地址是这个:https://github.com/tfutils/tfenv。
如果你没有用过tfenv,可以参考官方提供的方法进行安装。tfenv的核心用法就是将远程的不同版本Terraform下载下来,然后通过改变环境变量来切换成指定版本。当你装好tfenv之后,可以使用list-remote参数来查看所有的terraform的版本号,并指定所需要的版本。
然后,你可以使用latest的参数安装最新版本,也可以安装指定版本。
root@devops:~# tfenv install latest
Installing Terraform v1.3.2
Downloading release tarball from https://releases.hashicorp.com/terraform/1.3.2/terraform_1.3.2_linux_amd64.zip
############################################################################################################################################################################################## 100.0%
Downloading SHA hash file from https://releases.hashicorp.com/terraform/1.3.2/terraform_1.3.2_SHA256SUMS
Not instructed to use Local PGP (/root/.tfenv/use-{gpgv,gnupg}) & No keybase install found, skipping OpenPGP signature verification
Archive:  /tmp/tfenv_download.cTS98Z/terraform_1.3.2_linux_amd64.zip
inflating: /root/.tfenv/versions/1.3.2/terraform
Installation of terraform v1.3.2 successful. To make this your default version, run 'tfenv use 1.3.2'
root@devops:~/infra-automation/terraform/eks/example# tfenv install 1.2.0
Installing Terraform v1.2.0
Downloading release tarball from https://releases.hashicorp.com/terraform/1.2.0/terraform_1.2.0_linux_amd64.zip
############################################################################################################################################################################################## 100.0%
Downloading SHA hash file from https://releases.hashicorp.com/terraform/1.2.0/terraform_1.2.0_SHA256SUMS
Not instructed to use Local PGP (/root/.tfenv/use-{gpgv,gnupg}) & No keybase install found, skipping OpenPGP signature verification
Archive:  /tmp/tfenv_download.TpmQi9/terraform_1.2.0_linux_amd64.zip
inflating: /root/.tfenv/versions/1.2.0/terraform
Installation of terraform v1.2.0 successful. To make this your default version, run 'tfenv use 1.2.0'
root@devops:~/infra-automation/terraform/eks/example# tfenv use 1.2.0
Switching default version to v1.2.0
Default version (when not overridden by .terraform-version or TFENV_TERRAFORM_VERSION) is now: 1.2.0
root@devops:~/infra-automation/terraform/eks/example#
课程代码的概述
我在GitHub上建立了一个cloudnative-automation的组织,所有的课程代码,实现方式都会展现在这个组织中。
首先,你需要从GitHub上将课程代码clone到本地,链接是https://github.com/cloudnative-automation/eks-cluster/tree/example。
我给你简单讲解下example里的文件分别是什么作用。
versions.tf 定义了与Terraform相关的参数,比如版本号、使用模块的版本等等,这里我们将Terraform的版本设置为1.2,AWS模块的版本设置为4.15。
terraform {
required_providers {
aws = {
source  = "hashicorp/aws"
version = "~> 4.15.0"
}

random = {
source  = "hashicorp/random"
version = "3.1.0"
}
}

required_version = "~> 1.2.0"
}
variables.tf 包含一个区域变量,控制着在哪里创建EKS集群。这里面有一些参数我们在前面的aws configure里配置过,那么在variables.tf 配置的参数会去覆盖前面aws configure配置的参数。
再来看 vpc.tf ,它能为我们提供一个VPC、子网和可用区。为了不影响用户现有的云环境和资源,我们可以利用vpc.tf创建一个新的VPC。
在vpc.tf中我们需要配置两个网段,一个专门为内网服务,另一个为外网服务,但是有两个地方要注意。
- 网段不能重复。
- 子网掩码建议不要低于24,EKS的CNI网络会从VPC的subnet里取IP,所以集群越大,需要的IP越多。
private_subnets = ["10.0.1.0/24", "10.0.2.0/24", "10.0.3.0/24"]
public_subnets  = ["10.0.4.0/24", "10.0.5.0/24", "10.0.6.0/24"]
接着是 security-groups.tf ,它规定了EKS集群将使用的安全组。在这里,我们为每个node group都配置了规则策略,你可以根据你实际需求来放行端口,比如这个例子里放行的就是22端口。
resource "aws_security_group" "node_group_one" {
name_prefix = "node_group_one"
vpc_id      = module.vpc.vpc_id
ingress {
from_port = 22
to_port   = 22
protocol  = "tcp"
cidr_blocks = [
"10.0.0.0/8",
]
}
}
最后来看 eks-cluster.tf ,这里我们可以使用AWS EKS模块来配置EKS集群和其他所需资源,包括自动扩展组、安全组、IAM角色和IAM策略。
这里面有几个参数需要你注意。
cluster_version 定义了这个集群的版本,我们需要在AWS上确认我们可以使用哪些版本。在样例中我使用的是1.22这个大版本。
ami_type 表示你要选择什么类型的操作系统镜像。我曾在第三讲带你了解过专门为容器设计的操作系统—— Bottlerocket,建议在这里选择使用Bottlerocket。如果你对容器还不太熟悉,也可以选择Amazon Linux作为操作系统。
instance_types 是一个列表,你可以加入多种机型。这里注意,尽管公有云厂商准备了大量的服务器,但是它们不是万能的。我们经常会遇到在某个region、某种机型可以购买的数量吃紧的状况,所以建议多加几种类型的机器。
min_size, max_size, desired_size 定义了集群最少机器数量、最多机器数量以及默认机器数量。
启动集群
在讲解完代码之后,我们来启动一个Kubernetes集群。
首先通过命令行进入example的目录,执行 terraform init 这条命令。init命令会根据你配置文件里的要求,将相对应的Terraform模块下载到本地。
root@devops:~/infra-automation/terraform/eks/example# terraform init
Initializing modules...
Downloading registry.terraform.io/terraform-aws-modules/eks/aws 18.26.6 for eks...
- eks in .terraform/modules/eks
- eks.eks_managed_node_group in .terraform/modules/eks/modules/eks-managed-node-group
- eks.eks_managed_node_group.user_data in .terraform/modules/eks/modules/_user_data
- eks.fargate_profile in .terraform/modules/eks/modules/fargate-profile
Downloading registry.terraform.io/terraform-aws-modules/kms/aws 1.0.2 for eks.kms...
- eks.kms in .terraform/modules/eks.kms
- eks.self_managed_node_group in .terraform/modules/eks/modules/self-managed-node-group
- eks.self_managed_node_group.user_data in .terraform/modules/eks/modules/_user_data
Downloading registry.terraform.io/terraform-aws-modules/vpc/aws 3.14.2 for vpc...
- vpc in .terraform/modules/vpc

Initializing the backend...

Initializing provider plugins...
- Reusing previous version of hashicorp/tls from the dependency lock file
- Reusing previous version of hashicorp/cloudinit from the dependency lock file
- Reusing previous version of hashicorp/aws from the dependency lock file
- Reusing previous version of hashicorp/random from the dependency lock file
- Reusing previous version of hashicorp/kubernetes from the dependency lock file
- Installing hashicorp/cloudinit v2.2.0...
- Installed hashicorp/cloudinit v2.2.0 (signed by HashiCorp)
- Installing hashicorp/aws v4.15.1...
- Installed hashicorp/aws v4.15.1 (signed by HashiCorp)
- Installing hashicorp/random v3.1.0...
- Installed hashicorp/random v3.1.0 (signed by HashiCorp)
- Installing hashicorp/kubernetes v2.12.1...
- Installed hashicorp/kubernetes v2.12.1 (signed by HashiCorp)
- Installing hashicorp/tls v3.4.0...
- Installed hashicorp/tls v3.4.0 (signed by HashiCorp)

Terraform has made some changes to the provider dependency selections recorded
in the .terraform.lock.hcl file. Review those changes and commit them to your
version control system if they represent changes you intended to make.

Terraform has been successfully initialized!

You may now begin working with Terraform. Try running "terraform plan" to see
any changes that are required for your infrastructure. All Terraform commands
should now work.

If you ever set or change modules or backend configuration for Terraform,
rerun this command to reinitialize your working directory. If you forget, other
commands will detect it and remind you to do so if necessary.
当模块初始化完毕之后,我们就可以使用 terraform apply 命令来创建一个EKS集群。这步动作可能需要几分钟到十几分钟不等,时长取决于整个环境在前面是否有过初始化。
root@devops:~/infra-automation/terraform/eks/example# terraform apply
Plan: 56 to add, 0 to change, 0 to destroy.

Changes to Outputs:
+ cluster_endpoint          = (known after apply)
+ cluster_id                = (known after apply)
+ cluster_name              = (known after apply)
+ cluster_security_group_id = (known after apply)
+ region                    = "us-east-2"

Do you want to perform these actions?
Terraform will perform the actions described above.
Only 'yes' will be accepted to approve.

Enter a value: yes

random_string.suffix: Creating...
random_string.suffix: Creation complete after 0s [id=4hrTXxaD]
完成apply动作以后,terraform会将集群的地址、ID、name都打印在终端。此时需要你记录下这些信息。因为之后我们要用到这些信息来生成kubeconfig,从而连接集群。
Apply complete! Resources: 56 added, 0 changed, 0 destroyed.

Outputs:

cluster_endpoint = "https://4D58C6B2B0213AA1FB0925F950CEB497.gr7.us-east-2.eks.amazonaws.com"
cluster_id = "education-eks-4hrTXxaD"
cluster_name = "education-eks-4hrTXxaD"
cluster_security_group_id = "sg-0ffee9cb0c254f781"
region = "us-east-2"
root@devops:~/infra-automation/terraform/eks/example#
同时,我们在AWS的console上查询一下,看看集群是否建立成功。如果出现后面这样的截图就表示建立成功了。
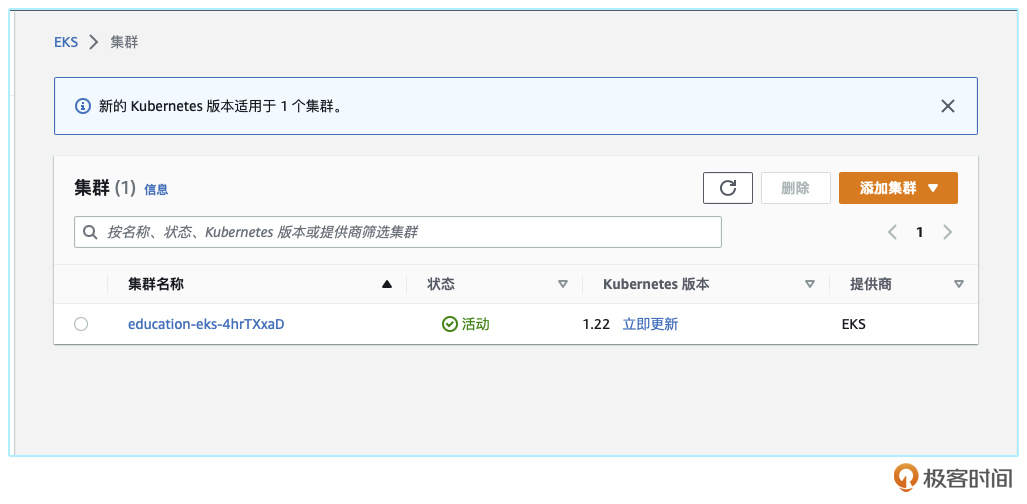
当我们看到集群的状态是绿色标记“活动”的时候,代表此时我们已经获得了一个可以使用的Kubernetes集群。
接下来我们来配置集群的kubeconfig,此时我们需要用到AWS CLI这个工具,它会帮我们把EKS的配置下载到本地 .kube/config 中。
root@devops:~# aws eks --region us-east-2 update-kubeconfig --name education-eks-4hrTXxaD
Added new context arn:aws:eks:us-east-2:614342226570:cluster/education-eks-4hrTXxaD to /root/.kube/conroot@devops:~/infra-automation/terraform/eks/example# terraform initfig
现在,你用kubectl这个命令就可以看到这个集群情况了。
root@devops:~# kubectl get node
NAME                                       STATUS   ROLES    AGE     VERSION
ip-10-0-1-65.us-east-2.compute.internal    Ready    <none>   4m9s    v1.22.12-eks-ba74326
ip-10-0-2-92.us-east-2.compute.internal    Ready    <none>   4m24s   v1.22.12-eks-ba74326
ip-10-0-3-141.us-east-2.compute.internal   Ready    <none>   4m19s   v1.22.12-eks-ba74326
root@devops:~#
这样我们就通过IaC的方式得到了一个全新的Kuberentes集群。
集群升级
接下来,我们继续结合实例,看看如何给集群升级,这是Kubernetes集群管理的高频操作。
之前的配置中, cluster_version 是1.22。需要升级集群时,我们只需要改写下面的配置,将cluster_version从1.22改成1.23。
version = "18.26.6"

cluster_name    = local.cluster_name
cluster_version = "1.23"

vpc_id     = module.vpc.vpc_id
然后,我们再跑一次terraform apply,即可自动完成集群版本的升级。
root@devops:~/infra-automation/terraform/eks/example# terraform apply

... (省略了一些输出)...

Do you want to perform these actions?
Terraform will perform the actions described above.
Only 'yes' will be accepted to approve.

Enter a value: yes

module.eks.aws_eks_cluster.this[0]: Modifying... [id=education-eks-4hrTXxaD]
module.eks.aws_eks_cluster.this[0]: Still modifying... [id=education-eks-4hrTXxaD, 10s elapsed]
module.eks.aws_eks_cluster.this[0]: Still modifying... [id=education-eks-4hrTXxaD, 20s elapsed]
module.eks.aws_eks_cluster.this[0]: Still modifying... [id=education-eks-4hrTXxaD, 30s elapsed]
module.eks.aws_eks_cluster.this[0]: Still modifying... [id=education-eks-4hrTXxaD, 40s elapsed]
module.eks.aws_eks_cluster.this[0]: Still modifying... [id=education-eks-4hrTXxaD, 50s elapsed]
module.eks.aws_eks_cluster.this[0]: Still modifying... [id=education-eks-4hrTXxaD, 1m0s elapsed]
module.eks.aws_eks_cluster.this[0]: Still modifying... [id=education-eks-4hrTXxaD, 1m10s elapsed]
module.eks.aws_eks_cluster.this[0]: Still modifying... [id=education-eks-4hrTXxaD, 1m20s elapsed]
module.eks.aws_eks_cluster.this[0]: Still modifying... [id=education-eks-4hrTXxaD, 1m30s elapsed]
我们在AWS的Console上可以观察到,集群现在的状态是正在更新。
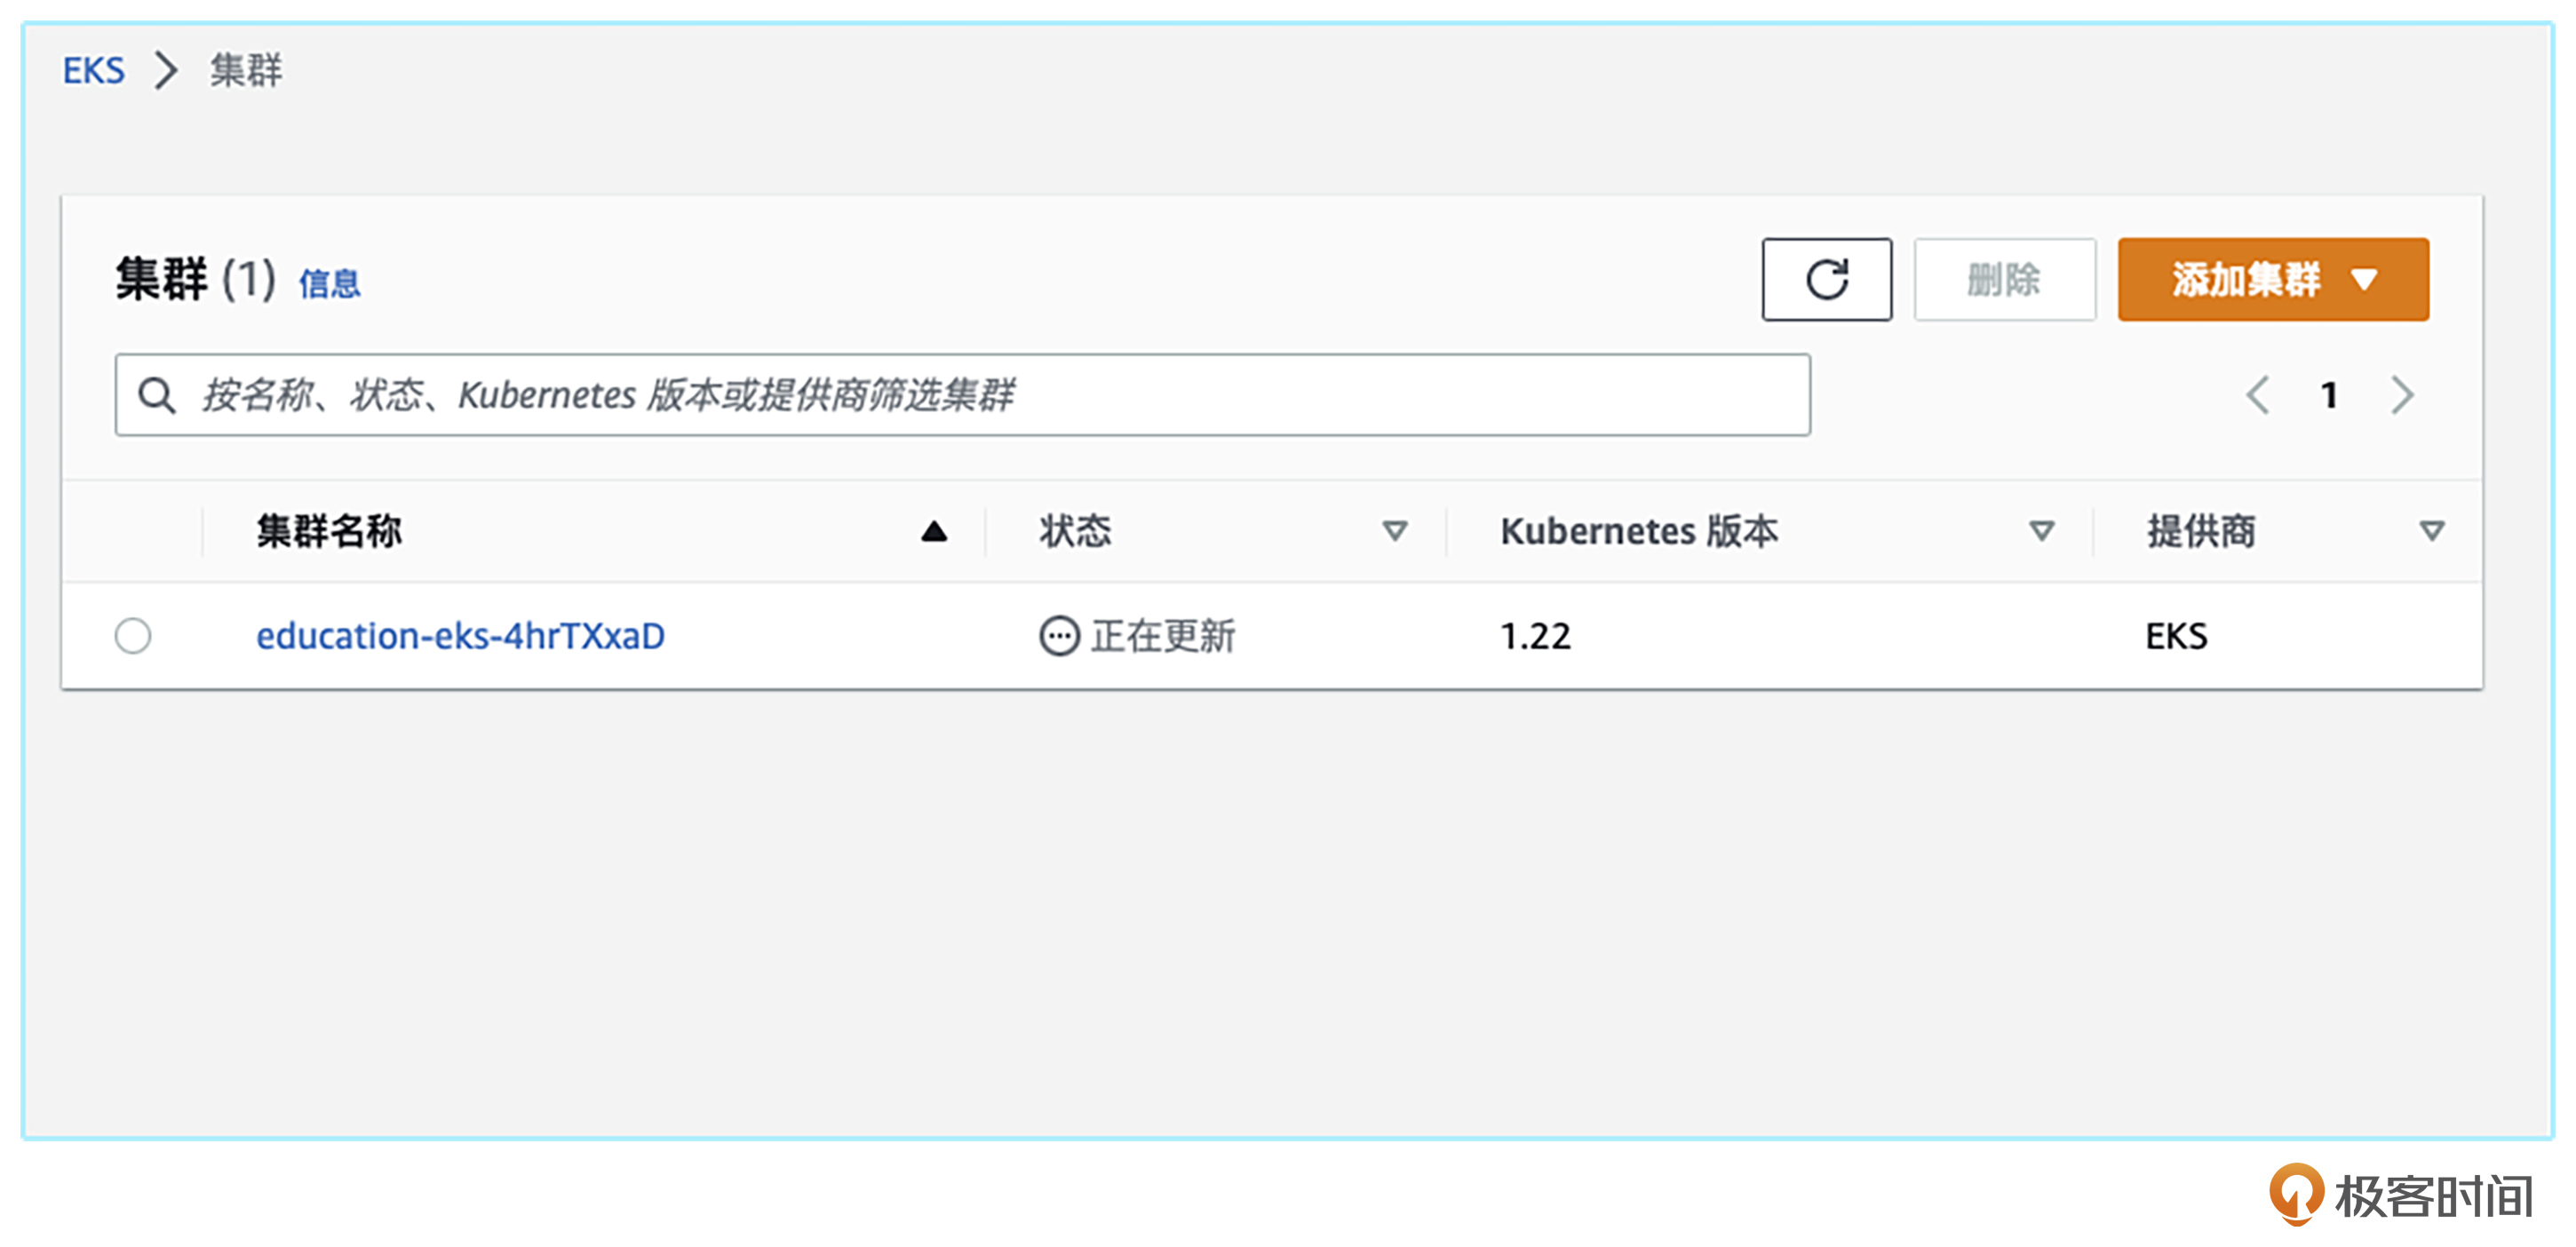
因为AWS的EKS升级的原理是加一台新的EC2节点,然后将老的EC2节点下线,所以整个升级的时间取决于你集群的大小。集群越大,升级时间越久。
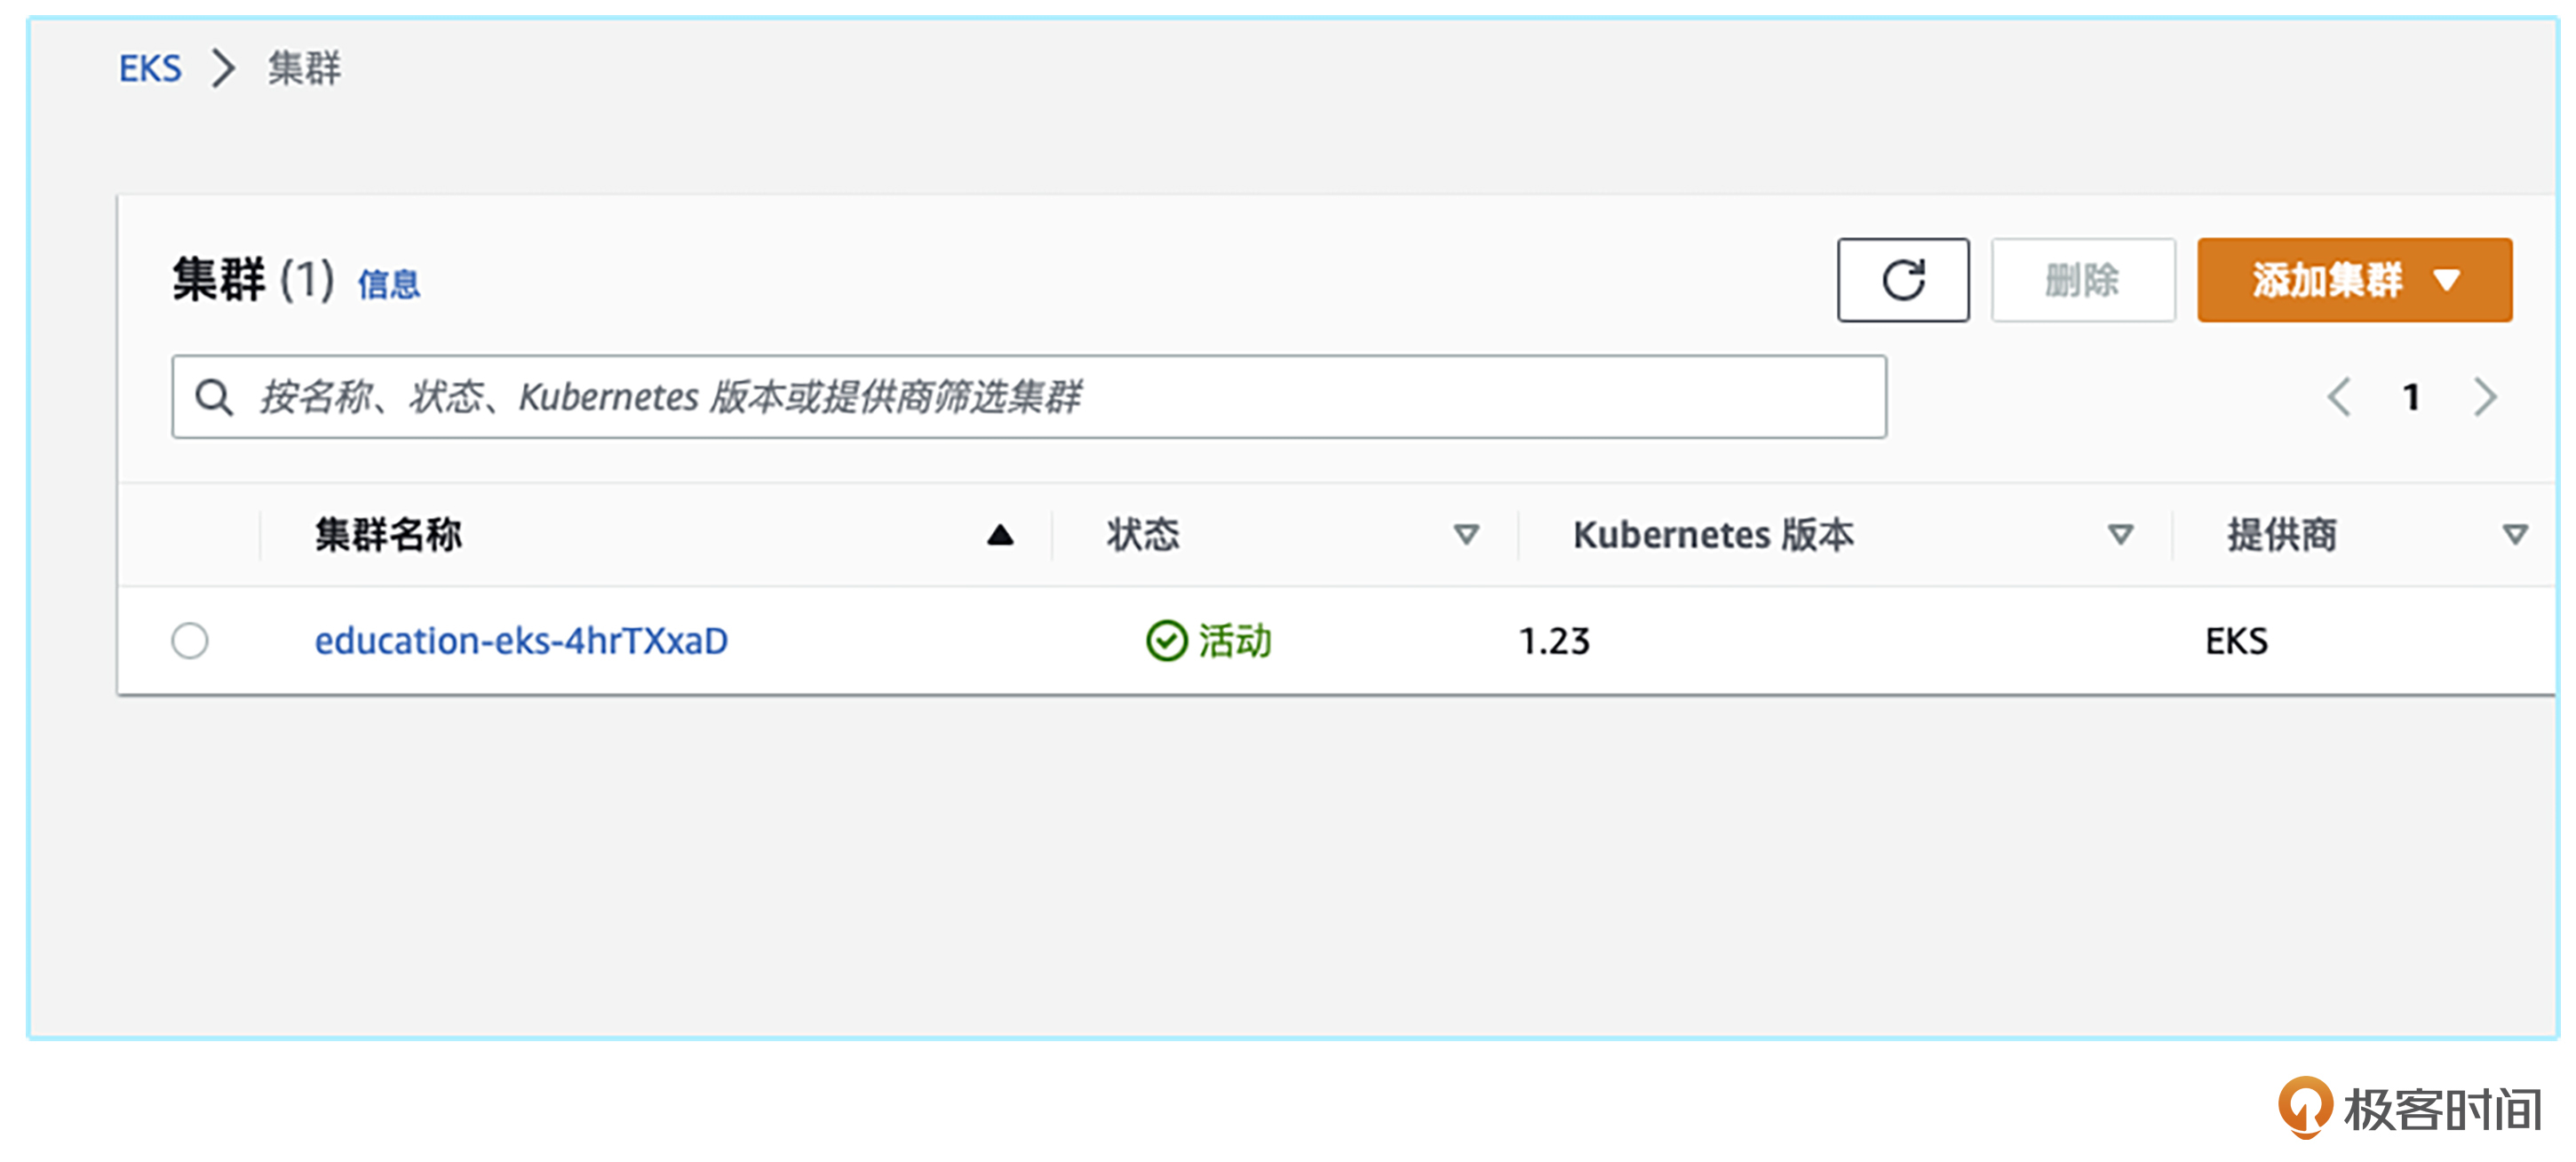
等待一段时间后,集群就顺利升级到1.23这个版本了。
总结
如果你在AWS的页面里探索过,就会发现你几乎不可能在页面上通过点点点的方式,顺利点出一个EKS集群。这是因为AWS在设计上,倾向让用户使用代码来管理云上的资源。
这一讲我们通过Terraform这个工具,熟悉了管理云资源的代码结构和关键参数,成功创建了一个EKS集群。然而对初学者来说,还是会卡在怎么写模块、怎么看懂代码上。这一讲我重点带你熟悉了核心代码和关键参数。更详细的代码解释和分析,你可以参考我为你准备的 GitHub代码,还可以自行查阅Terraform官方文档。
除了Terraform之外,社区里还有不少工具能帮我们用代码方式管理云上资源。比如后起之秀 Pulumi,基于Kubernetes方式 Crossplane,它们都可以做到一套代码管理多云的方式。你如果感兴趣可以课后自行探索。
其实无论是哪种工具,基本思路都是使用代码描述如何分配和使用资源,然后通过工具框架调用
IaaS API,最终获得我们所需的资源。希望你能举一反三,参考这一讲学到的管理思路,套用到其他公用云甚至私有云的资源管理上。
现在我们是手动执行代码来获得资源的,这显然并没完全达到自动化的要求。那如果我们想通过一些手段,比如DevOps的CI/CD来自动化执行这些代码获得资源,该怎么做呢?后续课程里我会继续和你探讨这个话题,敬请期待。
思考题
今天,我们使用了Terraform在公有云中启动了一个Kubernetes集群。但实际工作中,公司里只有一个集群的情况极少,往往我们面对十多个、甚至上百个Kubernetes集群,那么我们要如何管理多个集群的Terraform代码呢?
欢迎你在留言区和我交流探讨,我们下一讲见!
- Geek_45a572 👍(2) 💬(1)
老师您好,有一个场景,我的vpc使用tf创建之后。创建了rds也使用了这个vpc. 因为是在eks创建的脚本中写的vpc. 我此时释放eks,那么这个vpc也被释放了这个问题应该如何处理?
2024-04-10 - 发条橙 👍(0) 💬(3)
$ terraform apply ╷ │ Error: error configuring Terraform AWS Provider: error validating provider credentials: error calling sts:GetCallerIdentity: operation error STS: GetCallerIdentity, https response error StatusCode: 403, RequestID: afe63bae-7f5f-45b2-a3b5-80364f4a5f34, api error InvalidClientTokenId: The security token included in the request is invalid. │ │ with provider["registry.terraform.io/hashicorp/aws"], │ on main.tf line 11, in provider "aws": │ 11: provider "aws" {
2024-04-15 - Eason Lau 👍(0) 💬(1)
老师请问你在创建过程中有在哪里指定node的数量么? 另外就是eks集群是不是得挺贵啊?自己做实验的话😭
2024-04-08 - 🐭 🐹 🐭 🐹 🐭 👍(0) 💬(1)
为什么现在遇到的场景基本上是一个集群呢?是因为私有云的原因吗
2024-04-07 - 首富手记 👍(0) 💬(0)
多集群管理的时候,就把每个集群的差异地方抽出来 用变量的方式来管理应该就可以了
2024-04-29 - 良凯尔 👍(0) 💬(0)
针对Kubernetes集群的生命周期管理,比如说部署集群、扩容节点等等操作,使用Kubernetes SIGs 的 Cluster API(基于k8s CRD的方式来管理Kubernetes集群)会更加方便,众多云厂商都提供了自己的provider,使得可以基于不同云厂商的基础设施来部署Kubernetes集群;
2024-04-06