24 Rust图像识别:利用YOLOv8识别对象
你好,我是Mike。这节课我们来学习如何使用Rust对图片中的对象进行识别。
图像识别是计算机视觉领域中的重要课题,而计算机视觉又是AI的重要组成部分,相当于AI的眼睛。目前图像识别领域使用最广泛的框架是 YOLO,现在已经迭代到了v8版本。而基于Rust机器学习框架Candle,可以方便地实现YOLOv8算法。因此,这节课我们继续使用Candle框架来实现图片的识别。
Candle框架有一个示例,演示了YOLOv8的一个简化实现。我在此基础上,将这个源码中的示例独立出来,做成了一个单独的项目,方便你学习(查看代码地址)。
注:这节课的代码适用于 candle_core v0.3 版本。
YOLO简介
YOLO(You Only Look Once)是一种目标检测算法,它可以在一次前向传递中检测出图像中的所有物体的位置和类别。因为只需要看一次,YOLO被称为Region-free方法,相比于Region-based方法,YOLO不需要提前找到可能存在目标的区域(Region)。YOLO在2016年被提出,发表在计算机视觉顶会CVPR(Computer Vision and Pattern Recognition)上。YOLO对整个图片进行预测,并且它会一次性输出所有检测到的目标信息,包括类别和位置。
YOLO也使用神经网络进行图像识别,一般来说,如果是推理的话,我们需要一个神经网络的预训练模型文件。下面你会看到,在运行示例的时候,会自动从HuggingFace下载对应的预训练模型。
YOLOv8的模型结构比起之前的版本,会复杂一些,我们来看一下官方整理的图片。

这节课我们主要是去使用,不展开关于这个模型的讲解。目前官方的预训练模型分成5个。
- N:nano。模型最小。探测速度最快,精度最低。
- S:small,模型比nano大。
- M:middle,模型比small大。
- L:large,模型比middle大,比x小。
- X:extra large,模型最大。探测速度最慢,精度最高。
在下面的示例中,我们可以通过参数来指定选择哪个模型。
YOLOv8的能力
YOLO发展到第8代已经很强大了。它可以对图像做分类、探测、分段、轨迹、姿势等。

了解了YOLO的能力,下面我们开始实际用起来。
动手实验
下载源码:
物体探测
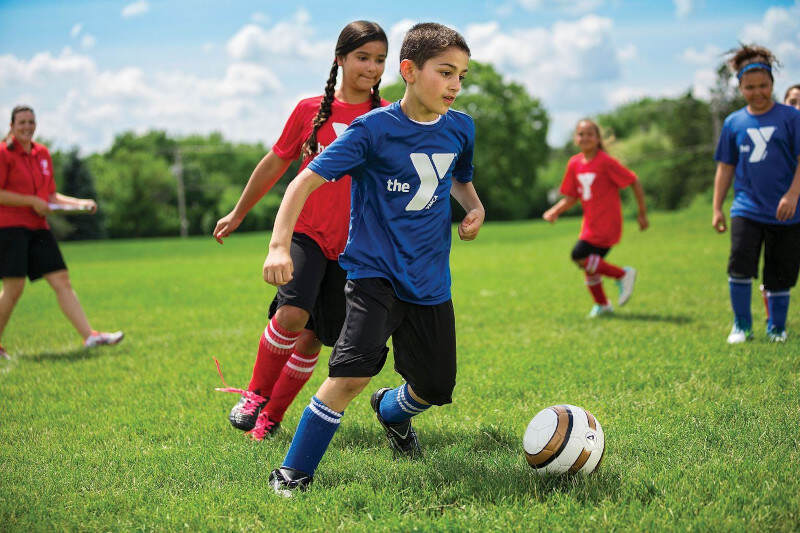
假设我们有这样一张图片。
编译运行下面这行代码。
请注意,这个运行过程中,会联网从HuggingFace上下载模型文件,需要科学上网环境。
运行输出:
$ cargo run --release -- assets/football.jpg --which m
ProxyChains-3.1 (http://proxychains.sf.net)
Finished release [optimized] target(s) in 0.08s
Running `target/release/candle_demo_yolov8 assets/football.jpg --which m`
Running on CPU, to run on GPU, build this example with `--features cuda`
model loaded
processing assets/football.jpg
generated predictions Tensor[dims 84, 5460; f32]
person: Bbox { xmin: 0.15629578, ymin: 81.735344, xmax: 99.46689, ymax: 281.7202, confidence: 0.94353473, data: [] }
person: Bbox { xmin: 433.88196, ymin: 92.59643, xmax: 520.25476, ymax: 248.76715, confidence: 0.933658, data: [] }
person: Bbox { xmin: 569.20465, ymin: 34.737877, xmax: 639.8049, ymax: 269.4999, confidence: 0.927611, data: [] }
person: Bbox { xmin: 209.33649, ymin: 16.313568, xmax: 388.09424, ymax: 388.7763, confidence: 0.92696583, data: [] }
person: Bbox { xmin: 169.212, ymin: 15.2717285, xmax: 312.59946, ymax: 345.16046, confidence: 0.900463, data: [] }
person: Bbox { xmin: 626.709, ymin: 65.91608, xmax: 639.791, ymax: 86.72856, confidence: 0.33487964, data: [] }
sports ball: Bbox { xmin: 417.45734, ymin: 315.16333, xmax: 484.62384, ymax: 372.86432, confidence: 0.93880117, data: [] }
writing "assets/football.pp.jpg"
在 assets 目录下生成 football.pp.jpg 文件,打开后效果如下:
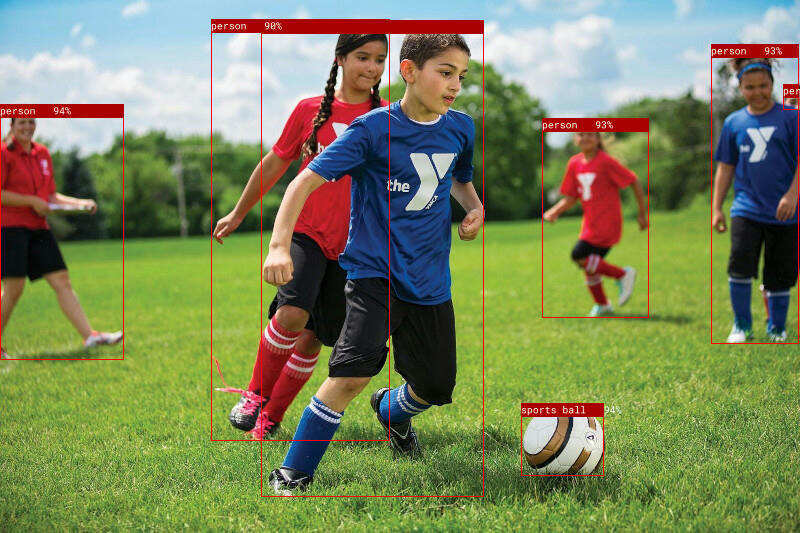
可以看到,Yolo 正确识别了6个人,和一个运动球。
姿势探测
我们来看一下,对同一张图片,运行姿势探测的效果。
我们的工具在 assets 目录下生成 football.pp.jpg 文件,打开后效果如下:
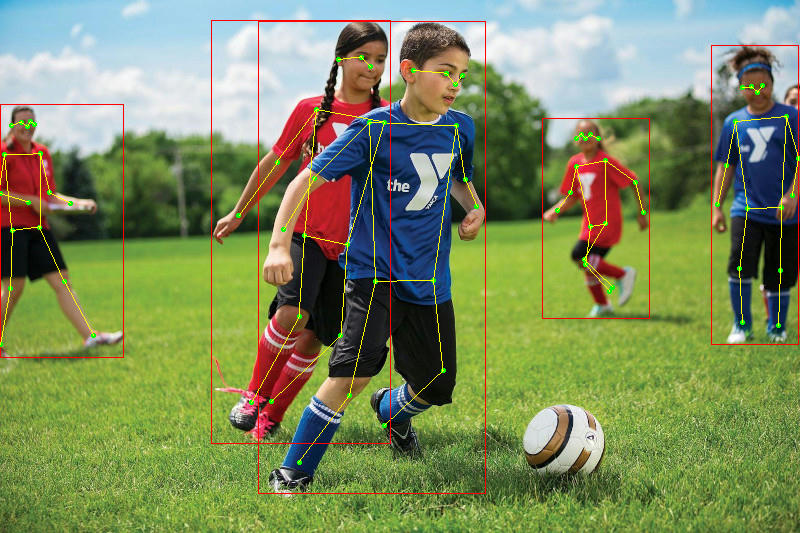
效果是不是很cool。下面我们详细解释一下这次实战的代码。
源码解释
YOLOv8 神经网络模型的原理比较复杂,这节课我们主要讲解这个示例中Rust的用法,从中可以学到不少Rust相关知识。
// #[cfg(feature = "mkl")]
// extern crate intel_mkl_src;

// #[cfg(feature = "accelerate")]
// extern crate accelerate_src;

mod model;
use model::{Multiples, YoloV8, YoloV8Pose};
mod coco_classes;

use candle_core::utils::{cuda_is_available, metal_is_available};
use candle_core::{DType, Device, IndexOp, Result, Tensor};
use candle_nn::{Module, VarBuilder};
use candle_transformers::object_detection::{non_maximum_suppression, Bbox, KeyPoint};
use clap::{Parser, ValueEnum};
use image::DynamicImage;

// Keypoints as reported by ChatGPT :)
// Nose
// Left Eye
// Right Eye
// Left Ear
// Right Ear
// Left Shoulder
// Right Shoulder
// Left Elbow
// Right Elbow
// Left Wrist
// Right Wrist
// Left Hip
// Right Hip
// Left Knee
// Right Knee
// Left Ankle
// Right Ankle
const KP_CONNECTIONS: [(usize, usize); 16] = [
(0, 1),
(0, 2),
(1, 3),
(2, 4),
(5, 6),
(5, 11),
(6, 12),
(11, 12),
(5, 7),
(6, 8),
(7, 9),
(8, 10),
(11, 13),
(12, 14),
(13, 15),
(14, 16),
];


// 获取设备,Cpu还是Cuda或Metal
pub fn get_device(cpu: bool) -> Result<Device> {
if cpu {
Ok(Device::Cpu)
} else if cuda_is_available() {
Ok(Device::new_cuda(0)?)
} else if metal_is_available() {
Ok(Device::new_metal(0)?)
} else {
#[cfg(all(target_os = "macos", target_arch = "aarch64"))]
{
println!(
"Running on CPU, to run on GPU(metal), build this example with `--features metal`"
);
}
#[cfg(not(all(target_os = "macos", target_arch = "aarch64")))]
{
println!("Running on CPU, to run on GPU, build this example with `--features cuda`");
}
Ok(Device::Cpu)
}
}
// 报告对象探测的结果,以及用图像处理工具在图上画出来标注
pub fn report_detect(
pred: &Tensor,
img: DynamicImage,
w: usize,
h: usize,
confidence_threshold: f32,
nms_threshold: f32,
legend_size: u32,
) -> Result<DynamicImage> {
let pred = pred.to_device(&Device::Cpu)?;
let (pred_size, npreds) = pred.dims2()?;
let nclasses = pred_size - 4;

let mut bboxes: Vec<Vec<Bbox<Vec<KeyPoint>>>> = (0..nclasses).map(|_| vec![]).collect();
// 选出符合置信区间的结果
for index in 0..npreds {
let pred = Vec::<f32>::try_from(pred.i((.., index))?)?;
let confidence = *pred[4..].iter().max_by(|x, y| x.total_cmp(y)).unwrap();
if confidence > confidence_threshold {
let mut class_index = 0;
for i in 0..nclasses {
if pred[4 + i] > pred[4 + class_index] {
class_index = i
}
}
if pred[class_index + 4] > 0. {
let bbox = Bbox {
xmin: pred[0] - pred[2] / 2.,
ymin: pred[1] - pred[3] / 2.,
xmax: pred[0] + pred[2] / 2.,
ymax: pred[1] + pred[3] / 2.,
confidence,
data: vec![],
};
bboxes[class_index].push(bbox)
}
}
}

non_maximum_suppression(&mut bboxes, nms_threshold);

// 在原图上标注,并打印标注的框的信息
let (initial_h, initial_w) = (img.height(), img.width());
let w_ratio = initial_w as f32 / w as f32;
let h_ratio = initial_h as f32 / h as f32;
let mut img = img.to_rgb8();
let font = Vec::from(include_bytes!("roboto-mono-stripped.ttf") as &[u8]);
let font = rusttype::Font::try_from_vec(font);
for (class_index, bboxes_for_class) in bboxes.iter().enumerate() {
for b in bboxes_for_class.iter() {
println!("{}: {:?}", coco_classes::NAMES[class_index], b);
let xmin = (b.xmin * w_ratio) as i32;
let ymin = (b.ymin * h_ratio) as i32;
let dx = (b.xmax - b.xmin) * w_ratio;
let dy = (b.ymax - b.ymin) * h_ratio;
if dx >= 0. && dy >= 0. {
imageproc::drawing::draw_hollow_rect_mut(
&mut img,
imageproc::rect::Rect::at(xmin, ymin).of_size(dx as u32, dy as u32),
image::Rgb([255, 0, 0]),
);
}
if legend_size > 0 {
if let Some(font) = font.as_ref() {
imageproc::drawing::draw_filled_rect_mut(
&mut img,
imageproc::rect::Rect::at(xmin, ymin).of_size(dx as u32, legend_size),
image::Rgb([170, 0, 0]),
);
let legend = format!(
"{}   {:.0}%",
coco_classes::NAMES[class_index],
100. * b.confidence
);
imageproc::drawing::draw_text_mut(
&mut img,
image::Rgb([255, 255, 255]),
xmin,
ymin,
rusttype::Scale::uniform(legend_size as f32 - 1.),
font,
&legend,
)
}
}
}
}
Ok(DynamicImage::ImageRgb8(img))
}
// 报告姿态探测的结果,以及用图像处理工具在图上画出来标注
pub fn report_pose(
pred: &Tensor,
img: DynamicImage,
w: usize,
h: usize,
confidence_threshold: f32,
nms_threshold: f32,
) -> Result<DynamicImage> {
let pred = pred.to_device(&Device::Cpu)?;
let (pred_size, npreds) = pred.dims2()?;
if pred_size != 17 * 3 + 4 + 1 {
candle_core::bail!("unexpected pred-size {pred_size}");
}
let mut bboxes = vec![];
// 选出符合置信区间的结果
for index in 0..npreds {
let pred = Vec::<f32>::try_from(pred.i((.., index))?)?;
let confidence = pred[4];
if confidence > confidence_threshold {
let keypoints = (0..17)
.map(|i| KeyPoint {
x: pred[3 * i + 5],
y: pred[3 * i + 6],
mask: pred[3 * i + 7],
})
.collect::<Vec<_>>();
let bbox = Bbox {
xmin: pred[0] - pred[2] / 2.,
ymin: pred[1] - pred[3] / 2.,
xmax: pred[0] + pred[2] / 2.,
ymax: pred[1] + pred[3] / 2.,
confidence,
data: keypoints,
};
bboxes.push(bbox)
}
}

let mut bboxes = vec![bboxes];
non_maximum_suppression(&mut bboxes, nms_threshold);
let bboxes = &bboxes[0];

// 在原图上标注,并打印标注的框和姿势的信息
let (initial_h, initial_w) = (img.height(), img.width());
let w_ratio = initial_w as f32 / w as f32;
let h_ratio = initial_h as f32 / h as f32;
let mut img = img.to_rgb8();
for b in bboxes.iter() {
println!("{b:?}");
let xmin = (b.xmin * w_ratio) as i32;
let ymin = (b.ymin * h_ratio) as i32;
let dx = (b.xmax - b.xmin) * w_ratio;
let dy = (b.ymax - b.ymin) * h_ratio;
if dx >= 0. && dy >= 0. {
imageproc::drawing::draw_hollow_rect_mut(
&mut img,
imageproc::rect::Rect::at(xmin, ymin).of_size(dx as u32, dy as u32),
image::Rgb([255, 0, 0]),
);
}
for kp in b.data.iter() {
if kp.mask < 0.6 {
continue;
}
let x = (kp.x * w_ratio) as i32;
let y = (kp.y * h_ratio) as i32;
imageproc::drawing::draw_filled_circle_mut(
&mut img,
(x, y),
2,
image::Rgb([0, 255, 0]),
);
}

for &(idx1, idx2) in KP_CONNECTIONS.iter() {
let kp1 = &b.data[idx1];
let kp2 = &b.data[idx2];
if kp1.mask < 0.6 || kp2.mask < 0.6 {
continue;
}
imageproc::drawing::draw_line_segment_mut(
&mut img,
(kp1.x * w_ratio, kp1.y * h_ratio),
(kp2.x * w_ratio, kp2.y * h_ratio),
image::Rgb([255, 255, 0]),
);
}
}
Ok(DynamicImage::ImageRgb8(img))
}
// 选择模型尺寸
#[derive(Clone, Copy, ValueEnum, Debug)]
enum Which {
N,
S,
M,
L,
X,
}
// 对象探测任务还是姿势探测任务
#[derive(Clone, Copy, ValueEnum, Debug)]
enum YoloTask {
Detect,
Pose,
}
// 命令行参数定义,基于Clap
#[derive(Parser, Debug)]
#[command(author, version, about, long_about = None)]
pub struct Args {
/// 是否运行在CPU上面
#[arg(long)]
cpu: bool,

/// 是否记录日志
#[arg(long)]
tracing: bool,

/// 模型文件路径
#[arg(long)]
model: Option<String>,

/// 用哪一个模型
#[arg(long, value_enum, default_value_t = Which::S)]
which: Which,

images: Vec<String>,

/// 模型置信门槛
#[arg(long, default_value_t = 0.25)]
confidence_threshold: f32,

/// non-maximum suppression的阈值
#[arg(long, default_value_t = 0.45)]
nms_threshold: f32,

/// 要执行的任务
#[arg(long, default_value = "detect")]
task: YoloTask,

/// 标注的字体的大小
#[arg(long, default_value_t = 14)]
legend_size: u32,
}

impl Args {
fn model(&self) -> anyhow::Result<std::path::PathBuf> {
let path = match &self.model {
Some(model) => std::path::PathBuf::from(model),
None => {
let api = hf_hub::api::sync::Api::new()?;
let api = api.model("lmz/candle-yolo-v8".to_string());
let size = match self.which {
Which::N => "n",
Which::S => "s",
Which::M => "m",
Which::L => "l",
Which::X => "x",
};
let task = match self.task {
YoloTask::Pose => "-pose",
YoloTask::Detect => "",
};
api.get(&format!("yolov8{size}{task}.safetensors"))?
}
};
Ok(path)
}
}

pub trait Task: Module + Sized {
fn load(vb: VarBuilder, multiples: Multiples) -> Result<Self>;
fn report(
pred: &Tensor,
img: DynamicImage,
w: usize,
h: usize,
confidence_threshold: f32,
nms_threshold: f32,
legend_size: u32,
) -> Result<DynamicImage>;
}
// Yolov8为对象探测的类型载体
impl Task for YoloV8 {
fn load(vb: VarBuilder, multiples: Multiples) -> Result<Self> {
YoloV8::load(vb, multiples, /* num_classes=*/ 80)
}

fn report(
pred: &Tensor,
img: DynamicImage,
w: usize,
h: usize,
confidence_threshold: f32,
nms_threshold: f32,
legend_size: u32,
) -> Result<DynamicImage> {
report_detect(
pred,
img,
w,
h,
confidence_threshold,
nms_threshold,
legend_size,
)
}
}
// YoloV8Pose为姿势探测的类型载体
impl Task for YoloV8Pose {
fn load(vb: VarBuilder, multiples: Multiples) -> Result<Self> {
YoloV8Pose::load(vb, multiples, /* num_classes=*/ 1, (17, 3))
}

fn report(
pred: &Tensor,
img: DynamicImage,
w: usize,
h: usize,
confidence_threshold: f32,
nms_threshold: f32,
_legend_size: u32,
) -> Result<DynamicImage> {
report_pose(pred, img, w, h, confidence_threshold, nms_threshold)
}
}
// 主体运行逻辑
pub fn run<T: Task>(args: Args) -> anyhow::Result<()> {
let device = get_device(args.cpu)?;
// 选择模型尺寸,加载模型权重参数进来
let multiples = match args.which {
Which::N => Multiples::n(),
Which::S => Multiples::s(),
Which::M => Multiples::m(),
Which::L => Multiples::l(),
Which::X => Multiples::x(),
};
let model = args.model()?;
let vb = unsafe { VarBuilder::from_mmaped_safetensors(&[model], DType::F32, &device)? };
let model = T::load(vb, multiples)?;
println!("model loaded");
for image_name in args.images.iter() {
println!("processing {image_name}");
let mut image_name = std::path::PathBuf::from(image_name);
let original_image = image::io::Reader::open(&image_name)?
.decode()
.map_err(candle_core::Error::wrap)?;
let (width, height) = {
let w = original_image.width() as usize;
let h = original_image.height() as usize;
if w < h {
let w = w * 640 / h;
//
(w / 32 * 32, 640)
} else {
let h = h * 640 / w;
(640, h / 32 * 32)
}
};
let image_t = {
let img = original_image.resize_exact(
width as u32,
height as u32,
image::imageops::FilterType::CatmullRom,
);
let data = img.to_rgb8().into_raw();
Tensor::from_vec(
data,
(img.height() as usize, img.width() as usize, 3),
&device,
)?
.permute((2, 0, 1))?
};
let image_t = (image_t.unsqueeze(0)?.to_dtype(DType::F32)? * (1. / 255.))?;
let predictions = model.forward(&image_t)?.squeeze(0)?;
println!("generated predictions {predictions:?}");
let image_t = T::report(
&predictions,
original_image,
width,
height,
args.confidence_threshold,
args.nms_threshold,
args.legend_size,
)?;
image_name.set_extension("pp.jpg");
println!("writing {image_name:?}");
image_t.save(image_name)?
}

Ok(())
}
// 程序入口
pub fn main() -> anyhow::Result<()> {
use tracing_chrome::ChromeLayerBuilder;
use tracing_subscriber::prelude::*;

let args = Args::parse();

let _guard = if args.tracing {
let (chrome_layer, guard) = ChromeLayerBuilder::new().build();
tracing_subscriber::registry().with(chrome_layer).init();
Some(guard)
} else {
None
};

match args.task {
YoloTask::Detect => run::<YoloV8>(args)?,
YoloTask::Pose => run::<YoloV8Pose>(args)?,
}
Ok(())
}
我挑选里面一些重要的内容来讲解一下。
第7~8行,加载模型模块。YOLOv8的模型实现都放在这里面,它在Candle的平台基础上实现了一个简易版本的 Darknet 神经网络引擎。第9行,加载coco数据集分类表。YOLOv8对数据分成80种类别。你可以打开 coco_classes.rs 文件查看。
第11~14行,引入 Candle 基础组件。第15行引用clap赋能命令行功能。这个在上一讲中已经讲过了。第16行引入 image crate。我们在这个例子里处理图片使用的是 image 和 imageproc 两个 crate。
第36~53行是人体姿势的参数配置 KP_CONNECTIONS。
第57~77行,是在 candle 中获取能使用的设备的函数。可以看到,Linux和Windows下我们可以使用 CUDA,mac下我们可以使用 Metal。
第79~167行,report_detect 是第一个任务,对象探测的业务代码。第169~258行,report_pose 是第二个任务,姿势探测的业务代码。这两个任务我们等会儿还会再说到。
第260~267行,定义选用哪个模型,分别对应前面讲到的 N、S、M、L、X。第269~273行,定义对象探测和姿势探测两个不同的任务。第275~311行,定义命令行参数对象Args,你可以关注一下各个字段的默认值。第313~336行,定义model函数,实际是加载到模型的正确路径,如果本地没有,就会从HuggingFace上下载。
第338~349行,定义Task trait,它依赖另外两个trait:Module和Sized。Module来自 candle_nn crate,表示神经网络中的一个模块,有向前推理forward的功能。Sized来自 Rust std 标准库,表示被实现的类型是固定尺寸的。
第351~375行,为YOLOv8实现Task trait,YOLOv8 就是我们用于目标探测的任务承载类型。第377~393,为YOLOv8Pose实现Task trait,YOLOv8Pose就是我们用于姿势探测的任务承载类型。
第395~459行是业务内容。第461~480行是main函数,里面做了一些日志配置,并且根据任务类型分配到YOLOv8或YOLOv8Pose两个不同的任务去。
我们看到,这里使用了 run::<YoloV8>(args) 这种写法,再对照run的函数签名:
这个函数签名中有一个类型参数T,被Task约束。根据第 10 讲的内容,我们可以说类型T具有Task的能力。::<> 是 turbofish 语法,用来将具体的类型传递进函数的类型参数中。
进入 run() 函数中,我们继续看。第405、406行,根据指定的不同的模型,将预训练模型的内容加载成 model 实例。第407行有个 T::load() 写法,实际就是 YOLOv8 和 YOLOv8Pose 上都实现了 load() 关联函数,它定义在Task trait中。
然后第409行可以批量对多个图片进行操作,这个需要你在命令行中传参数指定。我们前面的示例只处理一张图片。然后下面第415~426行,是对图片尺寸的规约化处理。因为YOLOV8只能在640px x 640px 的图片上进行检测,所以需要在代码中预处理一下。
第427~440行是将处理后的图片加载成 Tensor 对象。第441~442行,执行推理预测。第444~452行,调用各自任务的汇报业务。第453~455行,生成处理后的图片,写入磁盘中。
第444行出现了 T::report(),解释跟前面一样,实际就是 YOLOv8 和 YOLOv8Pose 上都实现了 report() 关联函数,它定义在Task trait中。然后这个 T::report() 会进一步路由到 report_detect() 和 report_pose() 函数中,各自调用。
在各自的 report 函数中,会对上一步YOLOv8预测的边框值按置信区间进行筛选,然后对图片添加标注,也就是画那些线和框。这样就生成了我们看到的效果图的内存对象。
到这里为止,全部代码就讲解完成了。细节比较生硬,还是图片好玩!
小结
这节课我们使用Rust实现了Yolov8算法探测图像中的对象和人物的姿势。从实现过程来说,并不比Python版本的实现复杂多少。而且从部署上来讲,Rust编译后就一个二进制可执行文件,对于做成一个软件(后面两讲我们会讲如何用GUI界面)要方便很多。
另一方面,代码中对于函数的返回值,使用了 anyhow::Result<T>。上节课我们讲过,使用anyhow的返回类型能够大大减少我们的心智负担。
这个版本的Yolov8的算法,是实现在Candle框架这个平台上的,你可以研究一下 model.rs 文件,可以看到,代码量非常少。因为有了Candle的基础设施,实现一个新的神经网络算法其实非常简单。
以前,当我们想学习图像识别的时候,我们就得求助于Python或C++。以后你也可以使用Rust玩起来了,我以后会持续地输出关于Rust在AI领域的应用,你可以持续关注,我们一起推进Rust在AI领域的影响力。
思考题
请你开启 cuda 或 metal 特性尝试一下,使用不同的预训练模型看一下效果差异。另外你还可以换用不同的图片来测试一下各种识别效果。
欢迎你把你实验的结果分享到评论区,也欢迎你把这节课的内容分享给其他朋友,邀他一起学习Rust,我们下节课再见!
- 渡鸦10086 👍(2) 💬(1)
网页下载模型到本地后通过--models参数即可使用本地模型,比如 cargo run --release -- assets/football.jpg --which m --model ./model/yolov8m.safetensors
2024-02-01 - Jump 👍(1) 💬(1)
启用cuda需要在cargo.toml里面开启特性 [dependencies] candle-core = {version= "0.3.1",features=["cuda"]} candle-nn = {version= "0.3.1",features=["cuda"]} candle-transformers = {version= "0.3.1",features=["cuda"]}
2024-03-23 - Geek_118351 👍(0) 💬(1)
老师你好,会考虑出一个针对视频流的目标识别课程吗。
2024-03-11 - Geek_e72251 👍(0) 💬(2)
老师可以贴一段怎么从本地加载 yolo 模型的代码吗?实在下载不下来😮💨
2024-01-11 - Geek_e72251 👍(0) 💬(5)
Error: request error: https://huggingface.co/lmz/candle-yolo-v8/resolve/main/yolov8m.safetensors: Connection Failed: Connect error: connection timed out Caused by: 0: https://huggingface.co/lmz/candle-yolo-v8/resolve/main/yolov8m.safetensors: Connection Failed: Connect error: connection timed out 1: connection timed out 一直下不来这个文件,可以提前下载下来然后放到项目里面吗?浏览器可以正常下载
2024-01-05 - 凤 梨 🍍 👍(0) 💬(2)
pytorch怎么转safetensors,没工具下载不了外面的模型
2023-12-30 - unistart 👍(0) 💬(1)
老师,我有一个问题就是猫猫那张图执行姿势探测任务时无法正确识别,这是为什么啊? cargo run --release -- assets/cats.jpg --model candle-yolo-v8/yolov8x-pose.safetensors --which x --task pose Compiling candle_demo_yolov8 v0.1.0 (E:\Project\rust-jikeshijian\24-candle_yolov8) Finished release [optimized] target(s) in 12.69s Running `target\release\candle_demo_yolov8.exe assets/cats.jpg --model candle-yolo-v8/yolov8x-pose.safetensors --which x --task pose` Running on CPU, to run on GPU, build this example with `--features cuda` model loaded processing "assets/cats.jpg" generated predictions Tensor[dims 56, 6300; f32] writing "assets/cats.pp.jpg"
2023-12-25 - 蕨火 👍(0) 💬(1)
同问,不联网怎么做?
2023-12-20 - My dream 👍(0) 💬(1)
用rust怎么训练录像资源啊?
2023-12-19 - My dream 👍(0) 💬(2)
如果我们的电脑不联网的情况下,用yolo训练图片资源啊?
2023-12-19 - My dream 👍(0) 💬(1)
怎么使用yolo训练图片?请老师请一下
2023-12-19