19 其他重要标准库特性实战:利用日历应用熟悉新特性
你好,我是卢誉声。
我们想要提升C++的编程效率,就需要对重要标准库的变更保持关注。在第18讲已经涵盖了绝大多数C++20带来的重要库变更。不过,我当时有意忽略了其中一个,就是我们今天的主角——C++20 Calendar、Timzone。
它们是对现有chrono库的重要补充。Calendar提供了日历的表示与计算工具。而Timezone提供了标准的时区定义,可以构建包含时区信息的zoned_time。
今天,我会围绕C++20 Calendar、Timzone带你进行编程实战,并结合上一讲涵盖的特性:jthread、source location、sync stream和u8string,实现一个使用新标准实现的日历程序。
哦,对了,我们还会在这一讲中使用C++ 20 Formatting库,帮你进一步加深对这个特性的理解。好,话不多说,就让我们从模块设计开始今天的内容(课程配套代码可以从这里获取)。
模块设计
我们准备构建的命令行日历应用,具备以下特性。
- 使用C++20 chrono:支持显示本月日历,显示日期和星期信息。
- 使用u8string:支持导出本年的全年日历到文本文件,编码为UTF-8。
我们依然采用传统C++模块结构设计,整体模块设计如下图所示。

该工程包含两个子项目,一个是可执行文件calendarpp,另一个是静态链接库logging。从图中可以看到,calendarpp的入口是main.cpp,其他实现都在calendarpp模块下,包括后面这几个模块。
- menu:主菜单实现,包括菜单定义与菜单交互。
- actions:各个菜单项的具体实现,完成具体的功能。
- utils:具体的底层实现模块,包括日历计算模块calendar、文本渲染模块render和输入输出模块io。
我们沿用了第15讲中的实现,即日志框架来构建并包装成了logging库,并利用第18讲中讲过的部分特性进行了改造。沿着这条路线,我们先从改造日志框架开始看。
改造日志框架
日志框架的所有代码文件都在projects/logging下,你可以结合代码来理解如何集成日志框架,并用它来记录系统运行日志。我们来看看,使用C++20的特性,可以在原有的框架基础上做出哪些改造。
之前的Handler在多线程场景下使用时,因为没有采用线程同步方案,导致输出时可能会产生错乱的问题,因此我们改造了Handler。
比如DefaultHandler的实现改造是后面这样。
#pragma once

#include "logging/Handler.h"
#include <syncstream>

namespace logging::handlers {
// 默认日志处理器
template <Level HandlerLevel = Level::Warning>
// 继承BaseHandler
class DefaultHandler : public BaseHandler<HandlerLevel> {
public:
// 构造函数,需要指定格式化器,默认格式化器为defaultFormatter
DefaultHandler(Formatter formatter = defaultFormatter) : BaseHandler<HandlerLevel>(formatter) {}
// 禁止拷贝构造函数
DefaultHandler(const DefaultHandler&) = delete;
// 定义移动构造函数
DefaultHandler(const DefaultHandler&& rhs) noexcept : BaseHandler<HandlerLevel>(rhs.getForamtter()) {}

// emit用于提交日志记录
// emitLevel > HandlerLevel的日志会被丢弃
template <Level emitLevel>
requires (emitLevel > HandlerLevel)
void emit(const Record& record) {
}

// emitLevel <= HandlerLevel的日志会被输出到标准输出流中
template <Level emitLevel>
requires (emitLevel <= HandlerLevel)
void emit(const Record& record) {
// 调用format将日志记录对象格式化成文本字符串
std::osyncstream(std::cout) << this->format(record) << std::endl;
}
};
}
代码中的改动在第31行,通过 std::osyncstream 包装了std::cout,然后通过包装后的输出流进行输出,这样就能完成输出的线程同步控制(详细讲解,你可以回顾上一讲 “sync stream” 这部分)。
日志框架的第二个改动在于,它通过source location记录了输出日志的源代码位置信息。实现在Record.h下,后面展示的是重点代码。
class Record {
public:
// Logger名称
std::string name;
// 日志等级
Level level;
// 日志时间
TimePoint time;
// 日志消息
std::string message;
std::source_location sourceLocation;

// getLevelName:获取日志等级文本
const std::string& getLevelName() const {
// 调用toLevelName获取日志等级文本
return toLevelName(level);
}
};
通过代码可以看到,Record定义增加了sourceLocation用于记录源代码位置。
接着,我们还要修改Logger定义,增加记录源代码位置信息的功能。具体实现在Logger.h下,我们将log的定义改为以下形式。
template <Level level>
requires (level > loggerLevel)
Logger& log(const std::string& message, std::source_location sourceLocation = std::source_location::current()) {
return *this;
}

// 通过requires约束提交等级为日志记录器设定等级及以上的日志
template <Level level>
requires (level <= loggerLevel)
Logger & log(const std::string& message, std::source_location sourceLocation = std::source_location::current()) {
// 构造Record对象
Record record{
.name = _name,
.level = level,
.time = std::chrono::system_clock::now(),
.message = message,
// 记录源代码位置
.sourceLocation = sourceLocation
};

// 调用handleLog实际处理日志输出
handleLog<level, HandlerCount - 1>(record);

return *this;
}
可以看到,我增加了source_location定义,并通过默认参数自动记录调用者的所在位置,调用者也可以自己指定需要记录的source_location。
我们同时修改了几个级别的相关接口,比如debug成员函数改造。
// 提交调试信息(log的包装)
Logger& debug(const std::string& message, std::source_location sourceLocation = std::source_location::current()) {
return log<Level::Debug>(message, sourceLocation);
}
其他的几个成员函数都和debug一样,这里就不展示出来了。
最后,我还修改了format函数输出sourceLocation中的信息。具体实现,我们以ModernFormatter.cpp的修改为例来看看。
#include "logging/formatters/ModernFormatter.h"
#include "logging/Record.h"

namespace logging::formatters::modern {
// formatRecord:将Record对象格式化为字符串
std::string formatRecord(const Record& record) {
const auto& sourceLocation = record.sourceLocation;

try {
return std::format(
"{0:<16}| [{1}] {2:%Y-%m-%d}T{2:%H:%M:%OS}Z - <{3}:{4} [{5}]> - {6}",
record.name,
record.getLevelName(),
record.time,
sourceLocation.file_name(),
sourceLocation.line(),
sourceLocation.function_name(),
record.message
);
}
catch (std::exception& e) {
std::cerr << "Error in format: " << e.what() << std::endl;

return "";
}
}
}
代码中format的部分加入了sourceLocation信息,其他部分相较于之前则没有变化。
主程序与菜单
在了解了日志框架的改造后,我们继续看如何通过C++20 Formatting库实现主程序和菜单。
主程序定义非常简单,在main.cpp中,代码是后面这样。
#include "menu/Menu.h"
#include <iostream>
#include <format>

int main() {
while (true) {
// 展示菜单
calendarpp::menu::showMenu();
// 读取并执行菜单项
calendarpp::menu::readAction();
}

return 0;
}
代码整体是一个while循环,首先展示菜单,然后读取用户输入并执行菜单项。所以只有用户选择退出程序时,整个程序才会退出。
菜单实现在menu/Menu.cpp中,代码是后面这样。
#include "menu/Menu.h"
#include "actions/ShowAction.h"
#include "actions/ExportAction.h"
#include "actions/ExitAction.h"
#include "utils/RenderUtils.h"

#include <iostream>
#include <string>
#include <vector>
#include <cstdint>
#include <format>
#include <algorithm>

namespace calendarpp::menu {
// 菜单项类型
struct MenuItem {
std::string title;
Action action;
};

// 所有菜单
static const std::vector<MenuItem> MenuItems = {
std::vector<MenuItem> {
{
.title = "展示本月日历",
.action = actions::showCurrentMonth
},
{
.title = "导出本年日历",
.action = actions::exportCurrentYear
},
{
.title = "退出程序",
.action = actions::exitApp
}
}
};

// 菜单选项范围
static const int32_t MinActionNumber = 1;
static const int32_t MaxActionNumber = MenuItems.size();

// 展示菜单
void showMenu() {
// 输出系统标题
std::cout << std::format("\n{:=^80}\n", " Calendar++ v1.0 ") << std::endl;
// 输出当前时间与本地时区信息
std::cout << utils::renderNow() << std::endl;

// 输出所有菜单
std::cout << std::format("{:*^80}\n", " MENU ");
std::cout << std::format("*{: ^78}*\n", "");
std::int32_t menuIndex = 0;
for (const auto& menuItem : MenuItems) {
menuIndex += 1;

// 输出菜单序号与菜单名称
std::string menuLine = std::format("({}) {}", menuIndex, menuItem.title);
std::cout << std::format("* {: <76} *", menuLine) << std::endl;
}
std::cout << std::format("*{: ^78}*\n", "");
std::cout << std::format("{:*^80}\n", "");

// 提示用户输入菜单编号
std::cout << std::format("\n请输入菜单编号({}-{}):", 1, menuIndex);
}

// 读取用户输入并执行动作
void readAction() {
std::string actionNumberString;
// 读取用户输入
std::getline(std::cin, actionNumberString);

try {
// 解析用户输入
int32_t actionNumber = std::stoi(actionNumberString);
if (actionNumber < MinActionNumber || actionNumber > MaxActionNumber) {
std::cerr << std::format("菜单编号超出范围({}-{})\n", MinActionNumber, MaxActionNumber);
}

// 执行相应菜单项的action
int32_t actionIndex = std::max(actionNumber - 1, 0);
const auto& action = MenuItems[actionIndex].action;
action();

return;
}
catch (const std::exception& e) {
std::cerr << e.what() << std::endl;
}

std::cerr << "无法识别用户输入" << std::endl;
}
}
这段代码中值得注意的部分是 showMenu函数,它用于展示菜单。该函数输出标题后,会遍历所有的MenuItems并输出菜单内容。发现了么?这段代码通过format完成了大量的文本格式化工作。
最后我们还定义了readAction函数,用于读取用户输入的菜单编号并执行对应的菜单动作。这里使用了C++11引入的std::stoi函数将字符串转换成对应的整型数字。
菜单的展示效果是后面这样。
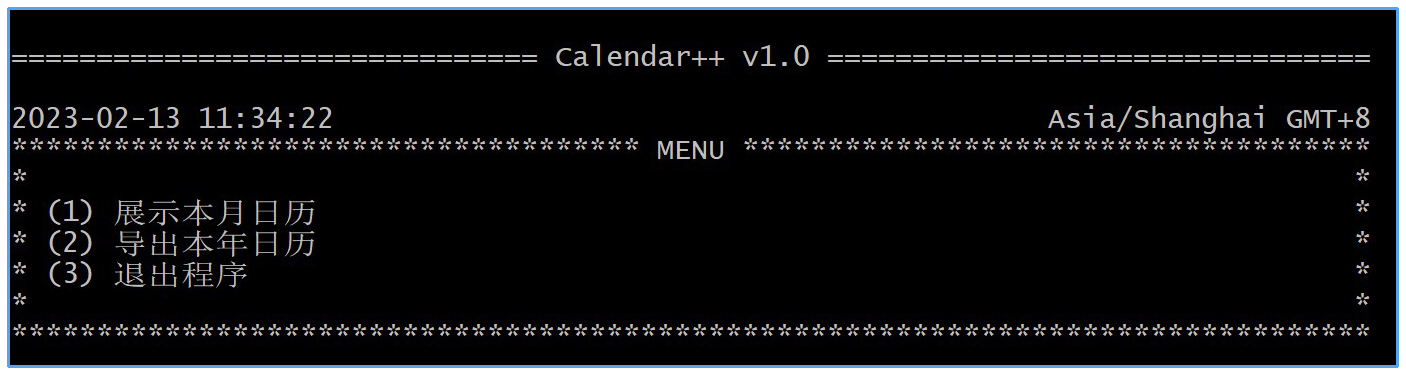
需要注意的是,本项目代码采用了UTF-8编码,因此如果你在Windows下执行,需要在支持UTF-8编码输出的控制台下使用(比如MinGW的bash)。
展示日历
接下来,我们看一下该如何展示本月日历。在actions中定义了菜单项的函数实现,代码实现在src/actions/ShowAction.cpp中。
#include "actions/ShowAction.h"
#include "utils/RenderUtils.h"

#include <chrono>
#include <iostream>
#include <format>

namespace chrono = std::chrono;

namespace calendarpp::actions {
void showCurrentMonth() {
// 获取当前时间
chrono::time_point now{ chrono::system_clock::now() };
// 将时间转换为year_month_day
chrono::year_month_day ymd{ chrono::floor<chrono::days>(now) };
// 获取当前年月(类型为year_month)
chrono::year_month currentYearMonth = ymd.year() / ymd.month();

// 调用渲染模块渲染当月日历
std::cout << std::endl;
std::cout << utils::renderMonth(currentYearMonth);
}
}
代码中定义了showCurrentMonth函数,该函数首先调用了chrono的Calendar获取当日所在的日期和月份。
Calendar是C++20引入到chrono中新的库特性,提供了标准的格里高利历(Gregorian calendar)实现。
这里简单介绍一下year_month_day,用于描述一个完整日期(年月日),该类型支持多种构造方法,这里使用chrono::system_clock::now()获取系统本地时间,然后采用chrono::floor<chrono::days>将时间转换为以日为单位的时间,最后调用year_month_day得到当日的日期。
year_month_day支持通过year和month成员函数获取当日的年份与月份,代码17行就调用了year / month这种形式构造了一个year_month对象,表示某年的某个月,这里最后得到的就是本日所在的当月。/是Calendar的一个操作符重载,是创建日期类型对象的一个语法糖。
代码最后调用renderMonth渲染了当月日历并将其输出到控制台,该函数定义在src/utils/RenderUtils.cpp中,属于渲染模块,我们分析一下相关代码。
首先定义了Weekdays常量,包含了周一到周日的所有星期几的定义。
// 定义一周七天的weekday常量
static std::vector<chrono::weekday> Weekdays = {
chrono::Monday,
chrono::Tuesday,
chrono::Wednesday,
chrono::Thursday,
chrono::Friday,
chrono::Saturday,
chrono::Sunday,
};
该数组的元素类型为chrono::weekday,这是chrono的标准类型,用来表示周几,其中Monday到Sunday都是chrono定义的常量,表示周一到周日。
// 渲染某个月份的日历,返回string
std::string renderMonth(chrono::year_month yearMonth) {
std::ostringstream os;

// 获取当月的所有周
auto monthWeeks = utils::buildMonthWeeks(yearMonth);

// 获取当月第一天
const auto firstDay = yearMonth / 1d;
// 获取当月最后一天
const auto lastDay = chrono::year_month_day(yearMonth / chrono::last);

// 输出格式化的标题(年份与月份)
std::string titleLine = std::format("** {:%Y-%m} **", yearMonth);
os << std::format("{:^35}", titleLine) << std::endl;
os << std::format("{:->35}", "") << std::endl;

// 输出日历表头(从周一到周日)
std::vector<std::string> headerLineParts;
for (const auto& weekday : Weekdays) {
headerLineParts.push_back(std::format(ZhCNLocale, "{:L%a}", weekday));
}
// 利用renderWeekLine生成格式化的表头(控制7个元素的位置与宽度)
std::string headerLine = renderWeekLine(headerLineParts);
os << headerLine << std::endl;
os << std::format("{:->35}", "") << std::endl;

// 遍历monthWeeks,调用renderWeek生成日历中的每一行
for (const auto& currentWeek : monthWeeks) {
std::string weekLine = renderWeek(currentWeek, yearMonth);
os << weekLine << std::endl;
}

// 返回渲染的字符串
return os.str();
}

// 渲染日历中的某一周
std::string renderWeek(const std::vector<chrono::year_month_day> week, chrono::year_month yearMonth) {
// 获取当月第一天
const auto firstDay = yearMonth / 1d;
// 获取当月最后一天
const auto lastDay = chrono::year_month_day(yearMonth / chrono::last);

// 生成本周的所有日期
std::vector<std::string> weekLine;
for (const auto& currentDay : week) {
std::string inCurrentMonthFlag = currentDay >= firstDay && currentDay <= lastDay ? "*" : "";

weekLine.push_back(std::format("{}{:>2}", inCurrentMonthFlag, currentDay.day()));
}

// 利用renderWeekLine生成格式化的本周日期
return renderWeekLine(weekLine);
}

// 生成某一周的格式化输出
std::string renderWeekLine(const std::vector<std::string>& weekLine) {
std::string renderResult;
for (const auto& weekLineItem : weekLine) {
// 所有内容按照宽度为4右对齐
renderResult.append(std::format("{:>4} ", weekLineItem));
}

return renderResult;
}
代码中的注释已经比较详细了,所以后面我们只讨论一些重点实现。
代码第5行,作用是获取当月的所有周的数组,utils::buildMonthWeeks属于日历计算模块,我们后面详细解释其实现。
在代码第8行,用yearMonth / 1d生成当月的第一天,返回的类型就是year_month_day。其中1d是一个自定义文字量,定义在名称空间std::literals::chrono_literals中,相当于chrono::days(1)的语法糖,表示某个月1号。yearMonth / 1d中的/是yearMonth的操作符重载,表示当月第一天。
在代码第10行,用yearMonth / chrono::last表示当月最后一天。其中,chrono::last是C++20中引入的,用来表示一个时间序列末尾的标记。最后,我们调用chrono::year_month_day转换成year_month_day。
代码第18到25行,调用了renderWeekLine帮助我们生成格式化的标题,因为输出的日历需要将一周七天按照一定的布局输出到控制台上,该函数可以帮助我们完成渲染布局。代码第20行利用了locale输出中文,有兴趣可以自己看RenderUtils.cpp中的定义以及locale相关内容。
在代码第28到31行,生成日历的内容。由于日历里每周输出到一行中,因此这里遍历当月所有周,调用renderWeek完成一周的布局输出。
renderWeekLine函数实现也会比较简单,输入参数是一个包含N个字符串的数组,数组元素就是在日历中的每一个格子中需要输出的内容(比如表头的周几或者日期),这里主要通过format将每一格内容的输出宽度限制在4,确保布局工整。
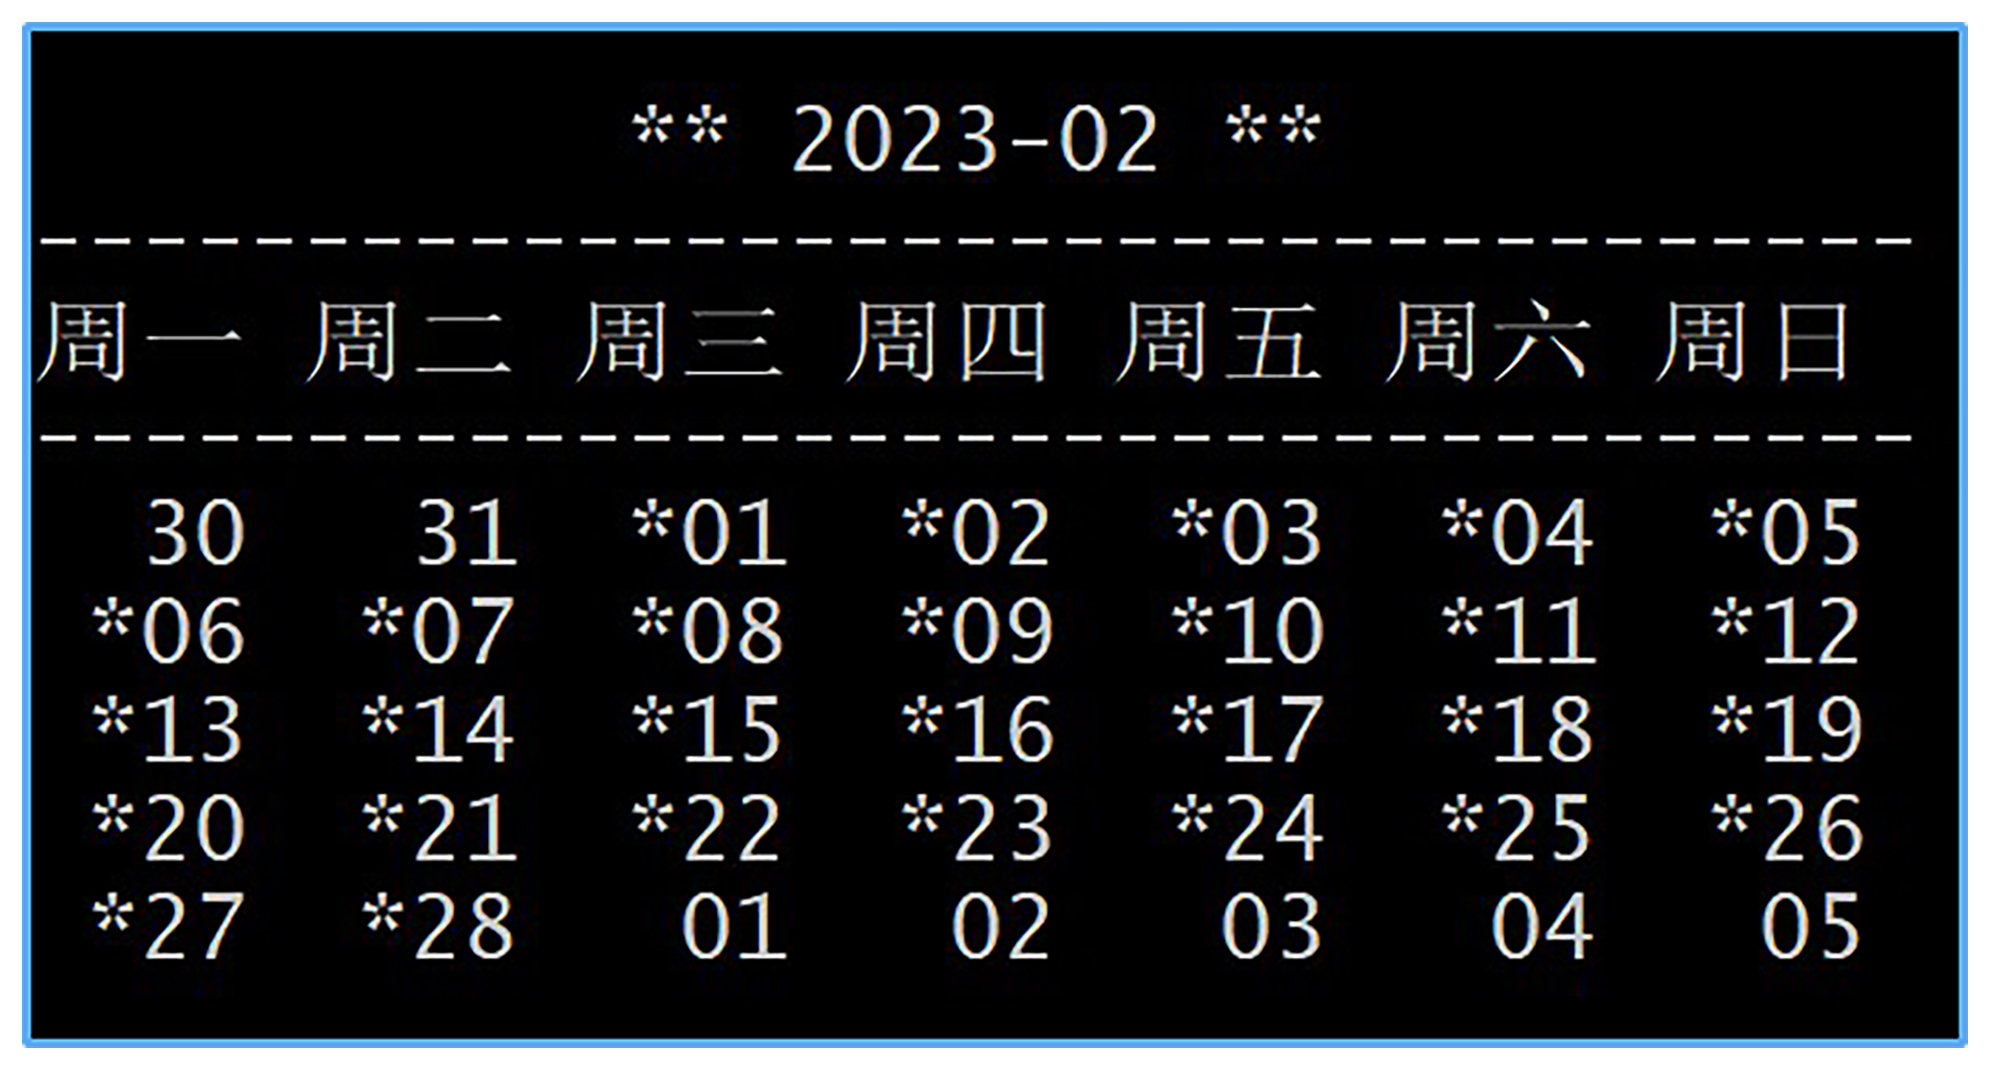
渲染出来的效果如下图所示。
最后,我们看一下utils::buildMonthWeeks的实现,代码实现在src/utils/CalendarUtils.cpp中。
#include "utils/CalendarUtils.h"
#include <format>

namespace chrono = std::chrono;
using namespace std::literals::chrono_literals;

static uint32_t MaxWeekdayIndex = 6;

namespace calendarpp::utils {
std::vector<std::vector<std::chrono::year_month_day>> buildMonthWeeks(std::chrono::year_month yearMonth) {
// 获取当月第一天
const auto firstDay = yearMonth / 1d;
// 获取当月最后一天
const auto lastDay = chrono::year_month_day(yearMonth / chrono::last);

std::vector<std::vector<chrono::year_month_day>> monthWeeks;

// 将当月第一天设定为当日
auto currentDay = firstDay;
// 当每周当日超出当月最后一天时中止循环
while (currentDay <= lastDay) {
// 每次循环都计算出当日所在周的7天(周一到周日)
std::vector<chrono::year_month_day> currentMonthWeek;

// 通过weekday获取某一天是周几
auto currentWeekday = chrono::weekday{ std::chrono::sys_days{ currentDay } };
// 通过iso_encoding获取周几的编码(1-7)
auto currentWeekdayIndex = currentWeekday.iso_encoding() - 1;

// 计算本周第一天
auto firstDayOfWeek = chrono::year_month_day{
std::chrono::sys_days{ currentDay } - chrono::days(currentWeekdayIndex)
};

currentDay = firstDayOfWeek;
// 计算出本周的所有日期并添加到currentMonthWeek中
for (uint32_t weekdayIndex = 0; weekdayIndex <= MaxWeekdayIndex; ++weekdayIndex) {
currentMonthWeek.push_back(currentDay);

currentDay = chrono::year_month_day{
std::chrono::sys_days{ currentDay } + chrono::days(1)
};
}
// 将计算好的当前周添加到monthWeeks中
monthWeeks.push_back(currentMonthWeek);
}

return monthWeeks;
}
}
在这段代码中,我们会生成当月的所有周,通过Calendar完成了大量的日期计算,相比自己实现格里高利历要方便不少。
导出日历
除了展示日历,我们继续讨论序列化日历的实现。在src/actions/ExportAction.cpp中定义了导出菜单项的代码实现。
#include "actions/ExportAction.h"
#include "utils/RenderUtils.h"
#include "utils/IOUtils.h"

#include <chrono>
#include <iostream>
#include <string>

namespace chrono = std::chrono;

namespace calendarpp::actions {
void exportCurrentYear() {
// 获取当前时间
chrono::time_point now{ chrono::system_clock::now() };
// 将时间转换为year_month_day
chrono::year_month_day ymd{ chrono::floor<chrono::days>(now) };
// 获取当前年份
chrono::year currentYear = ymd.year();

// 提示并读取用户输入
std::cout << "请输入导出文件路径: ";
std::string filePath;
std::getline(std::cin, filePath);

// 调用IO模块将renderYear的渲染结果输出到文件中
utils::writeFile(filePath, utils::renderYear(currentYear));

std::cout << std::format("已将日历导出到文件中: {}", filePath) << std::endl;
std::cout << std::endl;
}
}
这段代码非常简单,核心是通过renderYear渲染当年的日历,然后通过writeFile以UTF-8编码写入到文件中。
函数renderYear实现在src/utils/RenderUtils.cpp中,相关代码如下所示。
// 定义一年12个月的month常量
static std::vector<chrono::month> Months = {
chrono::January,
chrono::February,
chrono::March,
chrono::April,
chrono::May,
chrono::June,
chrono::July,
chrono::August,
chrono::September,
chrono::October,
chrono::November,
chrono::December,
};

std::string renderYear(std::chrono::year year) {
std::ostringstream os;

// 输出格式化的标题(年份)
std::string titleLine = std::format("**** {:%Y}年 ****", year);
os << std::format("{:^35}", titleLine) << std::endl;
os << std::format("{:=^35}\n", "") << std::endl;

// 调用renderYearMonths并行生成12个月的日历
std::vector<std::string> renderedMonths(Months.size(), "");
renderYearMonths(renderedMonths, year);

// 将12个月的日历输入到输出流中
for (const std::string& renderedMonth : renderedMonths) {
os << renderedMonth;
os << std::endl;
}

// 返回渲染好的字符串
return os.str();
}

static void renderYearMonths(std::vector<std::string>& renderedMonths, chrono::year year) {
std::vector<std::jthread> renderThreads;

int32_t monthIndex = 0;
for (const auto& currentMonth : Months) {
auto currentYearMonth = year / currentMonth;
auto& renderedMonth = renderedMonths[monthIndex];

// 创建jthread对象,开启计算线程,每个线程负责生成一个月的日历
renderThreads.push_back(std::jthread([currentYearMonth, &renderedMonth] {
renderedMonth = renderMonth(currentYearMonth);
}));

++monthIndex;
}

// 退出函数时,所有jthread对象会自动等待计算完成然后退出
}
我们重点看一下renderYearMonths函数的实现。
该函数定义了一个jthread数组,然后循环创建了12个线程,用于分别调用renderMonth渲染各自月份的日历。由于jthread会在析构时自动等待本线程完成。因此,我们并不需要去join这些线程,在退出renderYearMonths之前,所有的工作线程肯定能结束任务。
最后看一下writeFile的实现,代码在src/utils/IOUtils.cpp中。
#include "utils/IOUtils.h"
#include "Logger.h"

#include <filesystem>
#include <format>
#include <iostream>

namespace fs = std::filesystem;

namespace calendarpp::utils {
void writeFile(const std::string& filePath, const std::string& fileContent) {
auto& logger = getLogger();

// 检测文件是否存在
if (fs::exists(filePath)) {
logger.warning(std::format("Override existed file: {}", filePath));
}

// 由于源代码使用UTF-8,生成的字符串就是UTF-8,因此可以直接强制类型转换构建u8string
std::u8string utf8FileContent(reinterpret_cast<const char8_t*>(fileContent.c_str()), fileContent.size());

// 将u8string以二进制形式写入到文件中
std::ofstream outputFile(filePath, std::ios::binary);
outputFile.write(reinterpret_cast<char*>(utf8FileContent.data()), utf8FileContent.size());
}
}
在这段代码中,首先通过文件系统库中的std::filsystem::exists检测文件是否存在,如果存在则提示用户会覆盖原有文件。
接着,将字符串转换成u8string,由于源代码使用UTF-8,生成的字符串就是UTF-8。因此,我们可以直接强制类型转换构建u8string。
最后,将u8string的data强制类型转换为char*,并通过二进制形式写入到文件中。
总结
在这一讲中,我们通过一个工程,串讲了一系列C++20带来的重要库变更。我们在原有的日志框架基础上,追加了source_location,用于记录打印日志时代码的所在位置。除此之外,将传统的输出流替换成sync stream,就可以轻松实现输出的线程同步控制。
在实现的过程中,我们还使用了TimeZone获取带时区的本地时间,并通过使用Calendar完成日历计算。这些针对chrono的标准库补充,大大降低了时间处理的复杂度。
最后,我们利用u8string,轻松实现了UTF-8编码的文本导出。
通过这些案例,我们可以感受到,现代 C++的库变更建立在新的核心语言特性基础上,为我们日常编程工作提供了极大的便利。避免造轮子,提升编程效率——这些对于库的核心变更来说是核心议题,所以我们应该保持对标准库演进的持续关注。
课后思考
现在日历中显示的时间是包含时区信息的本地时间,如果我们希望日历中显示的当前时间是UTC时间(日历显示依然按照本地时间计算,不需要变化),我们要对代码做什么改动?
欢迎给出你的方案,与大家一起分享。我们一同交流。下一讲见!
- 李云龙 👍(1) 💬(1)
把本地时间的显示换成UTC时间,只需修改RenderUtils.cpp中的 renderNow() 函数:把chrono::system_clock::now() 替换为 auto utcNow = std::chrono::utc_clock::now(); 同时把时区信息去除。
2024-01-28 - 三笑三引伏兵 👍(0) 💬(2)
osyncstream好像是在调用emit()和析构时才会将自身缓冲区的内容传输给被包装的缓冲 在日志模块中的话不会导致缓冲区一直增长吗 一般怎么解决呢
2024-12-07 - peter 👍(0) 💬(1)
C++20之前没有Calendar吗? 文中“Calendar 是 C++20 引入到 chrono 中新的库特性”,之前没有Calendar吗?有点小怀疑。如果没有,以前是怎么处理日历问题的?
2023-03-07