12 Pipeline与Valve:如何实现容器间的调用、事务管理、权限验证?
你好,我是郭屹。今天我们继续手写MiniTomcat。
上一节课我们把项目结构进一步抽象成两层Container,分别是Context和Wrapper,从而实现一个服务器管理多个容器,而容器又可以管理多个Servlet,层层嵌套,提升了容器的扩展性。然后我们在这个基础上,参考Tomcat的项目结构,进行对应的调整,让它更贴近Tomcat源码本身。
接下来我们再转向通用部分的组件,首先考虑的就是日志。日志可以有效帮助我们调试程序运行过程中的问题,在合理的地方打印日志也可以帮助我们了解服务器的运行情况,所以我们接下来会定义通用的日志组件。
在日志组件定义完毕后,我们紧接着会学习职责链模式在Tomcat中的应用,当服务器要调用某个具体的Servlet时,是经过这些Contaienr一层一层调用的,所以Tomcat中每个Container的invoke()都是通过职责链模式调用的。
我们一起来动手实现。
项目结构
这节课我们新增Logger、Pipeline、Valve、ValveContext接口,以及处理日志Logger与Valve的实现类等众多Java文件,具体内容后面我们会详细说明。你可以看一下现在这个项目的目录结构。
MiniTomcat
├─ src
│  ├─ main
│  │  ├─ java
│  │  │  ├─ com
│  │  │  │  ├─ minit
│  │  │  │  │  ├─ connector
│  │  │  │  │  │  ├─ http
│  │  │  │  │  │  │  ├─ DefaultHeaders.java
│  │  │  │  │  │  │  ├─ HttpConnector.java
│  │  │  │  │  │  │  ├─ HttpHeader.java
│  │  │  │  │  │  │  ├─ HttpProcessor.java
│  │  │  │  │  │  │  ├─ HttpRequestImpl.java
│  │  │  │  │  │  │  ├─ HttpRequestLine.java
│  │  │  │  │  │  │  ├─ HttpResponseImpl.java
│  │  │  │  │  │  │  ├─ ServletProcessor.java
│  │  │  │  │  │  │  ├─ SocketInputStream.java
│  │  │  │  │  │  │  ├─ StatisResourceProcessor.java
│  │  │  │  │  │  ├─ HttpRequestFacade.java
│  │  │  │  │  │  ├─ HttpResponseFacade.java
│  │  │  │  │  ├─ core
│  │  │  │  │  │  ├─ ContainerBase.java
│  │  │  │  │  │  ├─ StandardContext.java
│  │  │  │  │  │  ├─ StandardContextValve.java
│  │  │  │  │  │  ├─ StandardPipeline.java
│  │  │  │  │  │  ├─ StandardWrapper.java
│  │  │  │  │  │  ├─ StandardWrapperValve.java
│  │  │  │  │  ├─ logger
│  │  │  │  │  │  ├─ Constants.java
│  │  │  │  │  │  ├─ FileLogger.java
│  │  │  │  │  │  ├─ LoggerBase.java
│  │  │  │  │  │  ├─ SystemErrLogger.java
│  │  │  │  │  │  ├─ SystemOutLogger.java
│  │  │  │  │  ├─ session
│  │  │  │  │  │  ├─ StandardSession.java
│  │  │  │  │  │  ├─ StandardSessionFacade.java
│  │  │  │  │  ├─ startup
│  │  │  │  │  │  ├─ BootStrap.java
│  │  │  │  │  ├─ util
│  │  │  │  │  │  ├─ CookieTools.java
│  │  │  │  │  │  ├─ StringManager.java
│  │  │  │  │  ├─ valves
│  │  │  │  │  │  ├─ AccessLogValve.java
│  │  │  │  │  │  ├─ ValveBase.java
│  │  │  │  ├─ Connector.java
│  │  │  │  ├─ Container.java
│  │  │  │  ├─ Context.java
│  │  │  │  ├─ Logger.java
│  │  │  │  ├─ Pipeline.java
│  │  │  │  ├─ Request.java
│  │  │  │  ├─ Response.java
│  │  │  │  ├─ Session.java
│  │  │  │  ├─ Valve.java
│  │  │  │  ├─ ValveContext.java
│  │  │  │  ├─ Wrapper.java
│  │  ├─ resources
│  ├─ test
│  │  ├─ java
│  │  │  ├─ test
│  │  │  │  ├─ HelloServlet.java
│  │  │  │  ├─ TestServlet.java
│  │  ├─ resources
├─ webroot
│  ├─ test
│  │  ├─ HelloServlet.class
│  │  ├─ TestServlet.class
│  ├─ hello.txt
├─ pom.xml
引入日志组件
首先我们开始着手定义我们服务器的通用日志组件,先看一下Logger接口的定义。
package com.minit;
public interface Logger {
public static final int FATAL = Integer.MIN_VALUE;
public static final int ERROR = 1;
public static final int WARNING = 2;
public static final int INFORMATION = 3;
public static final int DEBUG = 4;
public String getInfo();
public int getVerbosity();
public void setVerbosity(int verbosity);
public void log(String message);
public void log(Exception exception, String msg);
public void log(String message, Throwable throwable);
public void log(String message, int verbosity);
public void log(String message, Throwable throwable, int verbosity);
}
我们可以看到接口主要定义了不同的日志级别,以及重载了多个log方法,支持不同的传参。
接下来我们在Container接口里新增与Logger相关的Getter和Setter方法定义,用作Container的通用实现,你可以看一下示例代码。
package com.minit;
public interface Container {
public Logger getLogger();
public void setLogger(Logger logger);
}
有了这些定义之后,我们在之前已经定义好的/com/minit/logger目录下提供LoggerBase作为Logger接口的抽象实现类,主体如下:
package com.minit.logger;
public abstract class LoggerBase implements Logger {
protected int debug = 0;
protected static final String info = "com.minit.logger.LoggerBase/1.0";
protected int verbosity = ERROR;
public int getDebug() {
return (this.debug);
}
public void setDebug(int debug) {
this.debug = debug;
}
public String getInfo() {
return (info);
}
public int getVerbosity() {
return (this.verbosity);
}
public void setVerbosity(int verbosity) {
this.verbosity = verbosity;
}
public void setVerbosityLevel(String verbosity) {
if ("FATAL".equalsIgnoreCase(verbosity))
this.verbosity = FATAL;
else if ("ERROR".equalsIgnoreCase(verbosity))
this.verbosity = ERROR;
else if ("WARNING".equalsIgnoreCase(verbosity))
this.verbosity = WARNING;
else if ("INFORMATION".equalsIgnoreCase(verbosity))
this.verbosity = INFORMATION;
else if ("DEBUG".equalsIgnoreCase(verbosity))
this.verbosity = DEBUG;
}
//这个log方法由上层业务程序员实现
public abstract void log(String msg);

public void log(Exception exception, String msg) {
log(msg, exception);
}
//核心方法,printStackTrace,然后调用一个业务实现的log(msg)
public void log(String msg, Throwable throwable) {
CharArrayWriter buf = new CharArrayWriter();
PrintWriter writer = new PrintWriter(buf);
writer.println(msg);
throwable.printStackTrace(writer);
Throwable rootCause = null;
if  (throwable instanceof ServletException)
rootCause = ((ServletException) throwable).getRootCause();
if (rootCause != null) {
writer.println("----- Root Cause -----");
rootCause.printStackTrace(writer);
}
log(buf.toString());
}
public void log(String message, int verbosity) {
if (this.verbosity >= verbosity)
log(message);
}
public void log(String message, Throwable throwable, int verbosity) {
if (this.verbosity >= verbosity)
log(message, throwable);
}
}
public void log(String msg, Throwable throwable)这个方法是核心,根据具体实现可以知道,当存在Exception异常时,后端会调用printStackTrace抛出异常,然后调用abstract void log(String msg)方法,记录日志,这个方法是抽象方法,所以交给具体的实现类去记录。
接下来我们再定义通用类,为后续定义实现类做准备。首先在/com/minit/util包内定义StringManager工具类,这个类的作用在于提供单独的实例用来管理各自包下的日志打印,只需要调用getManager方法即可,不需要频繁创建日志打印对象。主体内容如下所示:
package com.minit.util;
public class StringManager {
private StringManager(String packageName) {
}
public String getString(String key) {
if (key == null) {
String msg = "key is null";
throw new NullPointerException(msg);
}
String str = null;
str = key;
return str;
}
//用参数拼串
public String getString(String key, Object[] args) {
String iString = null;
String value = getString(key);
try {
//消除null对象
Object nonNullArgs[] = args;
for (int i=0; i<args.length; i++) {
if (args[i] == null) {
if (nonNullArgs==args) nonNullArgs=(Object[])args.clone();
nonNullArgs[i] = "null";
}
}
//拼串
iString = MessageFormat.format(value, nonNullArgs);
} catch (IllegalArgumentException iae) {
StringBuffer buf = new StringBuffer();
buf.append(value);
for (int i = 0; i < args.length; i++) {
buf.append(" arg[" + i + "]=" + args[i]);
}
iString = buf.toString();
}
return iString;
}
public String getString(String key, Object arg) {
Object[] args = new Object[] {arg};
return getString(key, args);
}
public String getString(String key, Object arg1, Object arg2) {
Object[] args = new Object[] {arg1, arg2};
return getString(key, args);
}
public String getString(String key, Object arg1, Object arg2,
Object arg3) {
Object[] args = new Object[] {arg1, arg2, arg3};
return getString(key, args);
}
public String getString(String key, Object arg1, Object arg2,
Object arg3, Object arg4) {
Object[] args = new Object[] {arg1, arg2, arg3, arg4};
return getString(key, args);
}
private static Map<String,StringManager> managers = new ConcurrentHashMap<>();
//每个package有相应的StringManager
public synchronized static StringManager getManager(String packageName) {
StringManager mgr = (StringManager)managers.get(packageName);
if (mgr == null) {
mgr = new StringManager(packageName);
managers.put(packageName, mgr);
}
return mgr;
}
}
再之后,我们为Logger分别定义Constants常量类、SystemErrLogger标准错误日志类,还有SystemOutLogger标准输出日志类,这几个类目前的定义比较简单,你可以看一下。
Constants常量类:
package com.minit.logger;
public class Constants {
public static final String Package = "com.minit.logger";
}
SystemErrLogger标准错误日志类:
package com.minit.logger;
public class SystemErrLogger extends LoggerBase {
protected static final String info =
"com.minit.logger.SystemErrLogger/0.1";
public void log(String msg) {
System.err.println(msg);
}
}
SystemOutLogger标准输出日志类:
package com.minit.logger;
public class SystemOutLogger extends LoggerBase {
protected static final String info =
"com.minit.logger.SystemOutLogger/1.0";
public void log(String msg) {
System.out.println(msg);
}
}
有了前面的铺垫,接下来我们在这里定义LoggerBase其中一个实现类:FileLogger,这个类可以做到根据时间自动生成日志文件,你可以参考我给出的代码主体部分。
package com.minit.logger;
public class FileLogger extends LoggerBase{
private String date = "";
private String directory = "logs";
protected static final String info = "com.minit.logger.FileLogger/0.1";
private String prefix = "minit.";
private StringManager sm = StringManager.getManager(Constants.Package);
private boolean started = false;
private String suffix = ".log";
private boolean timestamp = true;
private PrintWriter writer = null;
public String getDirectory() {
return (directory);
}
public void setDirectory(String directory) {
String oldDirectory = this.directory;
this.directory = directory;
}
public String getPrefix() {
return (prefix);
}
public void setPrefix(String prefix) {
String oldPrefix = this.prefix;
this.prefix = prefix;
}
public String getSuffix() {
return (suffix);
}
public void setSuffix(String suffix) {
String oldSuffix = this.suffix;
this.suffix = suffix;
}
public boolean getTimestamp() {
return (timestamp);
}
public void setTimestamp(boolean timestamp) {
boolean oldTimestamp = this.timestamp;
this.timestamp = timestamp;
}
public void log(String msg) {
// 当前时间Construct the timestamp we will use, if requested
Timestamp ts = new Timestamp(System.currentTimeMillis());
String tsString = ts.toString().substring(0, 19);
String tsDate = tsString.substring(0, 10);
// 如果日期变化了,新生成一个log文件
// If the date has changed, switch log files
if (!date.equals(tsDate)) {
synchronized (this) {
if (!date.equals(tsDate)) {
close();
date = tsDate;
open();
}
}
}
// 记录日志,带上时间戳
if (writer != null) {
if (timestamp) {
writer.println(tsString + " " + msg);
} else {
writer.println(msg);
}
}
}
private void close() {
if (writer == null)
return;
writer.flush();
writer.close();
writer = null;
date = "";
}
private void open() {
File dir = new File(directory);
if (!dir.isAbsolute())
dir = new File(System.getProperty("catalina.base"), directory);
dir.mkdirs();
// 打开日志文件 Open the current log file
try {
String pathname = dir.getAbsolutePath() + File.separator +
prefix + date + suffix;
writer = new PrintWriter(new FileWriter(pathname, true), true);
} catch (IOException e) {
writer = null;
}
}
}
根据定义的属性,还有void log(String msg)方法,服务器会在 /logs/ 目录下生成一个类似minit.yyyy-MM-dd.log格式的日志文件,内部标明了这个文件创建的日期,如果记录的这个日期和当前日期不一样就关闭当前文件,同时再创建一个新的文件,这样就做到每天的日志文件不同,加以区分,方便定位问题。
里面的open()方法可以用来打开一个文件,close()则用于关闭。
最后我们在BootStrap中创建这个Logger,并且指派给Container使用,用来打印日志。
package com.minit.startup;
public class BootStrap {
public static final String WEB_ROOT =
System.getProperty("user.dir") + File.separator + "webroot";
private static int debug = 0;
public static void main(String[] args) {
if (debug >= 1)
log(".... startup ....");
HttpConnector connector = new HttpConnector();
StandardContext container = new StandardContext();
connector.setContainer(container);
container.setConnector(connector);
Logger logger = new FileLogger();
container.setLogger(logger);
connector.start();
}
private static void log(String message) {
System.out.print("Bootstrap: ");
System.out.println(message);
}
private static void log(String message, Throwable exception) {
log(message);
exception.printStackTrace(System.out);
}
}
在这里,我们把Logger传给Container的原因在于,多个Container可以使用不同的Logger,针对不同的目录和文件进行操作。
最后我们再完善一些代码,Logger的定义就改造完毕了。
首先我们在ContainerBase中增加与日志相关的代码。
package com.minit.core;
public abstract class ContainerBase implements Container {
//ContainerBase中增加与日志相关的代码
protected Logger logger = null;
public Logger getLogger() {
if (logger != null)
return (logger);
if (parent != null)
return (parent.getLogger());
return (null);
}
public synchronized void setLogger(Logger logger) {
Logger oldLogger = this.logger;
if (oldLogger == logger)
return;
this.logger = logger;
}
protected void log(String message) {
Logger logger = getLogger();
if (logger != null)
logger.log(logName() + ": " + message);
else
System.out.println(logName() + ": " + message);
}

protected void log(String message, Throwable throwable) {
Logger logger = getLogger();
if (logger != null)
logger.log(logName() + ": " + message, throwable);
else {
System.out.println(logName() + ": " + message + ": " + throwable);
throwable.printStackTrace(System.out);
}
}
protected String logName() {
String className = this.getClass().getName();
int period = className.lastIndexOf(".");
if (period >= 0)
className = className.substring(period + 1);
return (className + "[" + getName() + "]");
}
}
再在StandardContext中增加与日志相关的代码。
package com.minit.core;
public class StandardContext extends ContainerBase implements Context {
public StandardContext() {
try {
// create a URLClassLoader
URL[] urls = new URL[1];
URLStreamHandler streamHandler = null;
File classPath = new File(Bootstrap.WEB_ROOT);
String repository = (new URL("file", null, classPath.getCanonicalPath() + File.separator)).toString() ;
urls[0] = new URL(null, repository, streamHandler);
loader = new URLClassLoader(urls);
} catch (IOException e) {
System.out.println(e.toString() );
}
log("Container created.");
}
}
在HttpConnector中增加与日志相关的代码。
public class HttpConnector implements Connector, Runnable {
private String info = "com.minit.connector.http.HttpConnector/0.1";
private int port = 8080;
int minProcessors = 3;
int maxProcessors = 10;
int curProcessors = 0;
Deque<HttpProcessor> processors = new ArrayDeque<>();
public static Map<String, HttpSession> sessions = new ConcurrentHashMap<>();
Container container = null;
private String threadName = null;

//启动connector,记录启动日志
public void start() {
threadName = "HttpConnector[" + port + "]";
log("httpConnector.starting  " + threadName);
Thread thread = new Thread(this);
thread.start();
}

private HttpProcessor newProcessor() {
HttpProcessor initprocessor = new HttpProcessor(this);
initprocessor.start();
processors.push(initprocessor);
curProcessors++;
log("newProcessor");
return ((HttpProcessor) processors.pop());
}
//记录日志
private void log(String message) {
Logger logger = container.getLogger();
String localName = threadName;
if (localName == null)
localName = "HttpConnector";
if (logger != null)
logger.log(localName + " " + message);
else
System.out.println(localName + " " + message);
}
//记录日志
private void log(String message, Throwable throwable) {
Logger logger = container.getLogger();
String localName = threadName;
if (localName == null)
localName = "HttpConnector";
if (logger != null)
logger.log(localName + " " + message, throwable);
else {
System.out.println(localName + " " + message);
throwable.printStackTrace(System.out);
}
}
public Container getContainer() {
return this.container;
}
public void setContainer(Container container) {
this.container = container;
}
@Override
public String getInfo() {
return this.info;
}
}
引入日志组件后,我们转向第二部分,也是Tomcat设计里的一个特色:职责链。
引入职责链模式
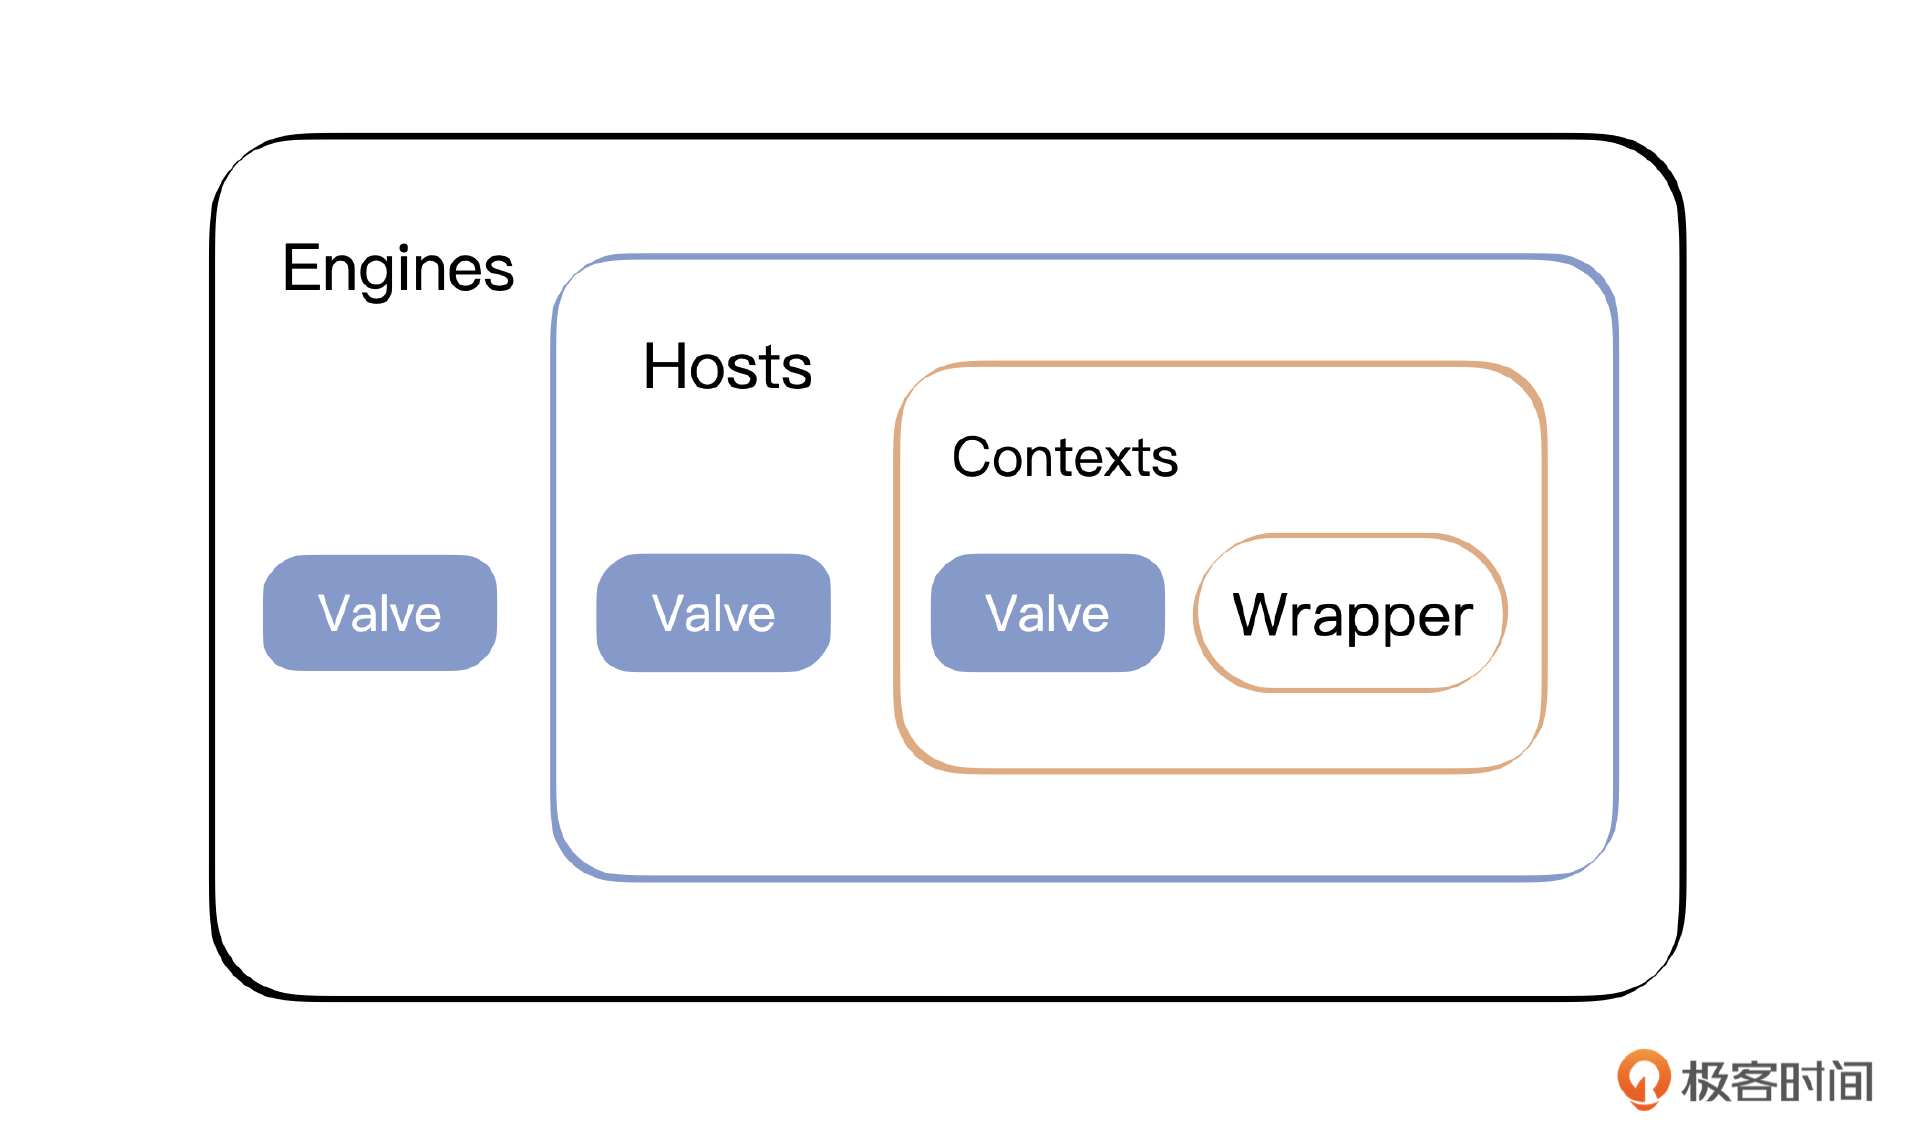
当服务器要调用某个具体的Servlet的时候,是先经过这些container的invoke()方法,一层一层调用的。每一个Container内部在真正的任务执行前(如执行Servlet),都会途径过滤层,这些层叫作Valve,一个一个地执行Valve之后再执行Servlet,这样可以给Container做一些过滤的操作,比如权限校验、日志打印、报错输出等。
在Tomcat中,还引入了一个概念——Pipeline,Container的invoke()方法没有硬编码,而是调用Pipeline的invoke方法。
public void invoke(Request request, Response response) throws IOException, ServletException {
pipeline.invoke(request, response);
}
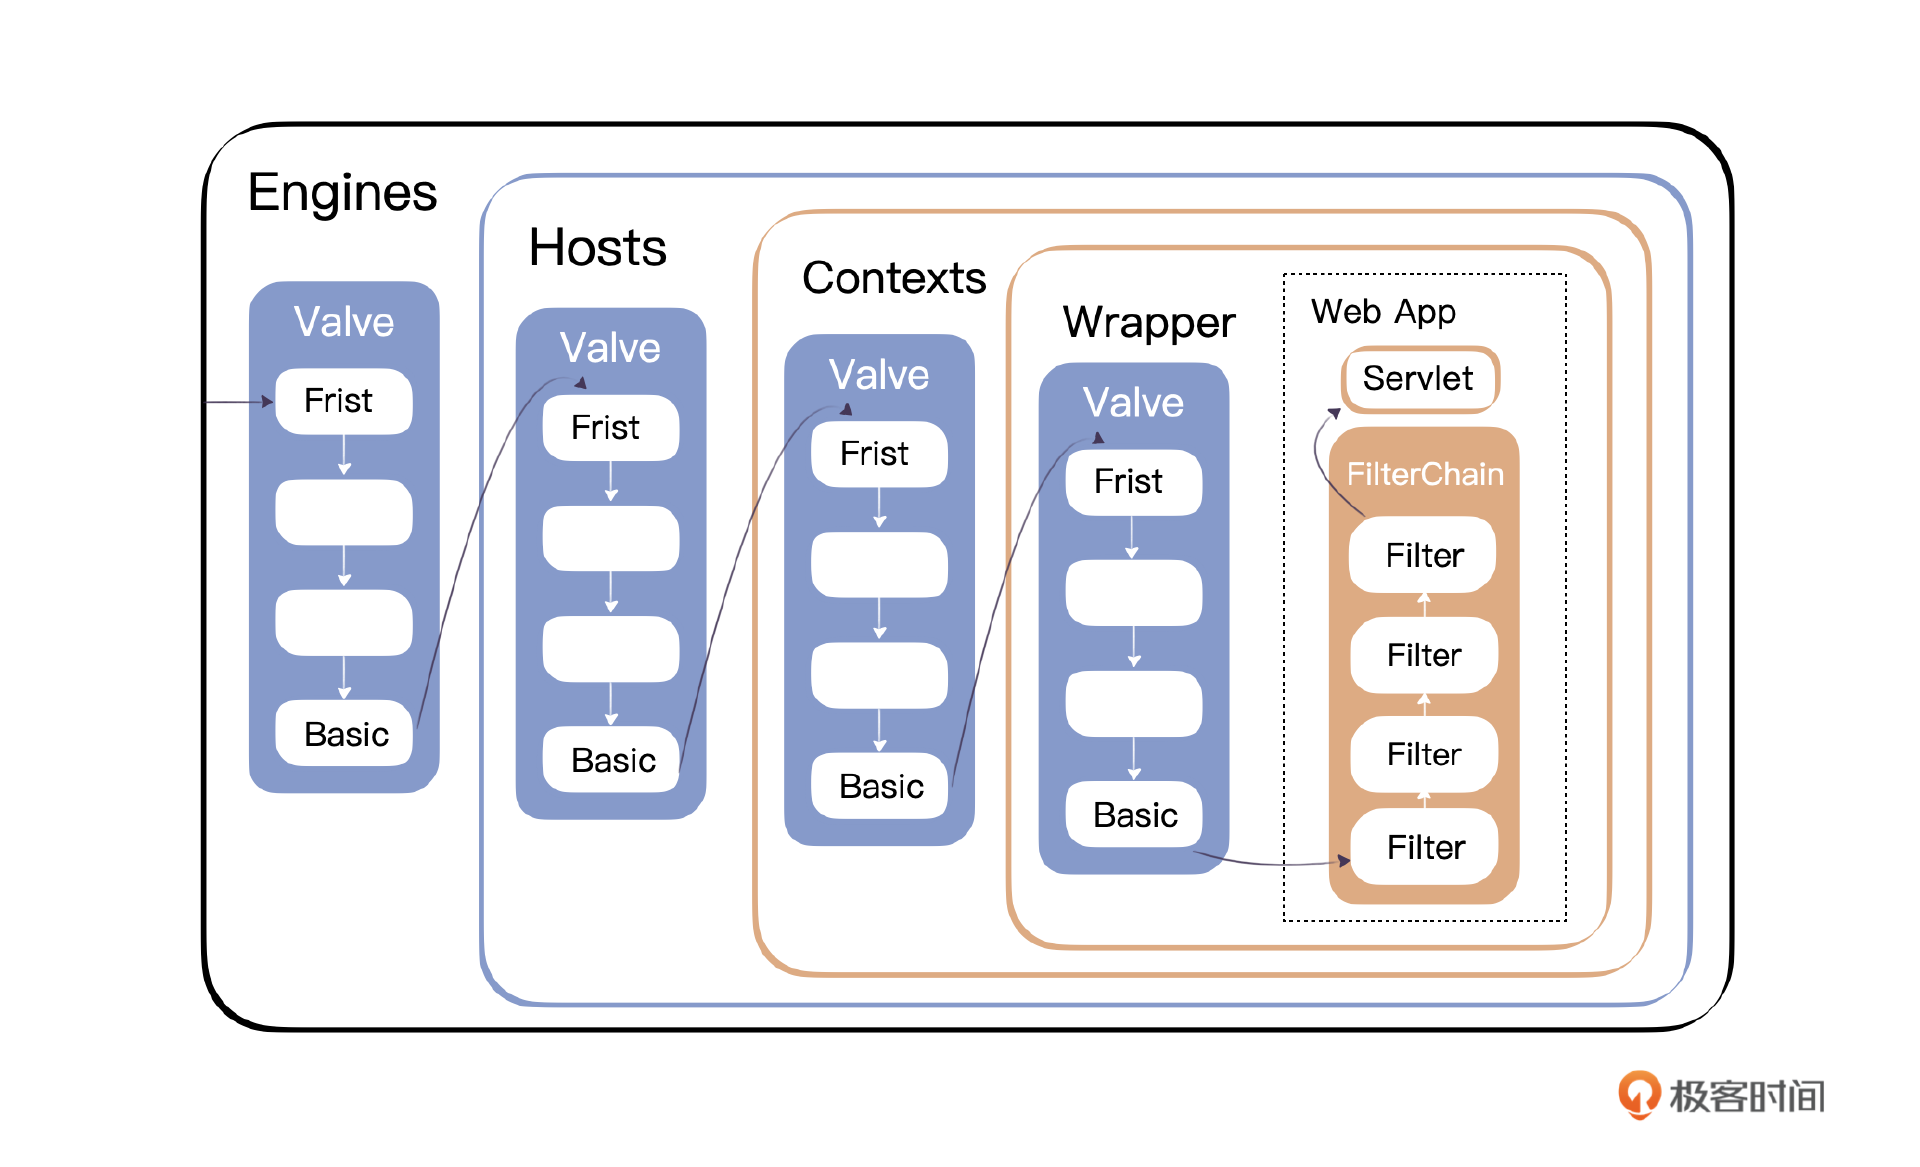
简单来讲,就是每一层Container都有一个Pipeline,也是一根链条,这根链条是许多Valve串起来的。调用某个Container的invoke(),就是找到Pipeline的第一个Valve进行调用,第一个Valve会调用下一个,一个一个传下去,到最后一个Basic Valve,然后调用下一层容器,直到结束。
而这个Basic Valve则是在每个Container里面都默认存在的,通过Pipeline来依次调用每一个Valve,这就是职责链模式,而且这种方式也像Pipeline名称一样,流水线似的从前往后。
这里我们先定义通用的Valve、ValveContext与Pipeline接口。Valve接口表示的Container中的一段用户增加的逻辑,主要就是一个invoke方法。
package com.minit;
public interface Valve {
public String getInfo();
public Container getContainer();
public void setContainer(Container container);
public void invoke(Request request, Response response,ValveContext context)
throws IOException, ServletException;
}
ValveContext接口负责调用下一个Valve,这样就会形成一系列对Valve的调用。
package com.minit;
import java.io.IOException;
import javax.servlet.ServletException;
public interface ValveContext {
public String getInfo();
public void invokeNext(Request request, Response response) throws IOException, ServletException;
}
Pipeline表示的是Container中的Valve链条,其中有特殊的basic。Pipeline启动Valve链条的调用。
package com.minit;
import java.io.IOException;
import javax.servlet.ServletException;
public interface Pipeline {
public Valve getBasic();
public void setBasic(Valve valve);
public void addValve(Valve valve);
public Valve[] getValves();
public void invoke(Request request, Response response) throws IOException, ServletException;
public void removeValve(Valve valve);
}
接着定义实现基类——ValveBase。
package com.minit.valves;
public abstract class ValveBase implements Valve {
protected Container container = null;
protected int debug = 0;
protected static String info = "com.minit.valves.ValveBase/0.1";
public Container getContainer() {
return (container);
}
public void setContainer(Container container) {
this.container = container;
}
public int getDebug() {
return (this.debug);
}
public void setDebug(int debug) {
this.debug = debug;
}
public String getInfo() {
return (info);
}
}
结合之前的内容,我们将Log与Valve结合,定义AccessLogValve类。这个Valve的作用是记录日志,你可以看一下程序的主体。
package com.minit.valves;
public final class AccessLogValve extends ValveBase {
//下面的属性都是与访问日志相关的配置参数
public static final String COMMON_ALIAS = "common";
public static final String COMMON_PATTERN = "%h %l %u %t \"%r\" %s %b";
public static final String COMBINED_ALIAS = "combined";
public static final String COMBINED_PATTERN = "%h %l %u %t \"%r\" %s %b \"%{Referer}i\" \"%{User-Agent}i\"";
public AccessLogValve() {
super();
setPattern("common");
}
private String dateStamp = "";
private String directory = "logs";
protected static final String info =
"com.minit.valves.AccessLogValve/0.1";
protected static final String months[] =
{ "Jan", "Feb", "Mar", "Apr", "May", "Jun",
"Jul", "Aug", "Sep", "Oct", "Nov", "Dec" };
private boolean common = false;
private boolean combined = false;
private String pattern = null;
private String prefix = "access_log.";
private String suffix = "";
private PrintWriter writer = null;
private DateTimeFormatter dateFormatter = null;
private DateTimeFormatter dayFormatter = null;
private DateTimeFormatter monthFormatter = null;
private DateTimeFormatter yearFormatter = null;
private DateTimeFormatter timeFormatter = null;
private String timeZone = null;
private LocalDate currentDate = null;
private String space = " ";
private long rotationLastChecked = 0L;

//省略属性的getter/setter

//这是核心方法invoke
public void invoke(Request request, Response response, ValveContext context)
throws IOException, ServletException {
// 先调用context中的invokeNext,实现职责链调用
// Pass this request on to the next valve in our pipeline
context.invokeNext(request, response);

//以下是本valve本身的业务逻辑
LocalDate date = getDate();
StringBuffer result = new StringBuffer();
// Check to see if we should log using the "common" access log pattern
//拼串
if (common || combined) {
//拼串,省略
} else { //按照模式拼串
// Generate a message based on the defined pattern
boolean replace = false;
for (int i = 0; i < pattern.length(); i++) {
char ch = pattern.charAt(i);
if (replace) {
result.append(replace(ch, date, request, response));
replace = false;
} else if (ch == '%') {
replace = true;
} else {
result.append(ch);
}
}
}
log(result.toString(), date);
}
private synchronized void close() {
if (writer == null)
return;
writer.flush();
writer.close();
writer = null;
dateStamp = "";
}
//按照日期生成日志文件,并记录日志
public void log(String message, LocalDate date) {
// Only do a logfile switch check once a second, max.
long systime = System.currentTimeMillis();
if ((systime - rotationLastChecked) > 1000) {
// We need a new currentDate
currentDate = LocalDate.now();
rotationLastChecked = systime;
// Check for a change of date
String tsDate = dateFormatter.format(currentDate);
// If the date has changed, switch log files
if (!dateStamp.equals(tsDate)) {
synchronized (this) {
if (!dateStamp.equals(tsDate)) {
close();
dateStamp = tsDate;
open();
}
}
}
}
// Log this message
if (writer != null) {
writer.println(message);
}
}

//打开日志文件
private synchronized void open() {
// Create the directory if necessary
File dir = new File(directory);
if (!dir.isAbsolute())
dir = new File(System.getProperty("minit.base"), directory);
dir.mkdirs();
// Open the current log file
try {
String pathname = dir.getAbsolutePath() + File.separator +
prefix + dateStamp + suffix;
writer = new PrintWriter(new FileWriter(pathname, true), true);
} catch (IOException e) {
writer = null;
}
}
//替换字符串
private String replace(char pattern, LocalDate date, Request request,
Response response) {
//省略
}
private LocalDate getDate() {
// Only create a new Date once per second, max.
long systime = System.currentTimeMillis();
if ((systime - currentDate.getLong(ChronoField.MILLI_OF_SECOND)) > 1000) {
currentDate = LocalDate.now();
}
return currentDate;
}
}
接下来我们定义StandardPipeline,提供Pipeline的标准实现,主体如下:
package com.minit.core;
public class StandardPipeline implements Pipeline{
public StandardPipeline() {
this(null);
}
public StandardPipeline(Container container) {
super();
setContainer(container);
}
protected Valve basic = null; //basic valve
protected Container container = null;
protected int debug = 0;
protected String info = "com.minit.core.StandardPipeline/0.1";
protected Valve valves[] = new Valve[0]; //一组valve,可以逐个调用

public Valve getBasic() {
return (this.basic);
}
public void setBasic(Valve valve) {
// Change components if necessary
Valve oldBasic = this.basic;
if (oldBasic == valve)
return;
// Start the new component if necessary
if (valve == null)
return;
valve.setContainer(container);
this.basic = valve;
}

//添加valve
public void addValve(Valve valve) {
// Add this Valve to the set associated with this Pipeline
synchronized (valves) {
Valve results[] = new Valve[valves.length +1];
System.arraycopy(valves, 0, results, 0, valves.length);
valve.setContainer(container);
results[valves.length] = valve;
valves = results;
}
}

public Valve[] getValves() {
if (basic == null)
return (valves);
synchronized (valves) {
Valve results[] = new Valve[valves.length + 1];
System.arraycopy(valves, 0, results, 0, valves.length);
results[valves.length] = basic;
return (results);
}
}
//核心方法invoke
public void invoke(Request request, Response response)
throws IOException, ServletException {
System.out.println("StandardPipeline invoke()");
// 转而调用context中的invoke,发起职责链调用
// Invoke the first Valve in this pipeline for this request
(new StandardPipelineValveContext()).invokeNext(request, response);
}

public void removeValve(Valve valve) {
synchronized (valves) {
// Locate this Valve in our list
int j = -1;
for (int i = 0; i < valves.length; i++) {
if (valve == valves[i]) {
j = i;
break;
}
}
if (j < 0)
return;
valve.setContainer(null);
// Remove this valve from our list
Valve results[] = new Valve[valves.length - 1];
int n = 0;
for (int i = 0; i < valves.length; i++) {
if (i == j)
continue;
results[n++] = valves[i];
}
valves = results;
}
}

//内部类,维护了stage,表示valves数组中的位置,逐个invoke
protected class StandardPipelineValveContext implements ValveContext {
protected int stage = 0;

public void invokeNext(Request request, Response response)
throws IOException, ServletException {
System.out.println("StandardPipelineValveContext invokeNext()");
int subscript = stage;
stage = stage + 1;
// Invoke the requested Valve for the current request thread
if (subscript < valves.length) {
valves[subscript].invoke(request, response, this);
} else if ((subscript == valves.length) && (basic != null)) {
basic.invoke(request, response, this);
} else {
throw new ServletException("standardPipeline.noValve");
}
}
}
}
在StandardPipeline类中,我们使用了一个数组保存当前valves的值以及单独的Basic Valve。
对Pipeline的调用变成了启动StandardPipelineValveContext的invokeNext()。
public void invoke(Request request, Response response)
throws IOException, ServletException {
System.out.println("StandardPipeline invoke()");
(new StandardPipelineValveContext()).invokeNext(request, response);
}
其中StandardPipelineValveContext是StandardPipeline里定义的一个内部类,在这个内部类里,维护了一个stage的域,用来记录Valve的编号。
protected class StandardPipelineValveContext implements ValveContext {
protected int stage = 0;
public void invokeNext(Request request, Response response) throws IOException, ServletException {
int subscript = stage;
stage = stage + 1;
// Invoke the requested Valve for the current request thread
if (subscript < valves.length) {
valves[subscript].invoke(request, response, this);
} else if ((subscript == valves.length) && (basic != null)) {
basic.invoke(request, response, this);
} else {
throw new ServletException("standardPipeline.noValve");
}
}
}
在判断条件中,根据编号调用valve.invoke(),调用到最后,就是调用Basic Valve的invoke()方法。而valve.invoke()方法调用的本质在于调用ValveContext的invokeNext()方法, 随后执行本身的业务任务,参考AccessLogValve也是这样。
public void invoke(Request request, Response response, ValveContext context) throws IOException, ServletException {
context.invokeNext(request, response);
}
这样一个一个传递下去,整个链路就调用完毕。
因为整个服务器的起点是Connector和Container,所以我们得把Pipeline加入到Container中,这就需要调整ContainerBase里的实现。你可以看一下当前ContainerBase类的实现,主体如下:
package com.minit.core;
import com.minit.*;
import javax.servlet.ServletException;
import java.io.IOException;
import java.util.Map;
import java.util.concurrent.ConcurrentHashMap;
public abstract class ContainerBase implements Container, Pipeline {
protected Map<String, Container> children = new ConcurrentHashMap<>();
protected ClassLoader loader = null;
protected String name = null;
protected Container parent = null;
protected Logger logger = null;
protected Pipeline pipeline = new StandardPipeline(this); //增加pipeline支持
public Pipeline getPipeline() {
return (this.pipeline);
}
public void invoke(Request request, Response response) throws IOException, ServletException {
System.out.println("ContainerBase invoke()");
pipeline.invoke(request, response);
}
public synchronized void addValve(Valve valve) {
pipeline.addValve(valve);
}
public Valve getBasic() {
return (pipeline.getBasic());
}
public Valve[] getValves() {
return (pipeline.getValves());
}
public synchronized void removeValve(Valve valve) {
pipeline.removeValve(valve);
}
public void setBasic(Valve valve) {
pipeline.setBasic(valve);
}
public ClassLoader getLoader() {
if (loader != null)
return (loader);
if (parent != null)
return (parent.getLoader());
return (null);
}
public synchronized void setLoader(ClassLoader loader) {
ClassLoader oldLoader = this.loader;
if (oldLoader == loader) {
return;
}
this.loader = loader;
}

protected void log(String message) {
Logger logger = getLogger();
if (logger != null)
logger.log(logName() + ": " + message);
else
System.out.println(logName() + ": " + message);
}

protected void log(String message, Throwable throwable) {
Logger logger = getLogger();
if (logger != null)
logger.log(logName() + ": " + message, throwable);
else {
System.out.println(logName() + ": " + message + ": " + throwable);
throwable.printStackTrace(System.out);
}
}

}
主要是增加了StandardPipeline的处理,在ContainerBase中引入Pipeline,调用invoke()就变成了调用Pipeline中的invoke()方法实现。
protected Pipeline pipeline = new StandardPipeline(this);
public Pipeline getPipeline() {
return (this.pipeline);
}
public void invoke(Request request, Response response) throws IOException, ServletException {
System.out.println("ContainerBase invoke()");
pipeline.invoke(request, response);
}
public synchronized void addValve(Valve valve) {
pipeline.addValve(valve);
}
而在StandardContext的构造方法中我们也进行调整,增加对Pipeline的处理。
处理之后,在StandardContext类里调用invoke()方法就很简单了,只要调用ContainerBase的invoke()启动Pipeline,随后调用Pipiline中的invoke()就可以了。
public void invoke(Request request, Response response) throws IOException, ServletException {
super.invoke(request, response);
}
你可以看一下StandardContext类中新增和调整的代码。
package com.minit.core;
public class StandardContext extends ContainerBase implements Context{
public StandardContext() {
super();
pipeline.setBasic(new StandardContextValve());
try {
// create a URLClassLoader
URL[] urls = new URL[1];
URLStreamHandler streamHandler = null;
File classPath = new File(BootStrap.WEB_ROOT);
String repository = (new URL("file", null, classPath.getCanonicalPath() + File.separator)).toString() ;
urls[0] = new URL(null, repository, streamHandler);
loader = new URLClassLoader(urls);
} catch (IOException e) {
System.out.println(e.toString() );
}
log("Container created.");
}

public void invoke(Request request, Response response)
throws IOException, ServletException {
System.out.println("StandardContext invoke()");
super.invoke(request, response);
}

public Wrapper getWrapper(String name){
StandardWrapper servletWrapper = servletInstanceMap.get(name);
if ( servletWrapper == null) {
String servletClassName = name;
servletWrapper = new StandardWrapper(servletClassName,this);
this.servletClsMap.put(name, servletClassName);
this.servletInstanceMap.put(name, servletWrapper);
}
return servletWrapper;
}
}
下面是被StandardContext引用的StandardContextValve类的定义。
package com.minit.core;
final class StandardContextValve extends ValveBase {
private static final String info =
"org.apache.catalina.core.StandardContextValve/1.0";
public String getInfo() {
return (info);
}
public void invoke(Request request, Response response, ValveContext valveContext)
throws IOException, ServletException {
System.out.println("StandardContextValve invoke()");
StandardWrapper servletWrapper = null;
String uri = ((HttpRequestImpl)request).getUri();
String servletName = uri.substring(uri.lastIndexOf("/") + 1);
String servletClassName = servletName;
StandardContext context = (StandardContext)getContainer();
servletWrapper = (StandardWrapper)context.getWrapper(servletName);
try {
System.out.println("Call service()");
servletWrapper.invoke(request, response);
}
catch (Exception e) {
System.out.println(e.toString());
}
catch (Throwable e) {
System.out.println(e.toString());
}
}
}
我们以前写在StandardContext类里面的invoke()方法实现代码,现在用StandardContextValve的invoke()来取代了,从这里面拿到Wrapper后直接调用。这里没有invokeNext()的实现,因为这个Valve是Basic Valve,是最后调用的。
同理,以前写在StandardWrapper类的invoke实现代码,现在也要用一个Valve来取代了。
package com.minit.core;
public class StandardWrapperValve extends ValveBase {
@Override
public void invoke(Request request, Response response, ValveContext context) throws IOException, ServletException {
// TODO Auto-generated method stub
System.out.println("StandardWrapperValve invoke()");
HttpServletRequest requestFacade = new HttpRequestFacade((HttpRequestImpl) request);
HttpServletResponse responseFacade = new HttpResponseFacade((HttpResponseImpl) response);
Servlet instance = ((StandardWrapper)getContainer()).getServlet();
if (instance != null) {
instance.service(requestFacade, responseFacade);
}
}
}
而当前的StandardWrapper,修改调整了哪些代码呢?我列出来了,你看一下。
package com.minit.core;
public class StandardWrapper extends ContainerBase implements Wrapper {
public StandardWrapper(String servletClass, StandardContext parent) {
super();
pipeline.setBasic(new StandardWrapperValve());
this.parent = parent;
this.servletClass = servletClass;
try {
loadServlet();
} catch (ServletException e) {
e.printStackTrace();
}
}

public void invoke(Request request, Response response)
throws IOException, ServletException {
System.out.println("StandardWrapper invoke()");
super.invoke(request, response);
}
}
到这里我们的职责链模式就改造好了,最后还有一些调整和改动,让它更贴近Tomcat。主要是HttpRequestImpl和HttpResponseImpl两个实现类,分别支持实现Request接口和Response接口。你可以看一下 Gitee 中的代码。
ServletProcessor类里的process方法签名也一并调整成Request与Response。
package com.minit.connector.http;
public class ServletProcessor {
public void process(Request request, Response response) throws IOException, ServletException {
this.connector.getContainer().invoke(request, response);
}
}
到这里这节课的改造就结束了,快试着运行一下吧!
小结
这节课我们先引入了日志组件,通过将日志输出到文件,并用不同日期加以区分,可以帮助我们更好记录服务器运行状态,尽快定位问题。
随后我们重点研究了Tomcat中的Pipeline,通过Pipeline和Valve的处理,带出了责任链这一设计模式,确保我们在流程走通的前提下,在每一层Container之间增加权限校验、日志打印、错误输出等自定义的处理。
这节课代码参见:https://gitee.com/yaleguo1/minit-learning-demo/tree/geek_chapter12
思考题
学完了这节课的内容,我们来思考一个问题:我们在某个容器的Pipeline中增加三个Valve和一个Basic Valve,那么具体的调用次序是怎样的?
欢迎你把你想到的方案分享到评论区,也欢迎你把这节课的内容分享给其他朋友,我们下节课再见!
- peter 👍(1) 💬(1)
请教老师几个问题: Q1:Logger接口定义中FATAL 为什么用 Integer.MIN_VALUE? 用0不就可以了吗? Q2:“后端”是指什么? “存在 Exception 异常时,后端会调用 printStackTrace 抛出异常”这句话中用到的“后端”是指什么?有“后端”就有“前端”,“前端”和“后端”分别指什么? Q3:为什么先调用next再调用自身业务? AccessLogValve的invoke方法中,先调用context中的invokeNext,实现职责链调用,再调用自己的业务。那就是先处理下一个,再处理自己,如此迭代下去,变成倒序了,类似于堆栈了。假设有3个业务,先到业务1,业务1调用业务2,业务2调用业务3,;业务3处理完以后再处理业务2,最后处理业务1。为什么这样设计? Q4:Tomcat中的日志处理有什么特别之处?
2024-01-04 - HH🐷🐠 👍(1) 💬(2)
个人理解是 Valve 先添加先执行,可以当做为 Filter,在 Servlet 前面拦截先执行; Basic 属于自身业务最后执行, 可以当做 Servlet。
2024-01-03