加餐 GPT编程(上) :如何用ChatGPT辅助我们编程?
你好,我是郭屹。
这节课,我们来了解一下GPT的基本知识,以及如何在编程中使用它。开发技术和模式正在开始一个巨大的变革,就是以GPT为代表的AI辅助编程。
AI不是一个新事物,在将近七十年的发展历史中,起起落落,一会儿被捧上天,一会儿被踩到脚下。在这个艰难的过程中,AI开始逐步显现它的强大,越来越成熟。就拿NLP自然语言处理这个领域来讲,实际上一直不温不火,直到2017年的Transformer技术问世,才打开了新局面,一时间GPT和BERT同时火热起来。最近这几年,BERT的风头一直压倒GPT,直到2022年底GPT演进为ChatGPT才开始标志着变革的力量登上主流舞台。
ChatGPT真正解决了长期困扰自然语言处理的一大难题,即上下文相关的问题。以前的AI对话系统,虽然也有很多成绩,但是明显不能很好地连贯对话,把握上下文。因此,这一领域也一直没有办法实用化。
ChatGPT及其后续GPT版本的出现,标志着自然语言理解进入新纪元。我们程序员也要拥抱这个新时代。
ChatGPT是什么
ChatGPT,全称是聊天生成预训练转换器(Chat Generative Pre-trained Transformer),是OpenAI在2022年11月发布的大语言模型,它以人机自然语言对话的方式进行交互。它上下文相关的连续对话的能力极强,一经发布就震惊了世界,两个月的时间用户就超过了一亿。它的功能主要有文本生成、对话、摘要、修正等等。
它还能编写程序,但是它并不懂编程,因为它是一个语言模式,只是基于代码语言之间的统计相关性进行建议而已。现在ChatGPT还在持续进化,基于实际用户的反馈在扩大语料,使得它的回答更加精准。同时,模型也在提升,2023年3月OpenAI发布了多模态模型GPT-4,这个模型更加强大。
注册ChatGPT
ChatGPT的正式访问地址是https://chat.openai.com/,在网页上你可以通过Sign up进行注册。登录进去之后,就是对话主界面,你可以看一下。
这时候,你就可以在文本框里输入内容开始对话了。英文和中文都可以,但是基于ChatGPT的训练数据,输入英文得到的回答质量会好很多。
ChatGPT人工对话示例
我们试着和它进行一次对话。
我:Create a Spring MVC application which connect to MySQL database
它的回复是这样的:To create a Spring MVC application which connects to a MySQL database, follow these steps:
- Set up a MySQL database: Install MySQL on your machine and create a database. Then, create a table with some sample data.
- Create a Spring MVC project: Create a new Spring MVC project in your favorite IDE. You can use Maven or Gradle as your build tool.
- Add MySQL dependencies: Add the MySQL JDBC driver and Spring JDBC dependencies to your project. You can add them in your build file (pom.xml or build.gradle).
- Configure the database connection: In your Spring configuration file (applicationContext.xml), configure the database connection details such as driver class, URL, username, and password.
- Create a data access object (DAO): Create a DAO class to interact with the database. This class should have methods to insert, update, delete, and select data from the database.
- Create a controller: Create a Spring controller to handle the HTTP requests. The controller should use the DAO to fetch data from the database and return it as a response.
- Create a view: Create a view to display the data returned by the controller. You can use JSP, Thymeleaf, or any other view technology.
这里它把如何创建一个SpringMVC数据库应用的步骤告诉我们了,它还给出了示例代码。这就是应用程序的整体框架步骤,对其中的任何一步,如果我们不知道怎么做,可以进一步追问,比如我们继续让它给出第六步controller的完整例子。
我:good. then the 6th step, I also need the complete code.
它回复:Sure, here is the complete code for the 6th step:
Create a controller
- Create a class called EmployeeController with the following methods:
@Controller
public class EmployeeController {
@Autowired
private EmployeeDAO employeeDAO;

@RequestMapping(value = "/", method = RequestMethod.GET)
public ModelAndView home() {
List<Employee> employees = employeeDAO.getAllEmployees();
ModelAndView model = new ModelAndView("home");
model.addObject("employees", employees);
return model;
}

@RequestMapping(value = "/addEmployee", method = RequestMethod.GET)
public ModelAndView addEmployee() {
ModelAndView model = new ModelAndView("addEmployee");
model.addObject("employee", new Employee());
return model;
}

@RequestMapping(value = "/saveEmployee", method = RequestMethod.POST)
public ModelAndView saveEmployee(@ModelAttribute("employee") Employee employee) {
employeeDAO.addEmployee(employee);
return new ModelAndView("redirect:/");
}
}
对于它的答案,我们可以校正,比如告诉它最后一步我们不想用JSP,而是想用React,让它给个例子。
我:great! fot the last step, I do not want to use JSP, but prefer to use React, could give me the script to access the above controller?
它也会接着给出答案。
从这里我们可以看出,对常规的任务,它能给我们一个程序框架,像一个编程助手一样跟我们对话,很强。下面我们再看一个完整例子,在Spring Boot中开发一个数据库应用项目。
用ChatGPT辅助编程
我们以典型的CRUD应用为例。ChatGPT并不能生成完整的CRUD应用程序,但是可以给出建立程序的步骤,指引我们一步一步地建立应用。
我们先从建立项目开始,跟它开始对话。
我:create a new spring boot crud project
它的回复是:Sure, here’s a step-by-step guide on how to create a new Spring Boot CRUD project:
- Open your preferred IDE (Integrated Development Environment) such as Eclipse or IntelliJ IDEA.
- Create a new Spring Boot project using the Spring Initializr. You can do this by going to https://start.spring.io/ and filling out the necessary information such as project type, language, packaging, and dependencies. For this example, we’ll use Maven as the project type and select Spring Web, Spring Data JPA, and H2 Database as the dependencies.
- Click the Generate button to download the project as a zip file.
- Extract the contents of the downloaded zip file to a directory on your computer.
- Open your IDE and import the project. In Eclipse, go to File > Import > Maven > Existing Maven Projects and select the directory where you extracted the project. In IntelliJ IDEA, go to File > New > Project from Existing Sources and select the directory where you extracted the project.
- Once the project is imported, open the application.properties file located in the src/main/resources directory. This file contains configuration properties for the project such as database connection settings. For this example, we’ll use the default H2 database settings.
- Create a new package called “model” and create a new class called “Person” in that package. This class will represent our data model for the CRUD operations. Add the necessary fields such as “id”, “firstName”, “lastName”, and “email”. Add getters and setters for each field.
- Create a new package called “repository” and create a new interface called “PersonRepository” in that package. This interface will extend the JpaRepository interface provided by Spring Data JPA and will allow us to perform CRUD operations on the “Person” class. Add any custom methods you need for your application.
- Create a new package called “controller” and create a new class called “PersonController” in that package. This class will handle incoming requests and call the appropriate methods in the “PersonRepository”. Use annotations such as @RestController and @RequestMapping to define the endpoint mappings.
- Run the project using your IDE or by running the “mvn spring-boot:run” command in the project directory. This will start the Spring Boot application and make it available at http://localhost:8080.
-
Test the CRUD operations by sending HTTP requests to the appropriate endpoints using a tool such as Postman or cURL. You can use the following endpoints as examples:
-
GET /person - Retrieve a list of all persons
- GET /person/{id} - Retrieve a person by ID
- POST /person - Create a new person
- PUT /person/{id} - Update an existing person
- DELETE /person/{id} - Delete a person by ID That’s it! You now have a basic Spring Boot CRUD project up and running. From here, you can add more features and functionality as needed for your application.
如果你熟悉Spring Boot的话,应该能看出来,ChatGPT它已经把整个应用创建的完整步骤发给我们了,我们用Intellij IDea 建立一个Spring Boot Web 项目,按照步骤就可以把项目建立起来。项目建立起来以后,还要进一步细化每一步。要实现CRUD功能,需要依次创建entity、repository、service、controller等包和类,我们完全可以用GPT,让它帮我们建立,而不用我们写一行代码。
我们继续跟它对话,根据步骤,首先我们要先创建entities。
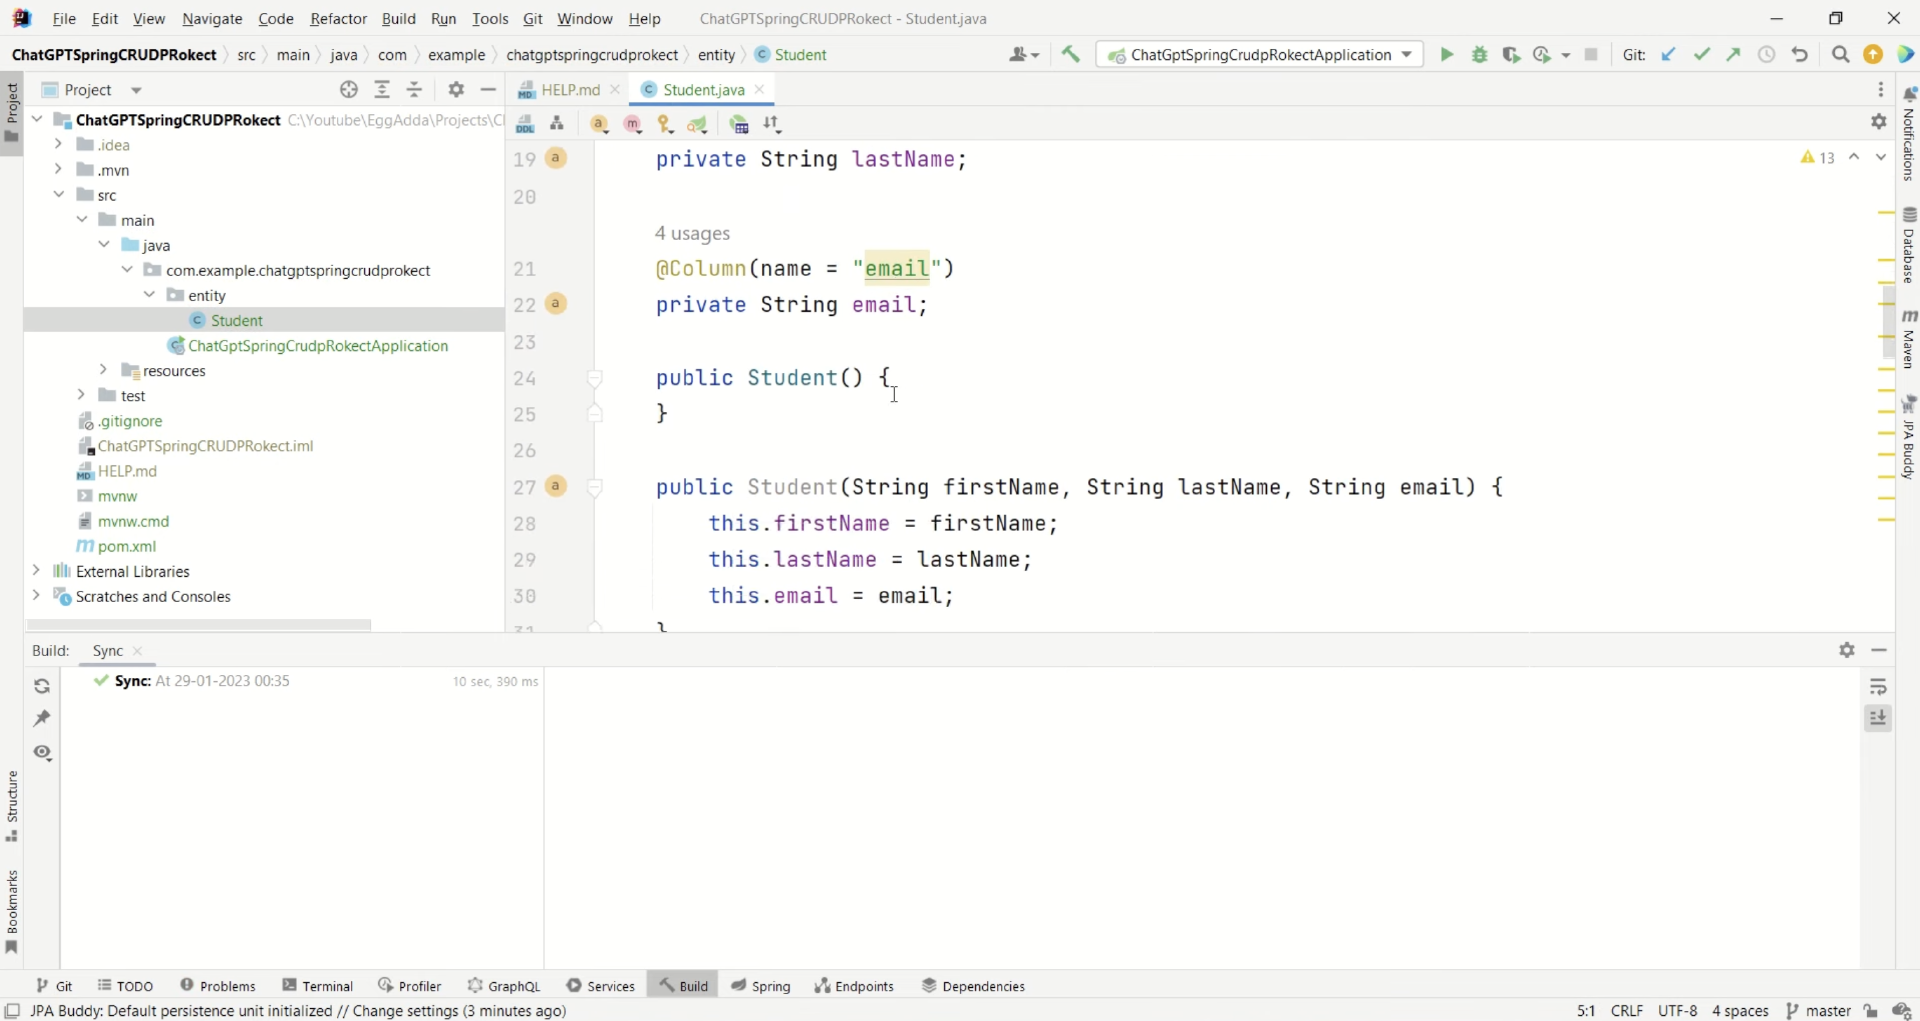
我:create a student entity for above project
此时它回复:Sure, here’s an example of a Student entity class that you can add to your Spring Boot project:
package com.example.demo.model;
import javax.persistence.*;
@Entity
@Table(name = "students")
public class Student {
@Id
@GeneratedValue(strategy = GenerationType.IDENTITY)
private Long id;
private String firstName;
private String lastName;
private String email;
public Student() {}
public Student(String firstName, String lastName, String email) {
this.firstName = firstName;
this.lastName = lastName;
this.email = email;
}
public Long getId() {
return id;
}
public void setId(Long id) {
this.id = id;
}
public String getFirstName() {
return firstName;
}
public void setFirstName(String firstName) {
this.firstName = firstName;
}
public String getLastName() {
return lastName;
}
public void setLastName(String lastName) {
this.lastName = lastName;
}
public String getEmail() {
return email;
}
public void setEmail(String email) {
this.email = email;
}
@Override
public String toString() {
return "Student{" +
"id=" + id +
", firstName='" + firstName + '\'' +
", lastName='" + lastName + '\'' +
", email='" + email + '\'' +
'}';
}
}
它的回答中已经把student的entity代码给到我们了,我们直接复制到开发工具里。你可以看一下图片。
这样entity 就建好了,然后我们创建repository。这时候我们继续询问GPT。
我:create a student repo for above project.
然后它回复:Sure, here’s an example of a StudentRepository interface that you can add to your Spring Boot project:
package com.example.demo.repository;

import com.example.demo.model.Student;
import org.springframework.data.jpa.repository.JpaRepository;
import org.springframework.stereotype.Repository;

@Repository
public interface StudentRepository extends JpaRepository<Student, Long> {
Student findByEmail(String email);
Student findByLastName(String lastName)
// add additional CRUD methods as needed
}
我们创建StudentRepository类,将上边GPT的代码粘贴进去,这样student的repository就创建好了。如下图所示:

我们继续创建service,给GPT发送指令:create Student service interface for above project.
GPT回复:Sure, here’s an example of a StudentService interface that you can add to your Spring Boot project:
package com.example.demo.service;
import com.example.demo.model.Student;
import java.util.List;
public interface StudentService {
List<Student> getAllStudents();
Student getStudentById(Long id);
Student createStudent(Student student);
Student updateStudent(Long id, Student student);
void deleteStudent(Long id);
}
GPT同样把代码给到我们了,我们创建好StudentService,把代码粘贴过去,这样Student 的数据操作接口类StudentService就创建好了。
然后我们利用GPT继续写这个类的实现类。给GPT发送指令。
我:create student service impl class for above project
GPT回复:Certainly, here’s an example of a StudentServiceImpl class that implements the StudentService interface:
package com.example.demo.service;

import com.example.demo.model.Student;
import com.example.demo.repository.StudentRepository;
import org.springframework.beans.factory.annotation.Autowired;
import org.springframework.stereotype.Service;
import org.springframework.transaction.annotation.Transactional;
import java.util.List;

@Service
@Transactional
public class StudentServiceImpl implements StudentService {
@Autowired
private StudentRepository studentRepository;
@Override
public List<Student> getAllStudents() {
return studentRepository.findAll();
}
@Override
public Student getStudentById(Long id) {
return studentRepository.findById(id).orElse(null);
}
@Override
public Student createStudent(Student student) {
return studentRepository.save(student);
}
@Override
public Student updateStudent(Long id, Student student) {
Student existingStudent = studentRepository.findById(id).orElse(null);
if (existingStudent != null) {
existingStudent.setName(student.getName());
existingStudent.setEmail(student.getEmail());
existingStudent.setDepartment(student.getDepartment());
return studentRepository.save(existingStudent);
}
return null;
}
@Override
public void deleteStudent(Long id) {
studentRepository.deleteById(id);
}
}
创建好StudentService类,把代码粘帖过去,一个service类就创建好了。接下来开始创建Controller。我们继续跟它对话。
我:create student controller for above project.
GPT回复:Sure! Here’s an example of a StudentController class that you can add to your Spring Boot project:
package com.example.demo.controller;

import com.example.demo.model.Student;
import com.example.demo.service.StudentService;
import org.springframework.beans.factory.annotation.Autowired;
import org.springframework.http.HttpStatus;
import org.springframework.http.ResponseEntity;
import org.springframework.web.bind.annotation.*;

import java.util.List;

@RestController
@RequestMapping("/students")
public class StudentController {

@Autowired
private StudentService studentService;

@GetMapping
public ResponseEntity<List<Student>> getAllStudents() {
List<Student> students = studentService.getAllStudents();
return new ResponseEntity<>(students, HttpStatus.OK);
}

@GetMapping("/{id}")
public ResponseEntity<Student> getStudentById(@PathVariable("id") Long id) {
Student student = studentService.getStudentById(id);
if (student == null) {
return new ResponseEntity<>(HttpStatus.NOT_FOUND);
}
return new ResponseEntity<>(student, HttpStatus.OK);
}

@PostMapping
public ResponseEntity<Student> createStudent(@RequestBody Student student) {
Student newStudent = studentService.createStudent(student);
return new ResponseEntity<>(newStudent, HttpStatus.CREATED);
}

@PutMapping("/{id}")
public ResponseEntity<Student> updateStudent(@PathVariable("id") Long id, @RequestBody Student student) {
Student updatedStudent = studentService.updateStudent(id, student);
if (updatedStudent == null) {
return new ResponseEntity<>(HttpStatus.NOT_FOUND);
}
return new ResponseEntity<>(updatedStudent, HttpStatus.OK);
}

@DeleteMapping("/{id}")
public ResponseEntity<HttpStatus> deleteStudent(@PathVariable("id") Long id) {
studentService.deleteStudent(id);
return new ResponseEntity<>(HttpStatus.NO_CONTENT);
}

}
将上述的代码放到StudentController类中,这样Student的操作接口类就好了。接下来,我们让GPT帮我们建立数据库连接。
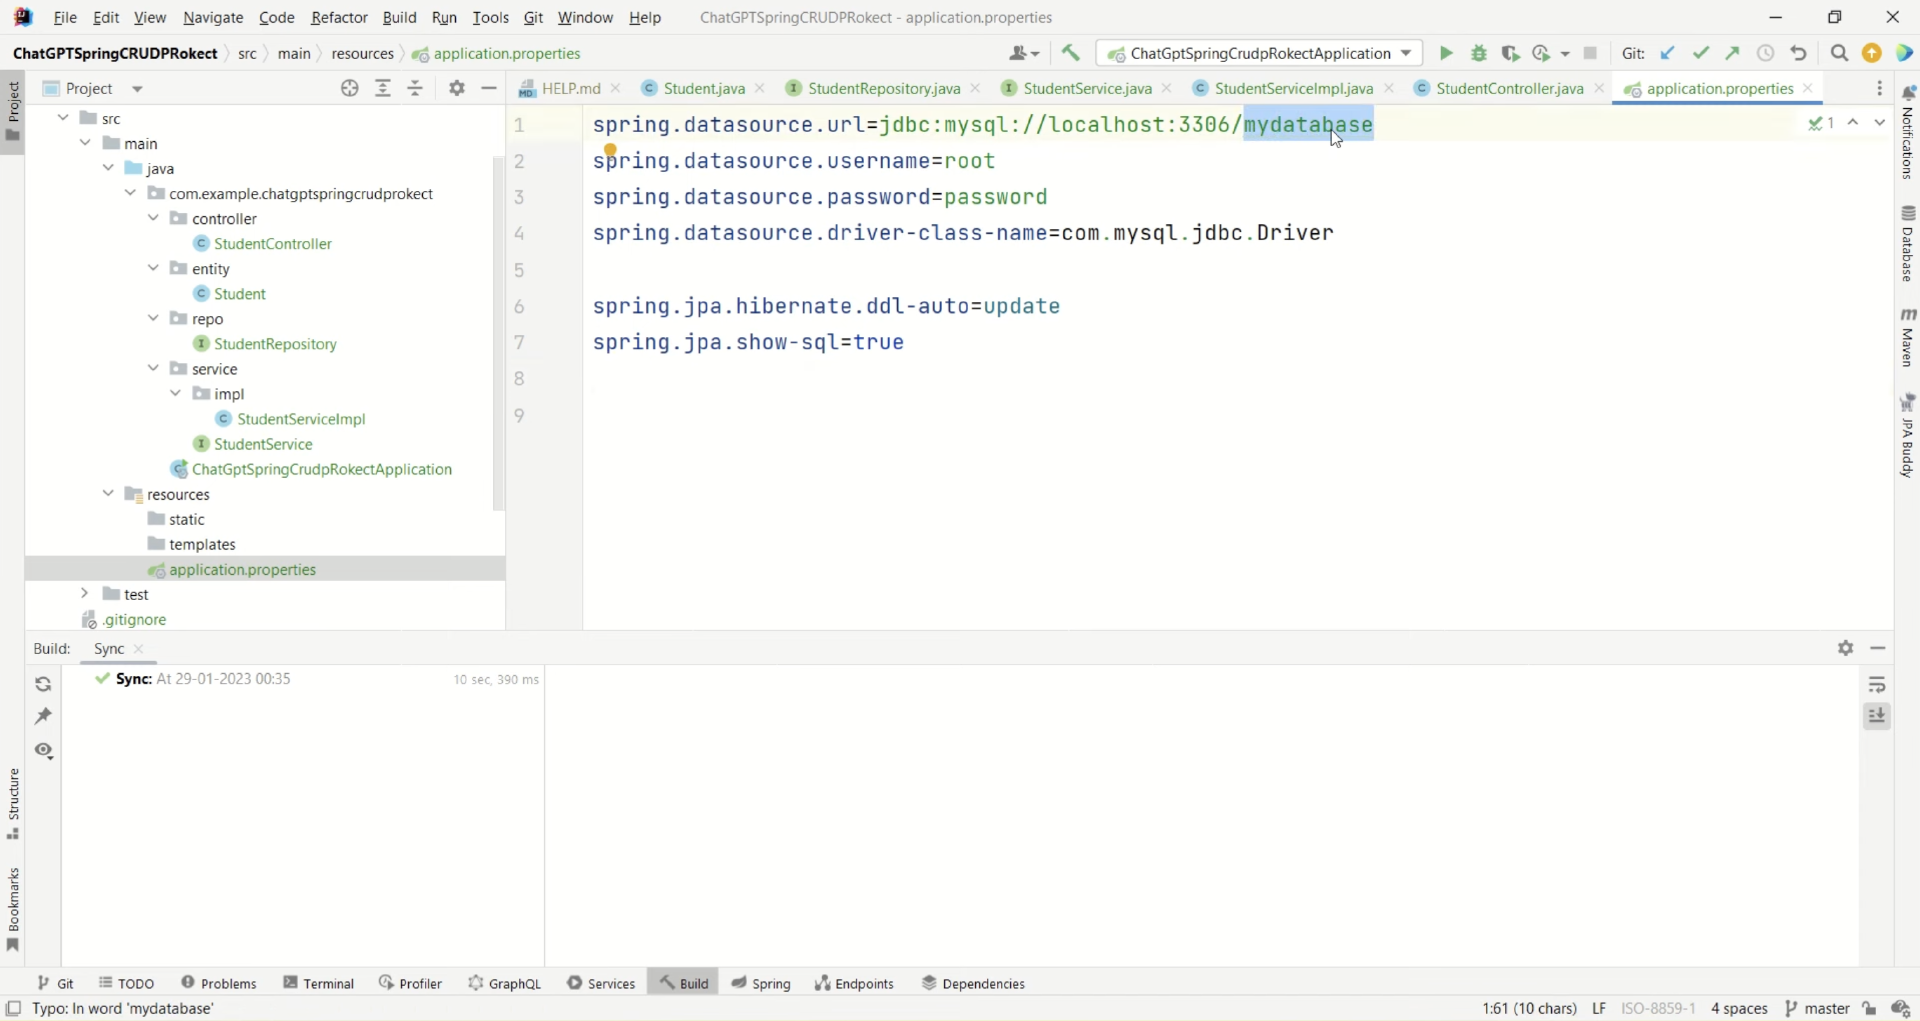
我:create application properties file configuration for database connectivity.
它回复:Sure! Here’s an example of an application.properties file that you can use to configure the database connectivity in your Spring Boot project:
# Database Configuration
spring.datasource.driver-class-name=com.mysql.jdbc.Driver
spring.datasource.url=jdbc:mysql://localhost:3306/your_database_name_here
spring.datasource.username=your_database_username_here
spring.datasource.password=your_database_password_here

# Hibernate Configuration
spring.jpa.hibernate.ddl-auto=update
spring.jpa.properties.hibernate.dialect=org.hibernate.dialect.MySQL8Dialect
GPT已经给出了 application.properties 文件的内容,我们把这些内容拷贝到项目的 application.properties文件里,并把其中的your_database_name_here、your_databas_username_here、your_database_password_here换成我们实际的值。
配置好正确的参数后,接下来我们尝试运行一下,看看能不能跑起来。如果能正常运行,就可以用postman来模拟请求验证项目的功能是否正确了。
到这里,我们整个项目就完整地搭建起来了。从项目的建立到各个类的建立,再到数据库的连接配置,GPT都可以帮助我们,我们甚至都没有写一行代码。当然,我们也必须知道用Spring Boot怎么创建项目,也得知道如何编程,但是一些常规性的具体代码则可以交给ChatGPT来完成。
不过有一点需要注意,ChatGPT的使用与编程是脱钩的,不太方便。不过现在也有很多插件可供我们使用,我们可以一起来看一下。
Intellij中的OpenAI插件
前面我们用跟ChatGPT对话的方式,实现了一个完整的CRUD项目。这种方式主要还是通过复制代码到项目实现的。其实还有一种更加高效的方式,那就是使用插件。目前Intellij Idea 支持多种基于GPT模型实现的开发插件,比如Github copilot、chatGPT、Bito等。这些插件可以实现代码生成、备注生成、代码检查等多个强大功能。
下面我们就以Bito为例,来感受一下它们的强大。
Bito是一款由ChatGPT团队基于 ChatGPT和GPT-4开发的插件。它能够在开发过程中为开发者提供方便快捷的人工智能交互工具。该插件支持 IntelliJ IDEA、Android Studio 等主流开发工具,可以为程序员提供一个智能化的编程过程。Bito支持以下功能:
- GPT对话;
- 代码检查;
- 解释代码;
- 自动生成注释;
- 安全检查;
- 样式检查;
- 优化代码,提高可读性;
- 清理代码,让代码更整洁;
- 生成单元测试。
安装完并注册成功以后,就可以正常使用了。目前免费版每天只能使用一个小时。下面我们具体看看应该怎么使用。
- 编写一个算法
安装好之后,在IDE环境中就显示了这个插件。我们在提问框里输入:请帮我写一个可靠性威布尔分布算法。
此时它回答:好的,以下是一个可靠性威布尔分布算法的实现。
public class WeibullDistribution {
public static void main(String[] args) {
double beta = 2.5; // 分布参数
double eta = 100.0; // 可靠寿命(无故障时间)
double t = 50.0; // 已运行时间
double reliability = getReliability(beta, eta, t);
System.out.println("The reliability of the system is " + reliability);
}
public static double getReliability(double beta, double eta, double t) {
double reliability = Math.exp(-Math.pow(t / eta, beta));
return reliability;
}
}
- 生成代码注释
然后我们选中代码,鼠标右键弹出菜单,选择Bito AI->Improve Readability。这时它就会把选中的代码的每一行都给出详细的英文注释。如果想把英文注释换成中文,就可以给插件发指令:把上面的注释从英文换成中文。
此时它回复:好的,以下是加入中文注释的重写代码。
//按照给定的beta、eta和t值计算系统的可靠性
public class Main {
public static void main(String[] args) {
//初始化变量
double beta = 2.5; // 分布参数
double eta = 100.0; // 可靠寿命(无故障时间)
double t = 50.0; // 已运行时间
// 计算可靠性
double reliability = getReliability(beta, eta, t);
// 打印结果
System.out.println("系统可靠性为:" + reliability);
}
//根据给定参数计算可靠性
public static double getReliability(double beta, double eta, double t) {
double reliability = Math.exp(-Math.pow(t / eta, beta));
return reliability;
}
}
- 检查代码质量
如果我们想知道一段代码的执行性能如何,Bito也可以帮助我们来判断。选中代码,然后点击右键菜单,选择Bito AI->Performance Check。这时候Bito就会帮我们检查代码的性能,并给出代码修改意见。
- 生成单元测试代码
Bito同时也可以生成单元测试代码。选中代码,然后点击右键菜单,选择Bito AI->Generate Unit Test。这时它会帮我们生成测试代码。
@Test
public void testGetReliabilityPositive() {
double beta = 2.5;
double eta = 100.0;
double t = 50.0;
double expected = 0.006737946999085467;
double actual = Main.getReliability(beta, eta, t);
assertEquals(expected, actual, 0.001);
}
@Test
public void testGetReliabilityNegative() {
double beta = 2.5;
double eta = 100.0;
double t = 50.0;
double expected = 0.006737946999085468;
double actual = Main.getReliability(beta, eta, t);
assertNotEquals(expected, actual, 0.001);
}
@Test
public void testGetReliabilityBoundary() {
double beta = 0;
double eta = 100.0;
double t = 0;
double expected = 1.0;
double actual = Main.getReliability(beta, eta, t);
assertEquals(expected, actual, 0.001);
}
@Test
public void testGetReliabilityEdge() {
double beta = 2.5;
double eta = 0;
double t = 50.0;
double expected = Double.POSITIVE_INFINITY;
double actual = Main.getReliability(beta, eta, t);
assertEquals(expected, actual, 0.001);
}
@Test
public void testGetReliabilityCorner() {
double beta = 0;
double eta = 0;
double t = 0;
double expected = 1.0;
double actual = Main.getReliability(beta, eta, t);
assertEquals(expected, actual, 0.001);
}
除了上述的四个功能以外,它还有Security Check、Style Check、Clean Code 等功能,帮助我们实现代码的安全检查、代码样式检查等功能。体验完之后,我们发现GPT-4的Bito,比之前的ChatGPT更加强大,生成的代码质量更高,并且插件的方式让我们使用起来更加方便。这真是我们程序员的福音!
小结
今天,我们介绍了ChatGPT的基本知识,重点看了它辅助编程这一方面的表现。不过ChatGPT只是一个语言模型,它的核心仍然是统计相关性,因此它从原理上并不理解知识,没有推理,对真理、隐私权和价值观更是一无所知。甚至对语言本身来讲,它生成的文本经常也是似是而非的,准确度还有欠缺,它回答的问题可靠性并没有保障。但是,这并不妨碍我们对它的高度评价,因为这是自然语言处理方面目前的最高水准,接近人类对语言的使用了。随着后面的继续进化,相信它会有更加可靠、实用的一天。
好了,今天的内容就到这里,如果你觉得这节课的知识对你有帮助的话,欢迎你分享给你的朋友和同事,如果你有好的想法也欢迎你分享到评论区,我们一起讨论,共同进步,我们下节课见!
- peter 👍(0) 💬(3)
Idea无法安装Bito.操作顺序是:File->Settings->Plugins,输入Bito,提示搜不到。Idea版本是2019。国内上网,没有用梯子,是否和这个有关?另外,如果安装成功,使用它需要账号吗?以及需要能上国外网站吗?
2023-05-17