13 FFmpeg 有哪些常见的应用场景?
你好,我是刘歧。
FFmpeg API 应用部分的前两节课,我们了解了AVFormat、AVCodec以及常用的操作接口,但是现在这些知识还是“各忙各的”的状态,好像没有真正地把图像与封装格式、传输协议给串起来,形成一个完整的音视频图形图像处理的链条,可能你都没空看FFmpeg源代码目录里面提供的例子。
别急,这节课我们就一起来看一看FFmpeg源代码里面的例子,主要是不转码只转封装、转码转封装和直播推流三个场景,通过分析这三个场景案例,加深一下你对API使用的理解。
Remuxing
在使用FFmpeg的API做开发之前,我们先来梳理一下想要做Remuxing的话都需要用到哪些结构体与模块,看一下基本的流程。
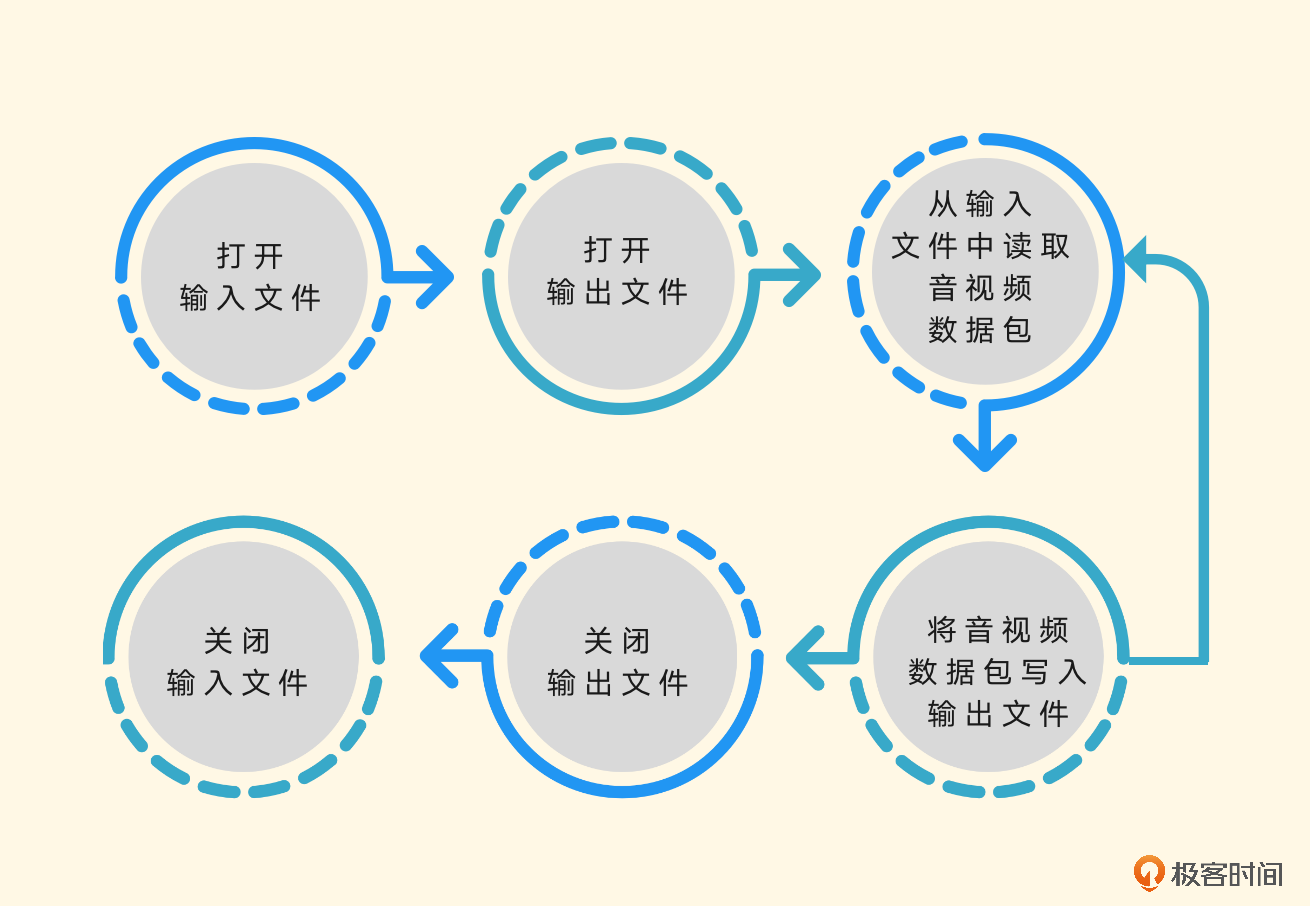
- 打开输入文件和打开输出文件,我们可以理解为初始化操作。
- 从输入文件中读取音视频数据包,将音视频数据包写入输出文件,我们可以把它理解为一个循环操作,直到遇到结束相关的操作信息才停止。
- 关闭输出文件和输入文件,我们可以理解为收尾操作。
下面,我们逐步剖析一下。
初始化操作部分的代码大概会使用这些函数。
使用avformat_open_input、avformat_find_stream_info来打开输入文件,并根据输入文件中的音视频流信息建立音视频流,也就是AVStreams。
使用avformat_alloc_output_context2、avformat_new_stream和avformat_write_header 来打开输出文件,并建立音视频流,输出文件会用到AVOutputFormat,并建立封装格式操作的AVFormatContext,作为操作上下文的结构体,并且会尝试写入输出文件的封装格式头部信息。
从输入文件中读取音视频数据包,将音视频数据包写入输出文件会使用av_read_frame 函数,从输入文件中读取AVPacket音视频数据包,还会使用av_interleaved_write_frame函数,将读取到的音视频数据包写入输出文件。
然后是关闭输出文件和输入文件,使用av_write_trailer函数,在关闭输出文件之前做写封装收尾工作。使用avformat_free_context函数关闭输出文件,并释放因操作输出文件封装格式申请的资源。最后使用avformat_close_input关闭输入文件并释放相关的资源。
当然,除了以上这些操作之外,还有一些API是我们可以根据自己的需要使用的。详细的内容你可以看一下示例代码。其实在日常操作时,做remux主要还是用于收录一些音视频内容的场景中,用得更多的还是编码或者转码的操作。因为音视频的编码数据格式比较多,需要统一转成相同的编码,换句话说,就是将输入的音视频内容转成统一规格输出的场景,比收录场景更常见,下面我们来看一下转码场景的代码用例。
Transcoding
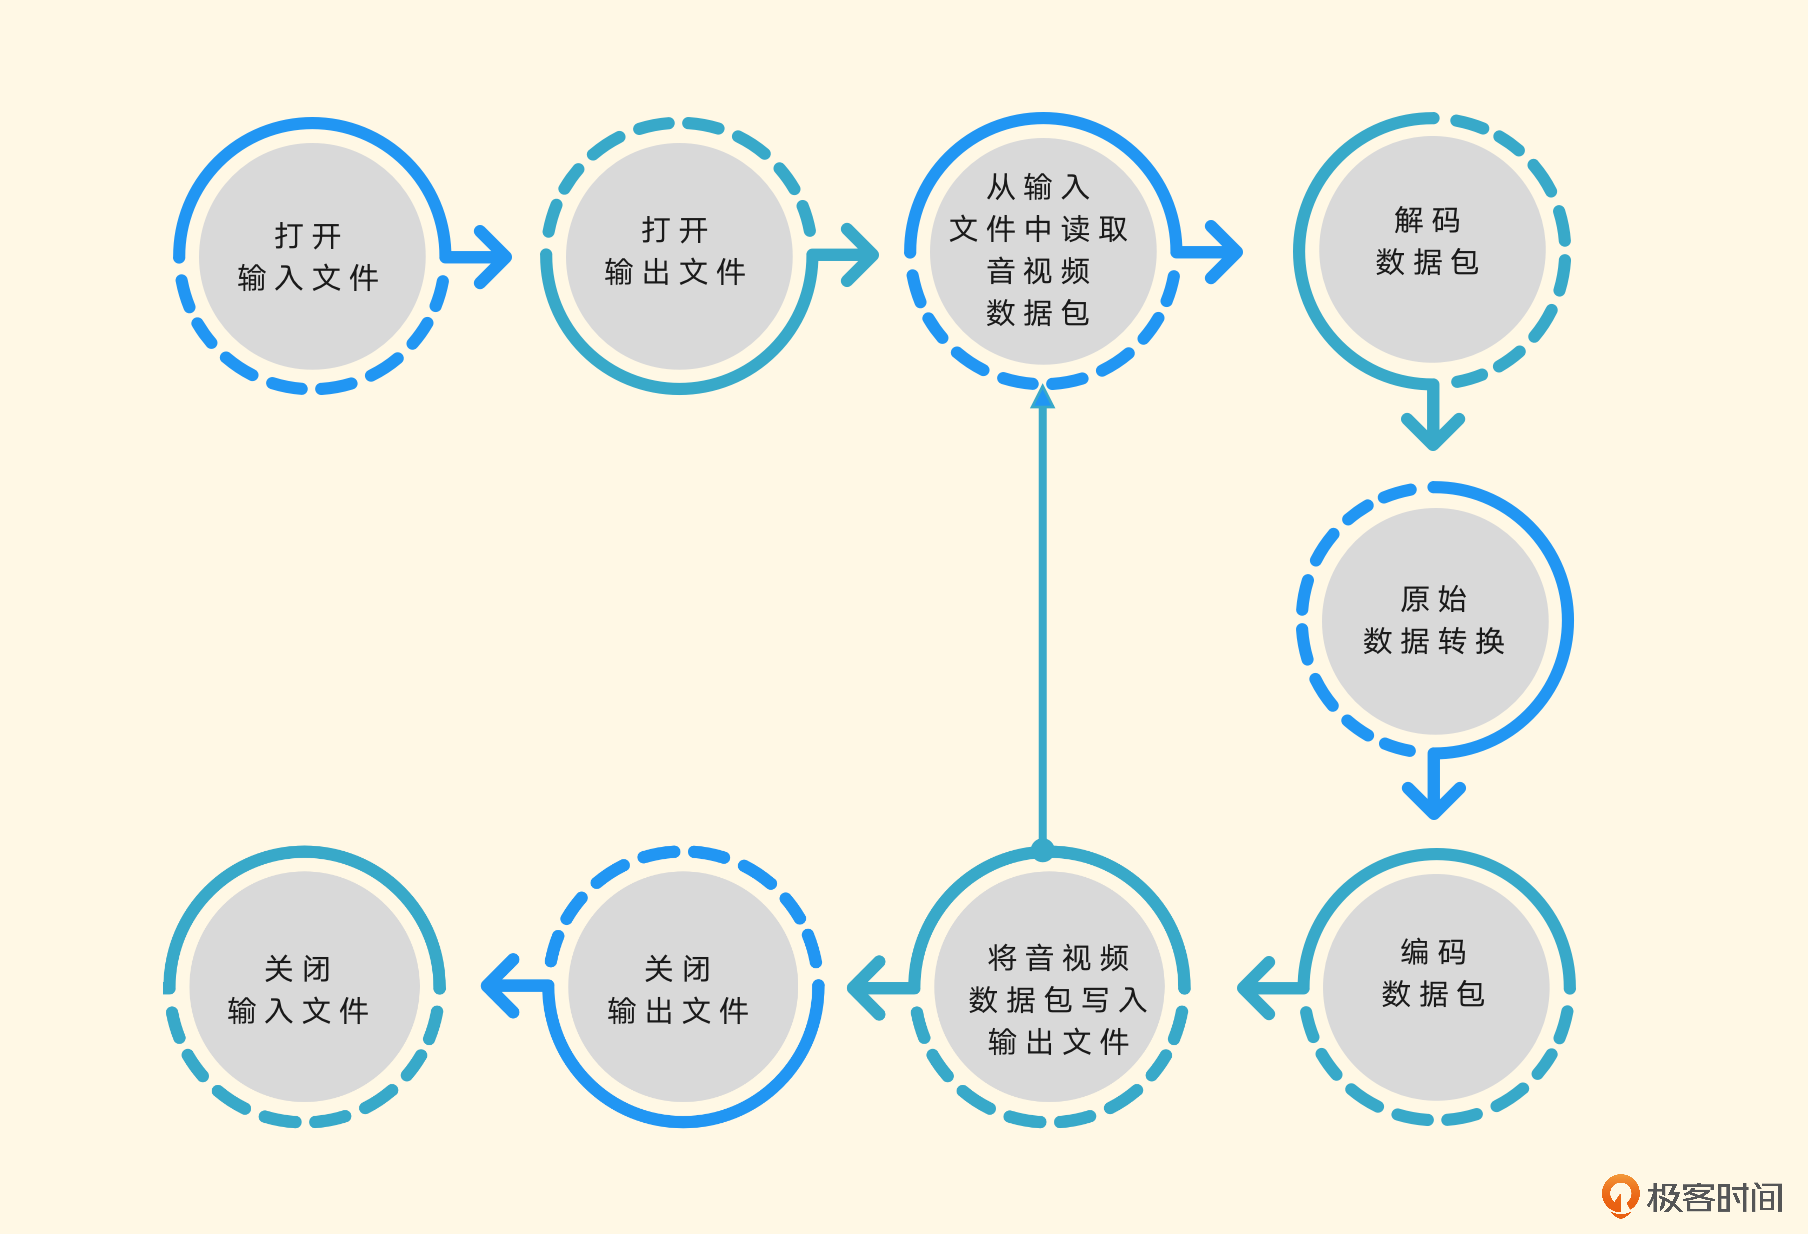
转码操作与转封装操作类似,就是多了解码和编码步骤,并且大多数情况下需要自己制定输出的编码参数与编码规格。和之前一样,我们先梳理一下转码的流程。
打开文件的操作,可以定义为open_input_file,这样将输入文件操作相关的代码放在一个函数里面比较清晰。
static int open_input_file(const char *filename)
{
int ret;
unsigned int i;

ifmt_ctx = NULL;
if ((ret = avformat_open_input(&ifmt_ctx, filename, NULL, NULL)) < 0) {
av_log(NULL, AV_LOG_ERROR, "Cannot open input file\n");
return ret;
}

if ((ret = avformat_find_stream_info(ifmt_ctx, NULL)) < 0) {
av_log(NULL, AV_LOG_ERROR, "Cannot find stream information\n");
return ret;
}

stream_ctx = av_calloc(ifmt_ctx->nb_streams, sizeof(*stream_ctx));
if (!stream_ctx)
return AVERROR(ENOMEM);

for (i = 0; i < ifmt_ctx->nb_streams; i++) {
AVStream *stream = ifmt_ctx->streams[i];
const AVCodec *dec = avcodec_find_decoder(stream->codecpar->codec_id);
AVCodecContext *codec_ctx;
if (!dec) {
av_log(NULL, AV_LOG_ERROR, "Failed to find decoder for stream #%u\n", i);
return AVERROR_DECODER_NOT_FOUND;
}
codec_ctx = avcodec_alloc_context3(dec);
if (!codec_ctx) {
av_log(NULL, AV_LOG_ERROR, "Failed to allocate the decoder context for stream #%u\n", i);
return AVERROR(ENOMEM);
}
ret = avcodec_parameters_to_context(codec_ctx, stream->codecpar);
if (ret < 0) {
av_log(NULL, AV_LOG_ERROR, "Failed to copy decoder parameters to input decoder context "
"for stream #%u\n", i);
return ret;
}
/* Reencode video & audio and remux subtitles etc. */
if (codec_ctx->codec_type == AVMEDIA_TYPE_VIDEO
|| codec_ctx->codec_type == AVMEDIA_TYPE_AUDIO) {
if (codec_ctx->codec_type == AVMEDIA_TYPE_VIDEO)
codec_ctx->framerate = av_guess_frame_rate(ifmt_ctx, stream, NULL);
/* Open decoder */
ret = avcodec_open2(codec_ctx, dec, NULL);
if (ret < 0) {
av_log(NULL, AV_LOG_ERROR, "Failed to open decoder for stream #%u\n", i);
return ret;
}
}
stream_ctx[i].dec_ctx = codec_ctx;

stream_ctx[i].dec_frame = av_frame_alloc();
if (!stream_ctx[i].dec_frame)
return AVERROR(ENOMEM);
}

av_dump_format(ifmt_ctx, 0, filename, 0);
return 0;
}
从代码中可以看到,除了在Remuxing中见过的函数之外,这里还使用了avcodec_find_decoder,通过CODECID查找要使用的解码器,当然,这里如果自己已经确定好音视频流是什么编码的话,也可以通过avcodec_find_decoder_by_name来指定解码器的名字。
然后用avcodec_alloc_context3申请AVCodecContext上下文,用avcodec_parameters_to_context将解析到的AVStream流信息中的AVCodecParameter复制到AVCodecContext对应字段中,方便后面解码的时候用。
使用avcodec_open2打开解码器,因为没有需要传的option,所以这里的avcodec_open2的option字段设置的是NULL,然后申请一个AVFrame,用来存储解码后的AVFrame数据。
然后是打开输出文件,这部分的代码也可以封装到一个函数里面,整体看上去会清晰很多。
static int open_output_file(const char *filename)
{
AVStream *out_stream;
AVStream *in_stream;
AVCodecContext *dec_ctx, *enc_ctx;
const AVCodec *encoder;
int ret;
unsigned int i;

ofmt_ctx = NULL;
avformat_alloc_output_context2(&ofmt_ctx, NULL, NULL, filename);
if (!ofmt_ctx) {
av_log(NULL, AV_LOG_ERROR, "Could not create output context\n");
return AVERROR_UNKNOWN;
}


for (i = 0; i < ifmt_ctx->nb_streams; i++) {
out_stream = avformat_new_stream(ofmt_ctx, NULL);
if (!out_stream) {
av_log(NULL, AV_LOG_ERROR, "Failed allocating output stream\n");
return AVERROR_UNKNOWN;
}

in_stream = ifmt_ctx->streams[i];
dec_ctx = stream_ctx[i].dec_ctx;

if (dec_ctx->codec_type == AVMEDIA_TYPE_VIDEO
|| dec_ctx->codec_type == AVMEDIA_TYPE_AUDIO) {
/* in this example, we choose transcoding to same codec */
encoder = avcodec_find_encoder(dec_ctx->codec_id);
if (!encoder) {
av_log(NULL, AV_LOG_FATAL, "Necessary encoder not found\n");
return AVERROR_INVALIDDATA;
}
enc_ctx = avcodec_alloc_context3(encoder);
if (!enc_ctx) {
av_log(NULL, AV_LOG_FATAL, "Failed to allocate the encoder context\n");
return AVERROR(ENOMEM);
}

/* In this example, we transcode to same properties (picture size,
* sample rate etc.). These properties can be changed for output
* streams easily using filters */
if (dec_ctx->codec_type == AVMEDIA_TYPE_VIDEO) {
enc_ctx->height = dec_ctx->height;
enc_ctx->width = dec_ctx->width;
enc_ctx->sample_aspect_ratio = dec_ctx->sample_aspect_ratio;
/* take first format from list of supported formats */
if (encoder->pix_fmts)
enc_ctx->pix_fmt = encoder->pix_fmts[0];
else
enc_ctx->pix_fmt = dec_ctx->pix_fmt;
/* video time_base can be set to whatever is handy and supported by encoder */
enc_ctx->time_base = av_inv_q(dec_ctx->framerate);
} else {
enc_ctx->sample_rate = dec_ctx->sample_rate;
ret = av_channel_layout_copy(&enc_ctx->ch_layout, &dec_ctx->ch_layout);
if (ret < 0)
return ret;
/* take first format from list of supported formats */
enc_ctx->sample_fmt = encoder->sample_fmts[0];
enc_ctx->time_base = (AVRational){1, enc_ctx->sample_rate};
}

if (ofmt_ctx->oformat->flags & AVFMT_GLOBALHEADER)
enc_ctx->flags |= AV_CODEC_FLAG_GLOBAL_HEADER;

/* Third parameter can be used to pass settings to encoder */
ret = avcodec_open2(enc_ctx, encoder, NULL);
if (ret < 0) {
av_log(NULL, AV_LOG_ERROR, "Cannot open video encoder for stream #%u\n", i);
return ret;
}
ret = avcodec_parameters_from_context(out_stream->codecpar, enc_ctx);
if (ret < 0) {
av_log(NULL, AV_LOG_ERROR, "Failed to copy encoder parameters to output stream #%u\n", i);
return ret;
}

out_stream->time_base = enc_ctx->time_base;
stream_ctx[i].enc_ctx = enc_ctx;
} else if (dec_ctx->codec_type == AVMEDIA_TYPE_UNKNOWN) {
av_log(NULL, AV_LOG_FATAL, "Elementary stream #%d is of unknown type, cannot proceed\n", i);
return AVERROR_INVALIDDATA;
} else {
/* if this stream must be remuxed */
ret = avcodec_parameters_copy(out_stream->codecpar, in_stream->codecpar);
if (ret < 0) {
av_log(NULL, AV_LOG_ERROR, "Copying parameters for stream #%u failed\n", i);
return ret;
}
out_stream->time_base = in_stream->time_base;
}

}
av_dump_format(ofmt_ctx, 0, filename, 1);

if (!(ofmt_ctx->oformat->flags & AVFMT_NOFILE)) {
ret = avio_open(&ofmt_ctx->pb, filename, AVIO_FLAG_WRITE);
if (ret < 0) {
av_log(NULL, AV_LOG_ERROR, "Could not open output file '%s'", filename);
return ret;
}
}

/* init muxer, write output file header */
ret = avformat_write_header(ofmt_ctx, NULL);
if (ret < 0) {
av_log(NULL, AV_LOG_ERROR, "Error occurred when opening output file\n");
return ret;
}

return 0;
}
输出部分的话,需要设置的不是解码器,而是编码器,所以调用的是avcodec_find_encoder,然后设置编码器的AVCodecContext上下文,打开编码器。
因为是例子,所以这里大多数参数是从输入的AVStream的AVCodecParameter和AVCodecContext里面拿到的,相当于复制到输出的AVStream里面了。然后通过avio_open打开输出的AVFormatContext的pb句柄,也就是AVIOContext。然后在初始化操作的时候,写一下输出文件的文件头。
接着,设置原始数据操作相关的滤镜初始化,例如调色、调音色、放大、缩小等操作,这些操作可以在自己拿到解码后的数据后,用OpenGL等强大的库来完成,这里就不展开介绍了。
接下来就是循环操作:拿到AVPacket、解码、取原始数据、编码,再拿到AVPacket、再解码、再取原始数据、再编码,直到遇到退出相关的条件为止。
static int encode_write_frame(unsigned int stream_index, int flush)
{
StreamContext *stream = &stream_ctx[stream_index];
FilteringContext *filter = &filter_ctx[stream_index];
AVFrame *filt_frame = flush ? NULL : filter->filtered_frame;
AVPacket *enc_pkt = filter->enc_pkt;
int ret;

av_log(NULL, AV_LOG_INFO, "Encoding frame\n");
/* encode filtered frame */
av_packet_unref(enc_pkt);

ret = avcodec_send_frame(stream->enc_ctx, filt_frame);

if (ret < 0)
return ret;

while (ret >= 0) {
ret = avcodec_receive_packet(stream->enc_ctx, enc_pkt);

if (ret == AVERROR(EAGAIN) || ret == AVERROR_EOF)
return 0;

/* prepare packet for muxing */
enc_pkt->stream_index = stream_index;
av_packet_rescale_ts(enc_pkt,
stream->enc_ctx->time_base,
ofmt_ctx->streams[stream_index]->time_base);

av_log(NULL, AV_LOG_DEBUG, "Muxing frame\n");
/* mux encoded frame */
ret = av_interleaved_write_frame(ofmt_ctx, enc_pkt);
}

return ret;
}


while (1) {
if ((ret = av_read_frame(ifmt_ctx, packet)) < 0)
break;
stream_index = packet->stream_index;
av_log(NULL, AV_LOG_DEBUG, "Demuxer gave frame of stream_index %u\n",
stream_index);

if (filter_ctx[stream_index].filter_graph) {
StreamContext *stream = &stream_ctx[stream_index];

av_packet_rescale_ts(packet,
ifmt_ctx->streams[stream_index]->time_base,
stream->dec_ctx->time_base);
ret = avcodec_send_packet(stream->dec_ctx, packet);
if (ret < 0) {
av_log(NULL, AV_LOG_ERROR, "Decoding failed\n");
break;
}

while (ret >= 0) {
ret = avcodec_receive_frame(stream->dec_ctx, stream->dec_frame);
if (ret == AVERROR_EOF || ret == AVERROR(EAGAIN))
break;
else if (ret < 0)
goto end;

stream->dec_frame->pts = stream->dec_frame->best_effort_timestamp;
ret = encode_write_frame(stream->dec_frame, stream_index);
if (ret < 0)
goto end;
}
}
av_packet_unref(packet);
}
从代码里可以看到,通过av_read_frame循环读取AVPacket,然后调用avcodec_send_packet将AVPacket发送给解码器做解码,通过avcodec_receive_frame拿到解码后的AVFrame数据,然后通过编码器给AVFrame的数据编码,再写到输出文件里。这时候,写编码后的AVPacket数据用的是交错的方式。最后千万别忘了收尾工作,不然内存就泄露了。
关于转码相关的操作也有代码示例,通过访问官方文档转码示例就可以看到对应代码的完整版。到这里,Remuxing、Transcoding都介绍完了,如果想试试RTMP推流的话,我们可以继续看一下Muxing的例子,自己造一个数据,编码之后推流。
推流
因为前面两个例子涵盖了API的大部分接口了,其实做推流的话也比较简单,可以任选Remuxing或者Transcoding里的任何一个例子。
设置输出文件的时候,有一个avformat_alloc_output_context2操作,从我们Remuxing例子中可以看到,最后一个字段是输出文件名,这里可以改成RTMP的URL地址,关于URL的地址,我们第5节课讲过,这里就不再介绍了。
有一点需要注意,因为是推RTMP的直播流,所以输出格式要设置成FLV,否则会报错,报错内容是这样的:
它提示找不到适合这个URL的输出格式,也就是说,我们需要指定输出格式,RTMP对应的输出格式是FLV,所以最后avformat_alloc_output_context2的第一个参数是输出的AVFormatContext,第二个参数可以设置成NULL交给FFmpeg自动查找,第三个参数设置为"flv"字符串,第四个参数就是我们输出的URL地址。
为了控制节奏,我们可以在循环av_read_frame操作的时候,在av_read_frame的下一句加上usleep(40000)来控制节奏,也就是sleep 40毫秒。最后,别忘了在头文件声明部分加上#include <unistd.h>,不然编译会报错。
小结
最后,我们来复习一下这节课的主要内容。
这节课,我们通过不转码只转封装、转码转封装和直播推流三个场景案例,详细地了解了FFmpeg中API的使用方法。现在我们可以在视频内容收录的场景中,使用API来自己独立实现收录音视频内容。如果需要将音视频文件或者直播流转一下码再输出的话,也可以通过转码的例子来完成。
灵活运用今天学到的这三个例子,基本上就可以满足大部分的场景了。当然,这些还是远远不够的,就像上节课说的,还是要从FFmpeg源代码的doc/examples目录下提供的例子入手,多改、多看、多学习,必要的话,以examples代码为入口跟踪代码进行学习,你会对FFmpeg的API有更深刻的理解的。
思考题
讲了这么多,你可以思考这么一个问题,如果想通过Remuxing将一个视频编码是H.264,音频编码是AAC编码的直播流,收录为MP4文件,并且MP4文件是moov在mdat的前面的话,该怎么改Remuxing这段代码呢?
- peter 👍(1) 💬(1)
请教老师两个问题: Q1:双声道合并单声道,还能听到两个声道,有什么意义? 用这个命令:ffmpeg -i input.aac -ac 1 output.aac,可以把双声道合并为单声道,但是,合并后的文件,还是能听到两个声道的声音,怎么能算是“单声道”呢? 用命令“ffmpeg -i jixiaolan_aac.aac -map_channel 0.0.0 left.aac -map_channel 0.0.1 right.aac”生成的两个文件,无论是left.aac还是right.aac ,两个耳机都能听到,为什么? 这个问题是看书《FFmpeg从入门到精通》遇到的。 Q2:文中的代码,应该是C代码。这些代码可以下载并执行吗? (比如:从github上下载,然后编译、执行,能看到结果)。如果有一个完整的步骤,能操作成功并看到结果就更好了。
2022-08-23 - Amos 👍(0) 💬(1)
请教老师个问题:如果将视频文件的码率下降一半,其他编码参数不变,视频文件的大小也应该下降一半吧?
2023-09-21 - ifelse 👍(0) 💬(0)
学习打卡
2023-12-31